


Jmix BPM is an open-source platform that helps Java developers automate processes while avoiding complexities of BPM engine configuration. With a set of intuitive BPMN 2.0 visual tools it provides a user-friendly experience for creating, running, and testing business processes.
This tutorial explores Jmix BPM capabilities through a practical example: an art gallery website where artists can submit requests to take part in the upcoming event, backed by a collaborative, process-driven application that helps curators review submissions.
In the course of the tutorial, you will:
- Design and run a web site
- Develop a backend application
- Create and integrate a business process
By the end of this tutorial, you'll be ready to develop your own process-driven application within a tight timeline, as a solo project or with a small team.
Jmix for sure. What else?
As you start a project, you’ll likely find yourself asking questions and investigating tools. You might consider building a public-facing part using PHP or creating a Single Page Application with React. What about using Next.js for business logic? Which BPM engine would best suit your needs — Flowable or Camunda? Should it be a standalone or embedded solution? How will you manage production deployments effectively? Where should data be stored — on the BPM engine's side or in a separate backend? How to design process forms?
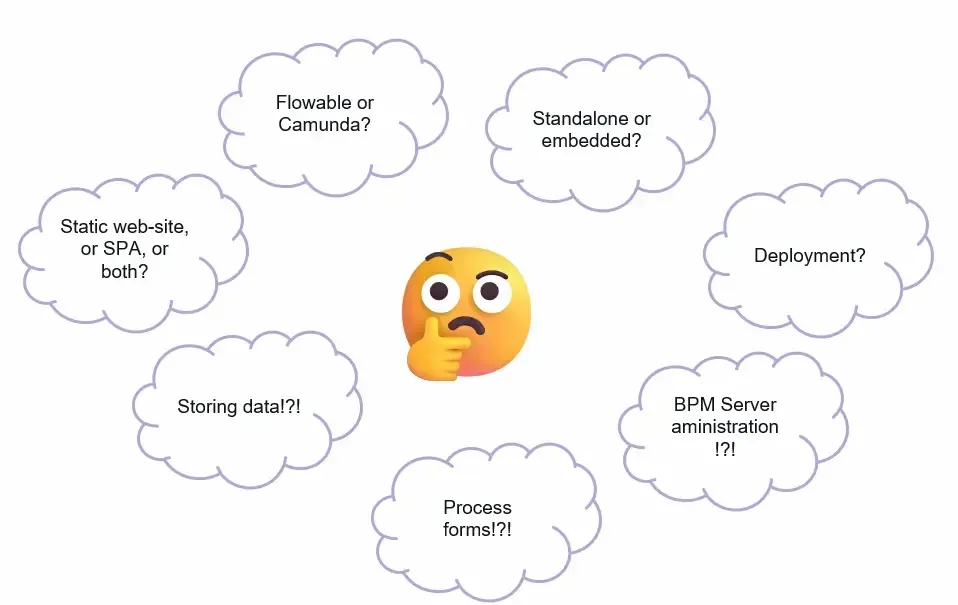
This can be overwhelming, but Jmix is here to make things manageable. However, Jmix alone won't cover everything.
Overall, to complete this tutorial, you will need the following:
- IntelliJ IDEA with Jmix plugin
- Jmix REST API and Jmix BPM add-ons
- GrapesJS (or your preferred tool for creating a website layout)
- Docker Desktop to run NGINX web server image
Website Design
Let’s begin with creating a public-facing part of the service. GrapesJS is a fantastic tool for creating visually appealing layouts without going deep into HTML and CSS.
With the WYSIWYG designer, you can see a live preview of a web page as you build it. No need to be a web design pro or have any special expertise to use this tool.
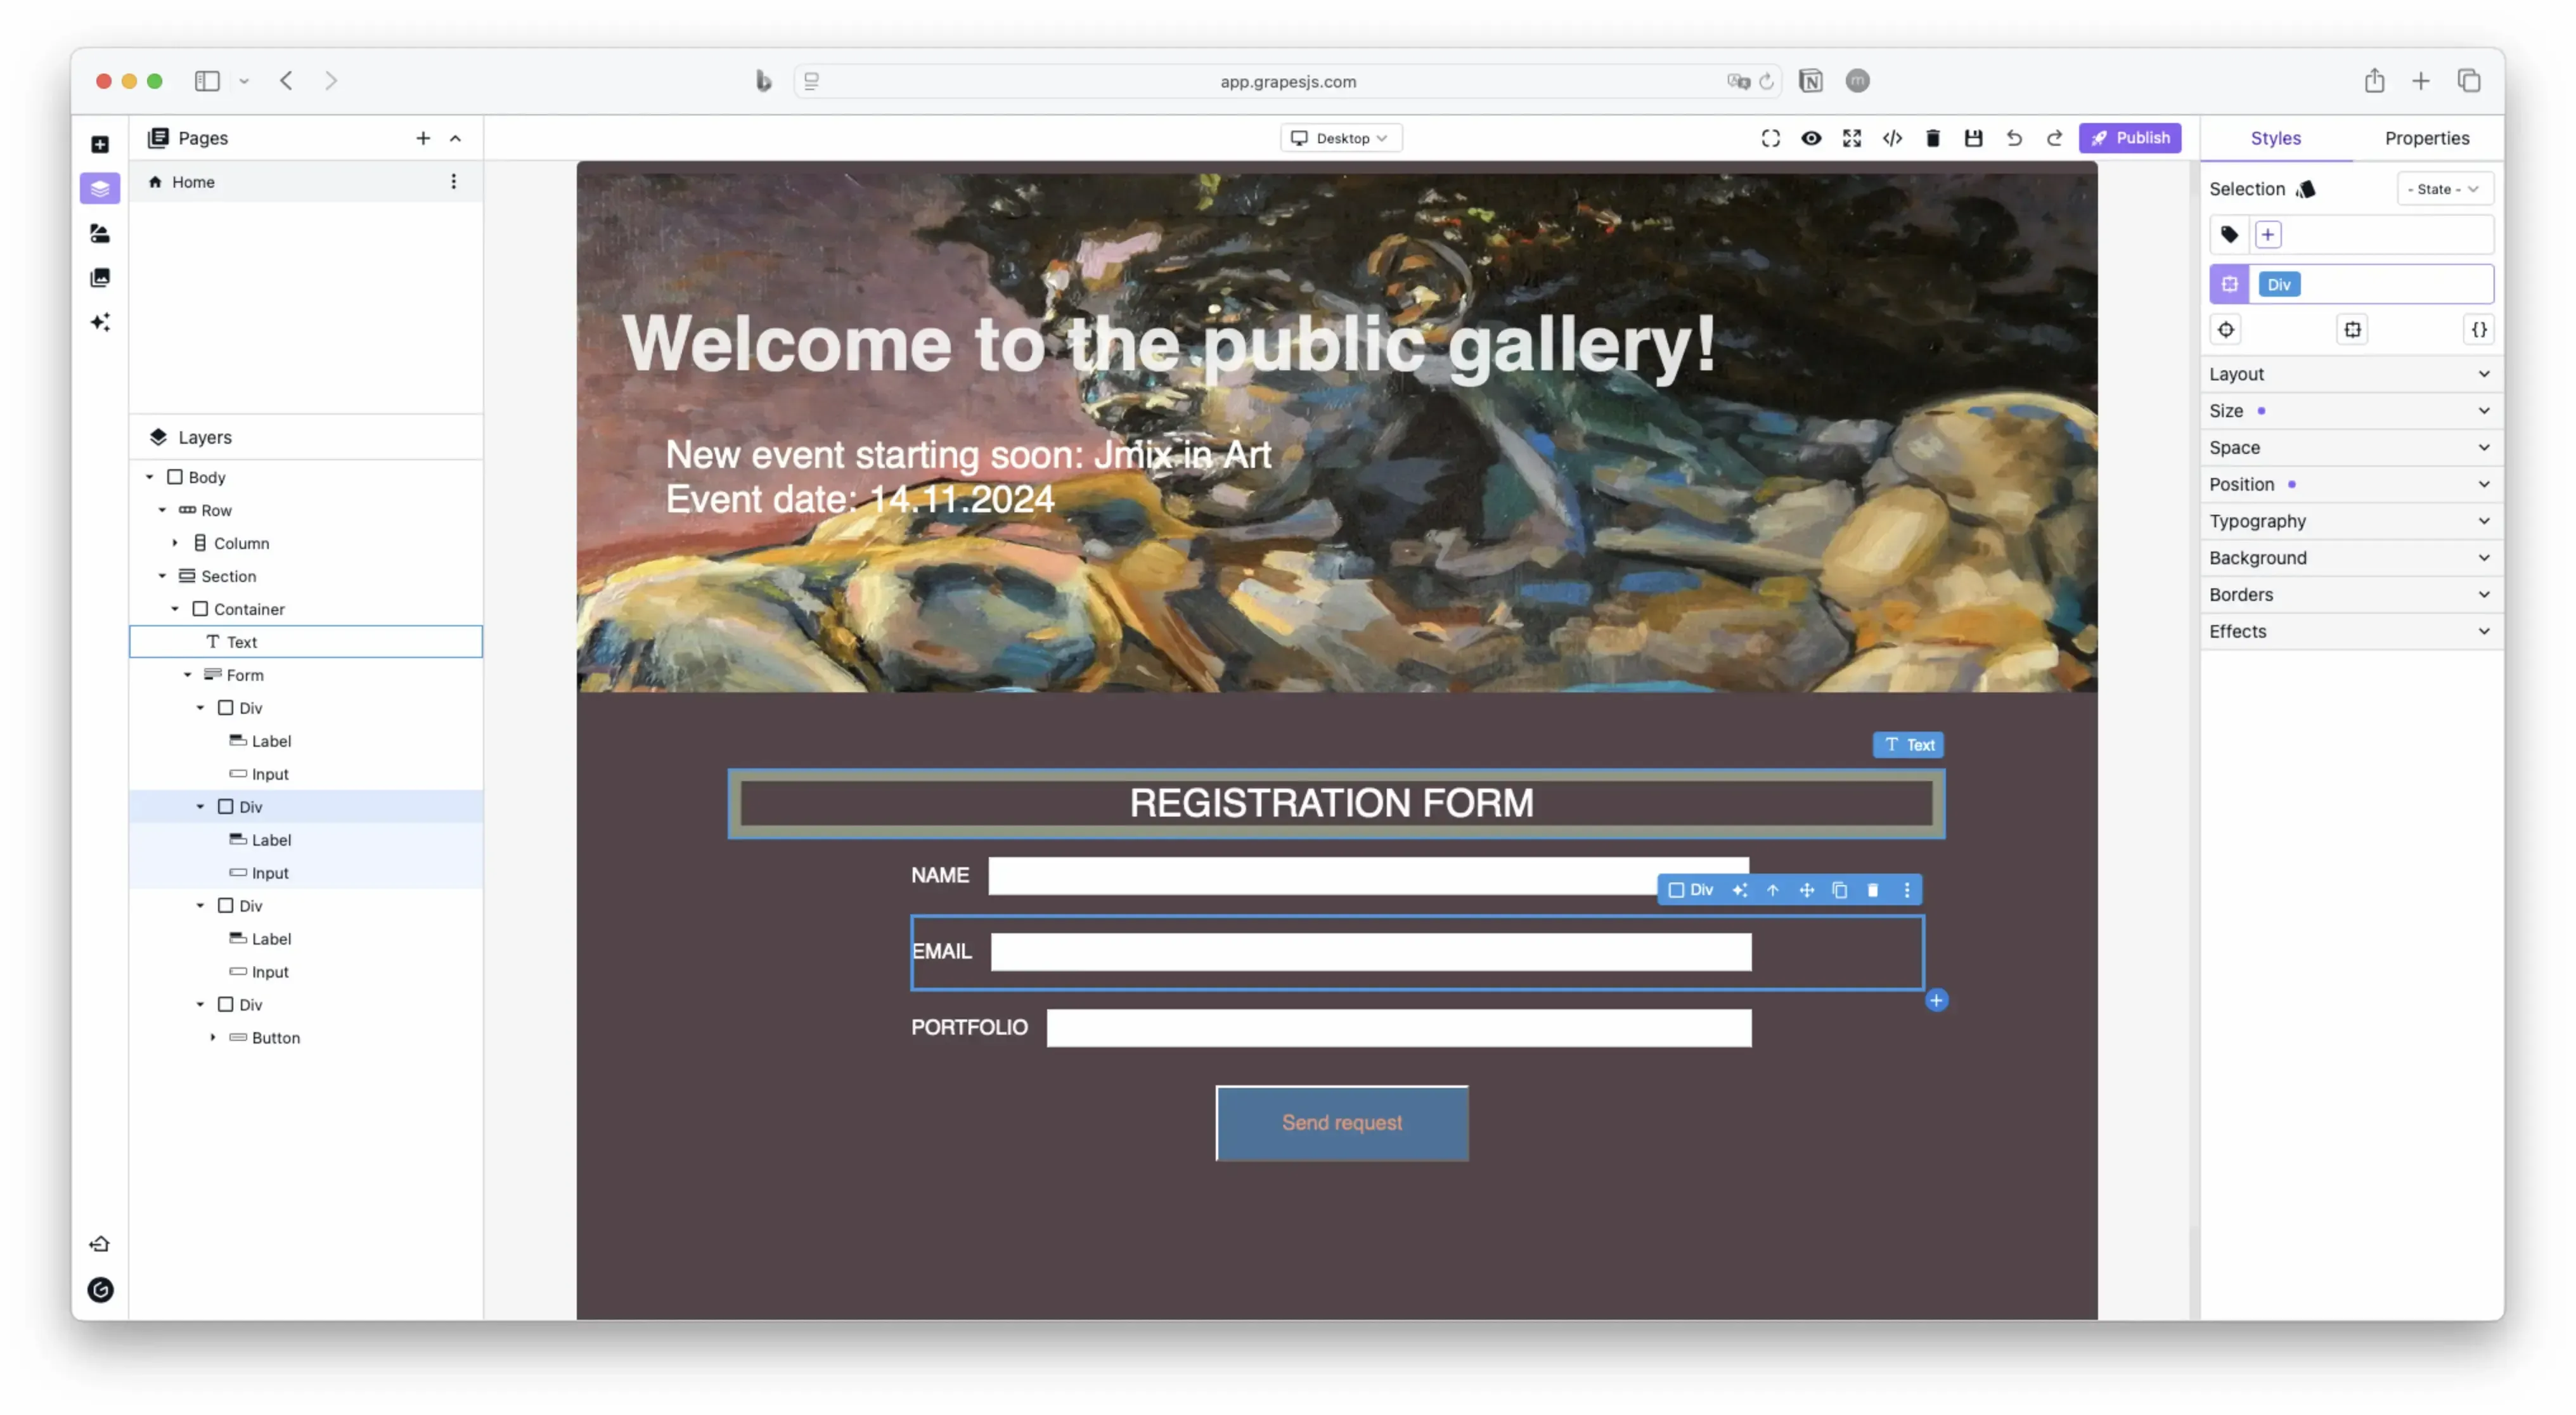
Similarly, there is no need to aim for perfection. It's easy to get caught up in making endless tweaks. At first, just focus on adding the fields needed for user input.
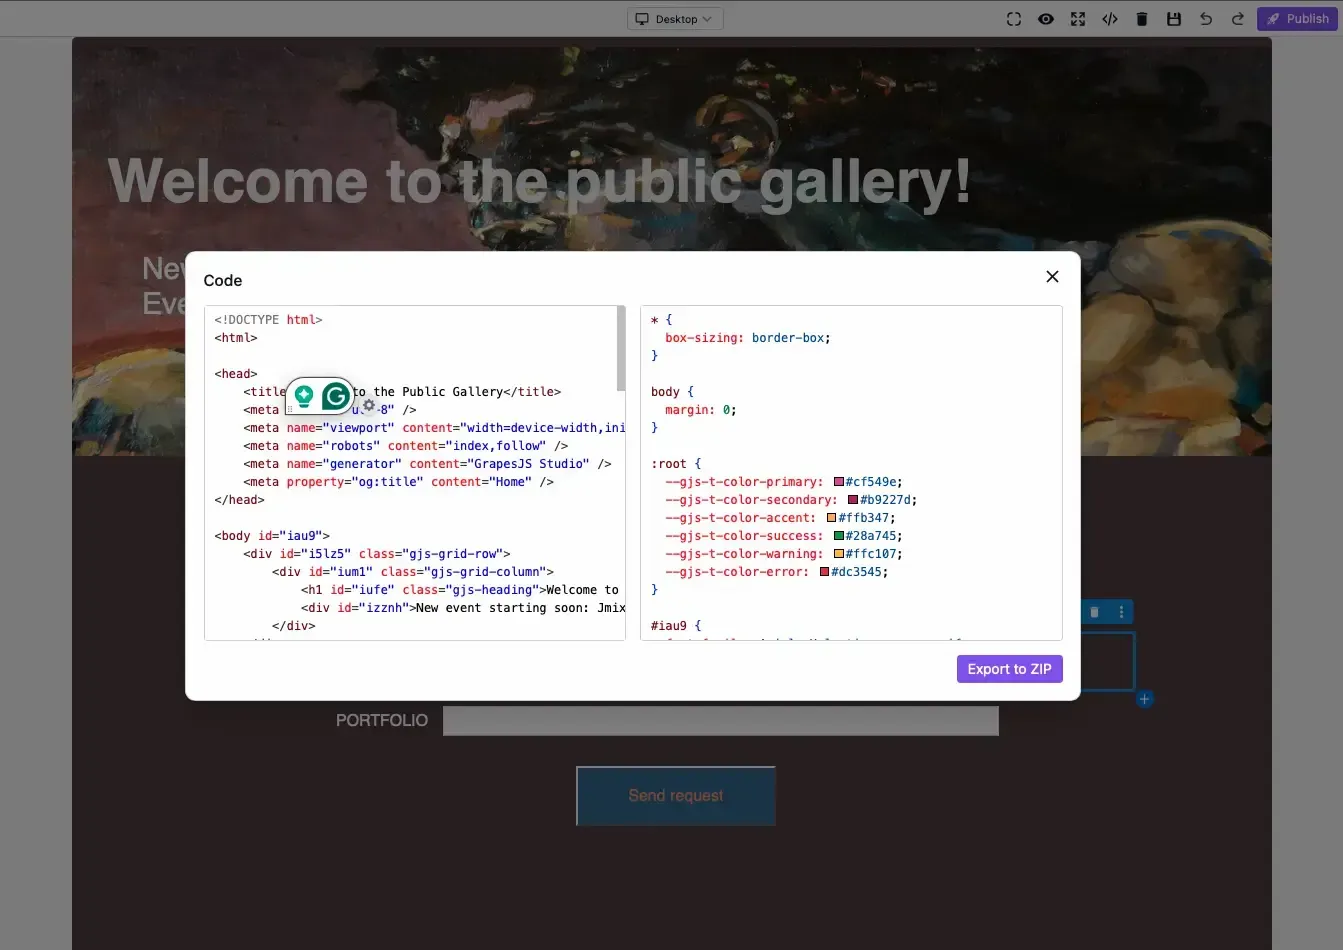
The editor will let you view the source code:
Looking ahead, this page will communicate with the backend application. To make this work, include the following JavaScript snippet:
<script>

document.getElementById('sendRequestButton').addEventListener('click', function() {

    // Get values from input fields

    const name = document.getElementById('name').value;

    const email = document.getElementById('email').value;

    const portfolio = document.getElementById('portfolio').value;


    // Prepare the request payload

    const data = {

        "request": {

            name: name,

            email: email,

            portfolio: portfolio

        }

    };


    // Send POST request using Fetch API

    fetch('http://localhost:8080/rest/services/public/create', {

        method: 'POST',

        headers: {

            'Content-Type': 'application/json'

        },

        body: JSON.stringify(data)

    })

    .then(response => {

        if (!response.ok) {

            throw new Error('Network response was not ok');

        }

        return response.json();

    });

});

</script>
Running Web Server
The page will be hosted on a NGINX web server running in a Docker container. For a straightforward yet thorough overview of using NGINX with Docker, check out the Docker blog. In short, you need to open Docker Desktop and run a few commands, starting with pulling the NGINX image:
docker pull nginx k
By default, NGINX looks for files to serve in the /usr/share/nginx/html directory within the container. To get our website files into this directory, we can use a mounted volume. This allows us to link a directory from our local machine and map it into the running container. That is, simply place the site content created with GrapesJS into a local directory, such as /GrapesJS-Demo/site-content, and map it to /usr/share/nginx/html in the running container:
docker run -it --rm -d -p 8181:80 --name webserver -v ~/GrapesJS-Demo/site-content:/usr/share/nginx/html nginx
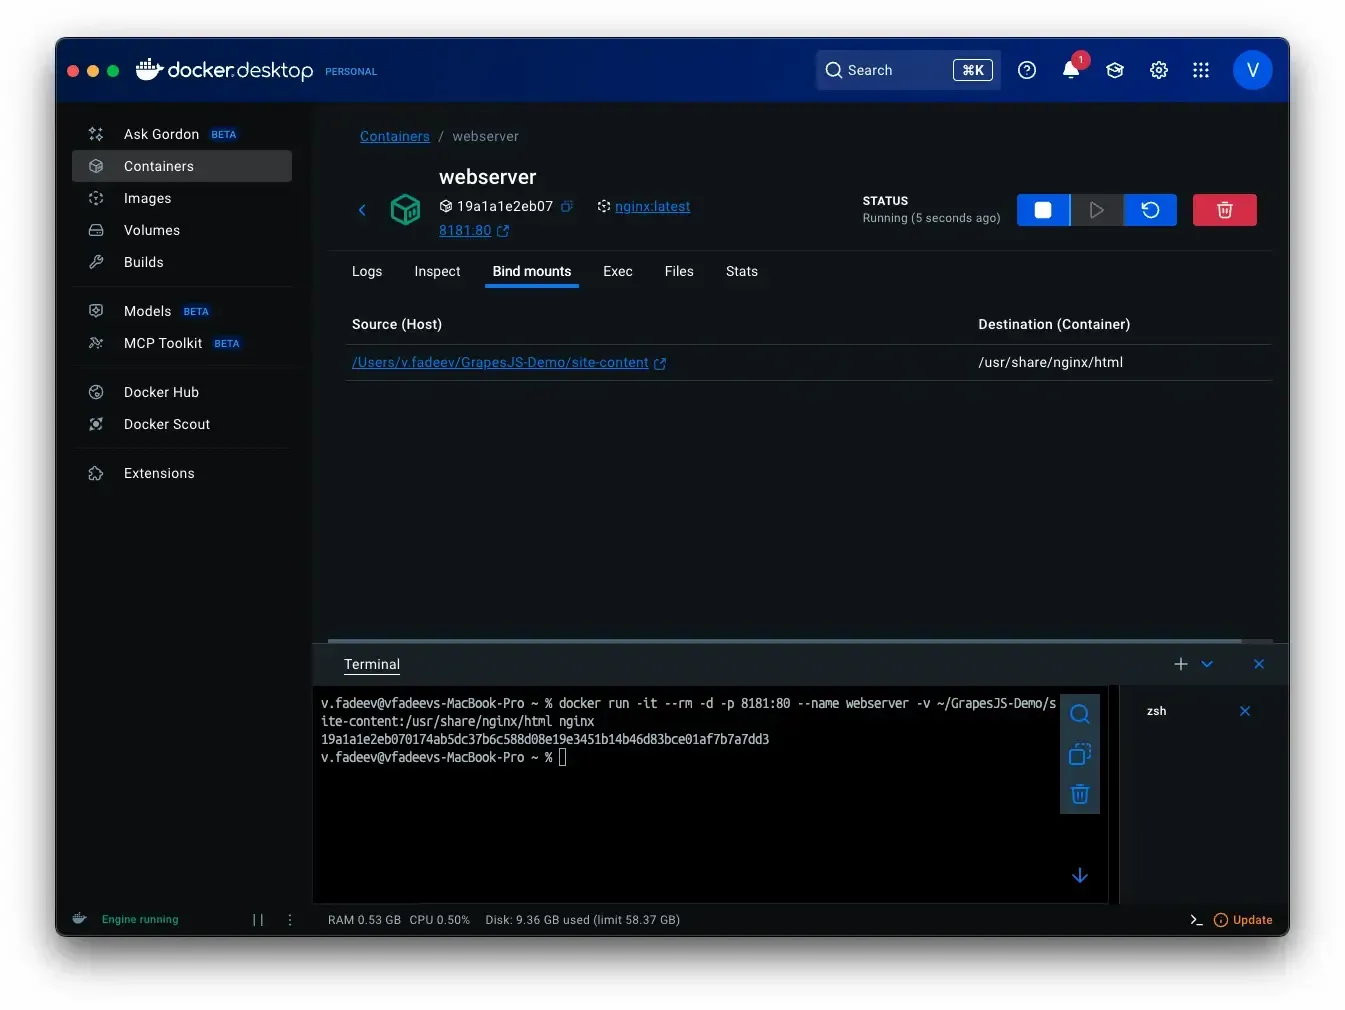
Once you run this command, Docker Desktop will confirm that the web server is running and that the local directory has been successfully mounted to the container. The website can be now accessed at http://localhost:8181.
Backend Application
The backend development is about to start. We'll start by creating the project and move forward step by step. Just be sure to install Jmix into your IDE beforehand.
Create a Project
Create a new Jmix project from the IntelliJ IDEA starting screen:
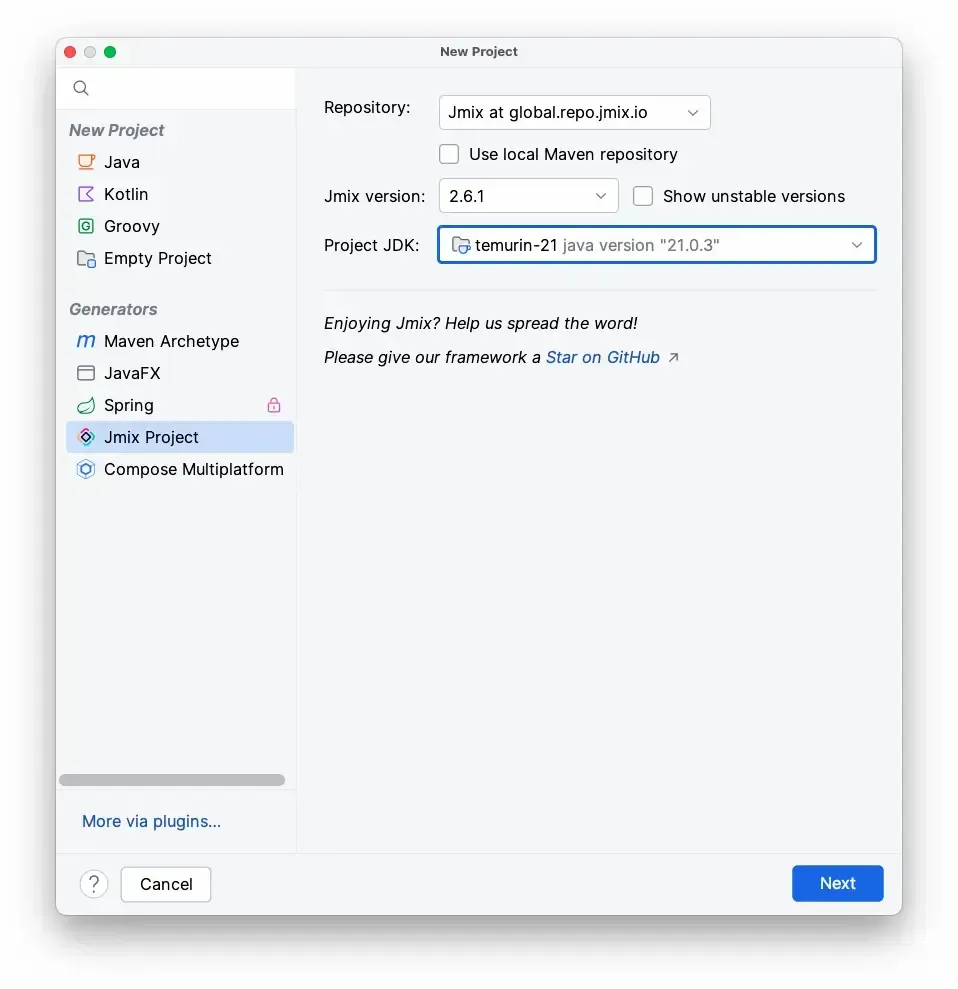
In the wizard, select "Full-Stack Application (Java)."
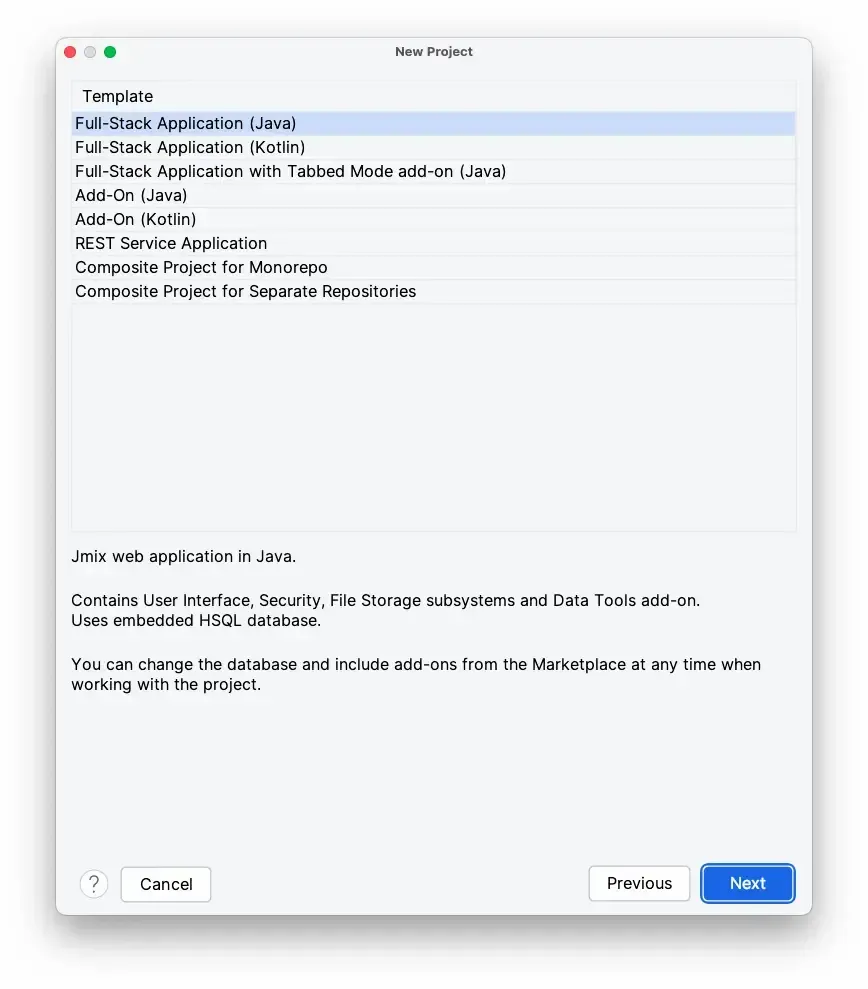
Note that this application template comes with its own web interface. That's on purpose – it will function as our submission management system.
Data Model
Once the project loads all dependencies, create a JPA entity named PublicRequest. Use the entity designer to add attributes for the submission fields: name, email, and portfolio. Also, add attributes for the final decision and status to help supervisors manage submissions.

One small addition to make is to always set a default status value. You can easily do this by modifying the source code of the entity class. In the Designer, just switch to the Text tab and update the status attribute like this:
@Column(name = "STATUS")
private String status = "new"
Now, return to the Designer tab and click Views in the top left corner. This will open the view creation wizard. In the first step, choose a view template to work with this entity:
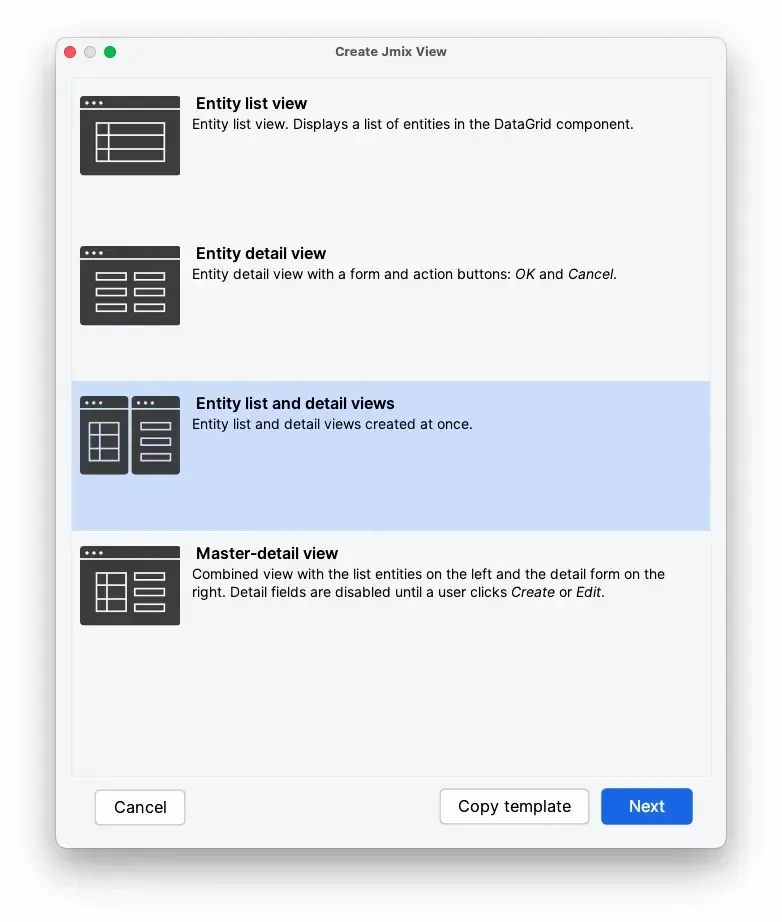
Choose Entity List and Details views, to create views to list of instances and to edit specific instance. Then, simply click through the wizard with all the default settings. Once that’s done, run the application to see it in the browser. The view is now available from the main menu:
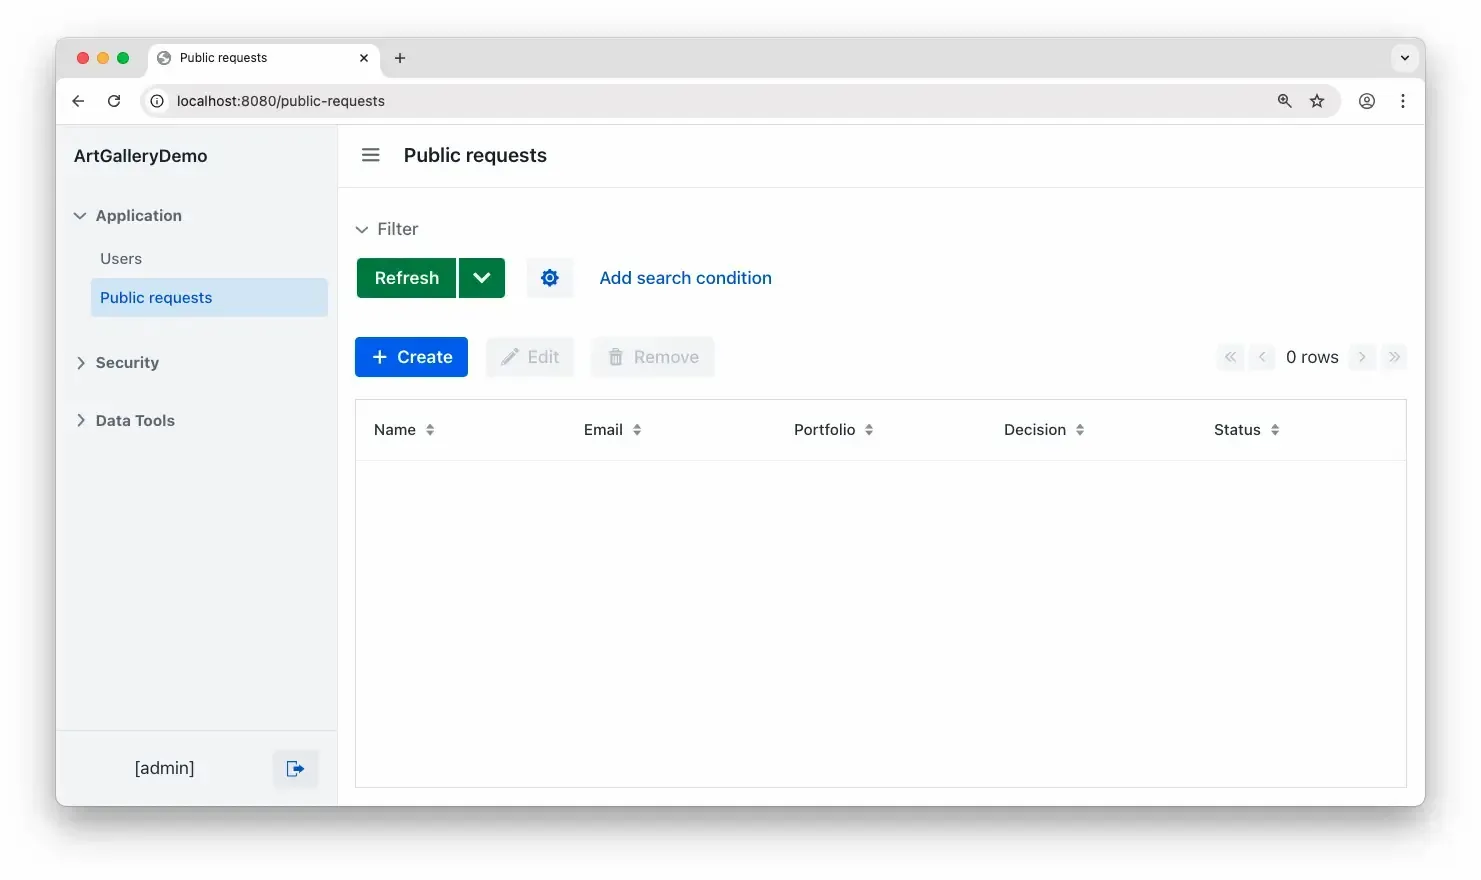
The list is currently empty. To make new submissions appear on the list, we will set up a REST controller.
REST controller
REST controller will handle incoming requests and send them between the frontend and the backend. In Jmix there are three options for creating REST controllers:
- Classic Spring-style REST Controller – fully manual and verbose with maximum control for any intricate logic.
- Using rest-services.xml – ideal for quickly exposing backend logic without the need to build custom endpoints.
- Using the REST API Add-on – employs @RestService for service class and @RestMethod for endpoint method. Jmix automatically generates the REST controller logic.
The third approach is the cleanest and most straightforward, and it will be the one we choose to follow. Let’s approach it step-by-step.
Create a new Spring Bean and name it PublicService. It’s good practice to put it inside a dedicated service package.

In the code, replace the @Component annotation for @RestService(“public”). The "public" is a part of the URL path for accessing the REST method, such as /rest/services/public/create.
Next, declare a method to create requests and annotate it with @RestMethod. In the body of the method, add a stub so we can confirm that it’s functioning. Don’t worry, we’ll tackle saving the data next. The code is as follows:
@RestService("public")

public class PublicService {


    private record Request(String name, String email, String portfolio) {}

    private record ServiceResponse(boolean result, String responseMessage) {}


    @RestMethod

    public ServiceResponse create(Request request) {

        ServiceResponse result = new ServiceResponse(true,

            "New incoming request received from " + request.name());

        System.out.println(result.toString());

        return result;

    }

}
Public Access to Endpoint
For obvious reasons, Jmix won’t allow access to the endpoint until the specific permission is granted. But for our art gallery event it’s perfectly fine for this endpoint to be public. After all, submitting a portfolio should be a simple process that doesn’t require users to sign up or log in.
To allow unauthorized access to the endpoint, follow these steps:
-
Add a new property to the
application.propertiesfile:# Configure resources allowed for anonymous access jmix.resource-server.anonymous-url-patterns = /rest/services/public/** -
Edit the security configuration within the
ArtgalleryDemoSecurityConfiguration.javaclass:@Configuration public class ArtgalleryDemoSecurityConfiguration { @Bean @Order(JmixSecurityFilterChainOrder.CUSTOM) SecurityFilterChain publicFilterChain(HttpSecurity http) throws Exception { http.securityMatcher("/rest/**") .authorizeHttpRequests(authorize -> authorize.anyRequest().permitAll() ) .csrf(csrf -> csrf.disable()) .cors(Customizer.withDefaults()); JmixHttpSecurityUtils.configureAnonymous(http); return http.build(); } }
This configuration enables unauthorized users to access the REST endpoint. It establishes a custom security filter chain that permits requests to /rest/**, disables CSRF protection, and enables CORS with default settings.
Testing Endpoint
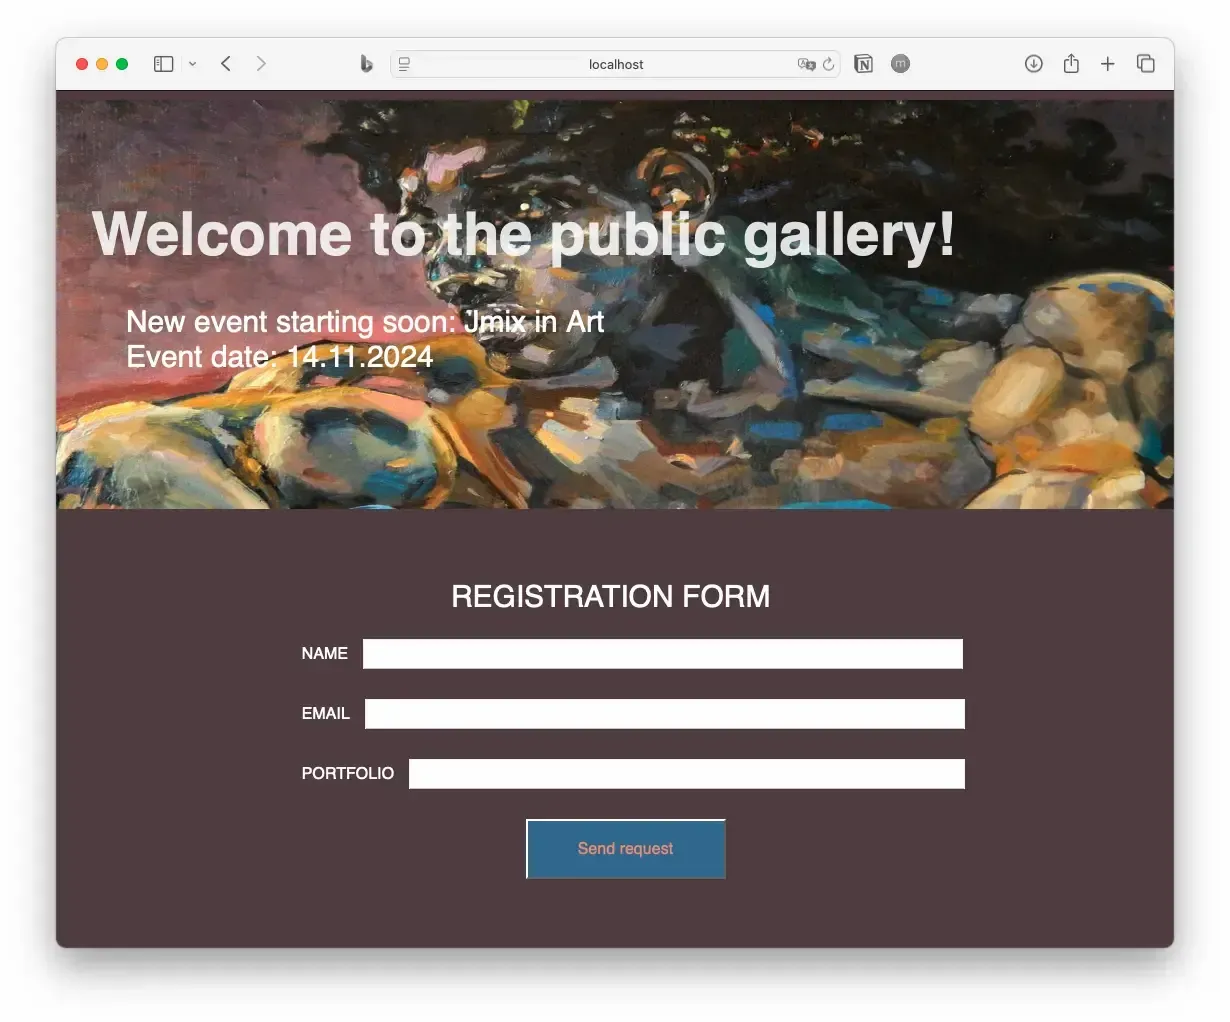
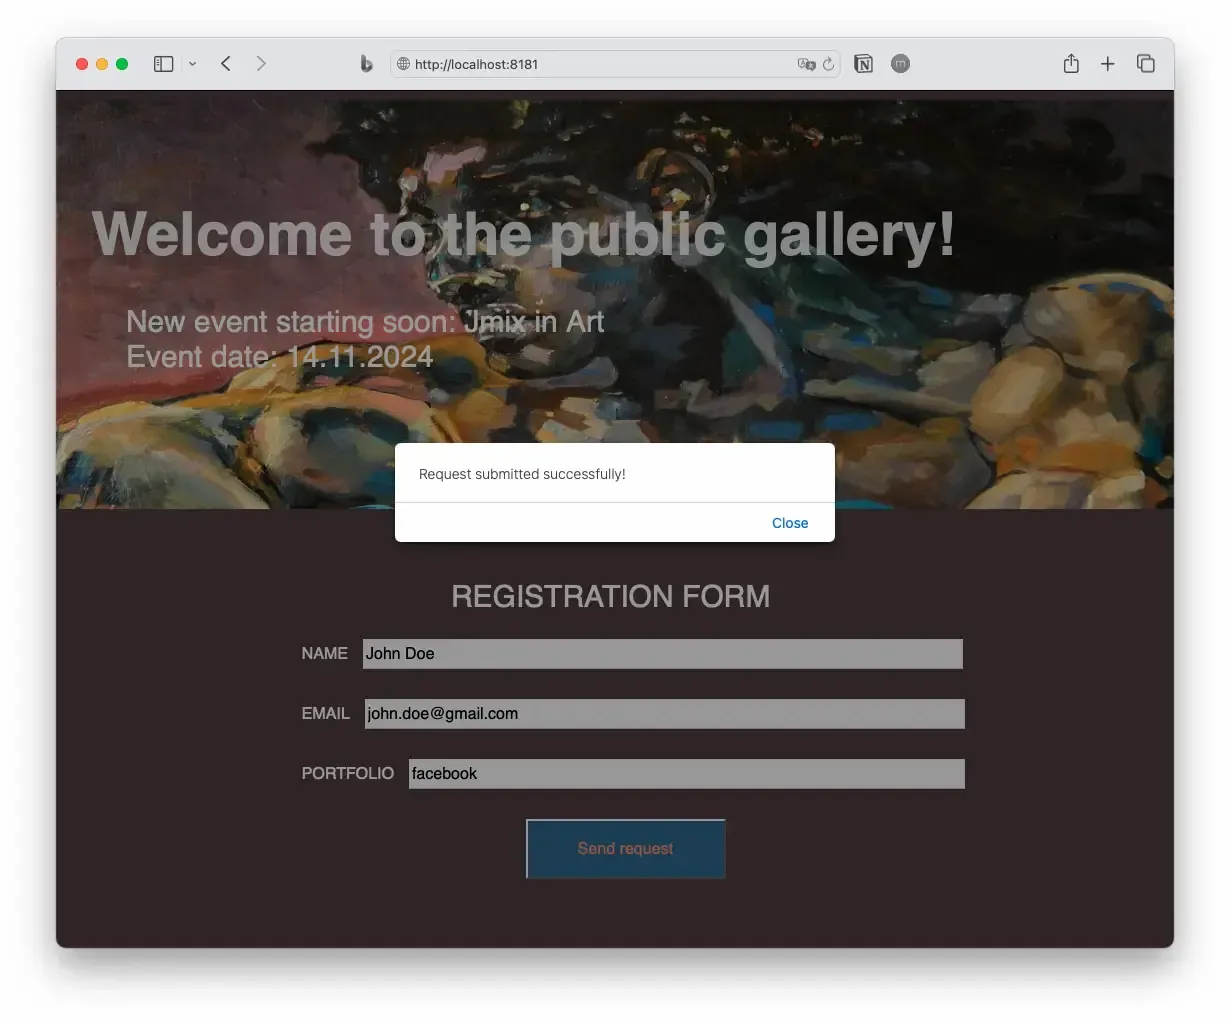
Let’s run a quick test to see if the web server is communicating with the backend. Open the site, enter some values, and click the send button.
Switch to the IDE. Check the output in the terminal to confirm receiving a request:
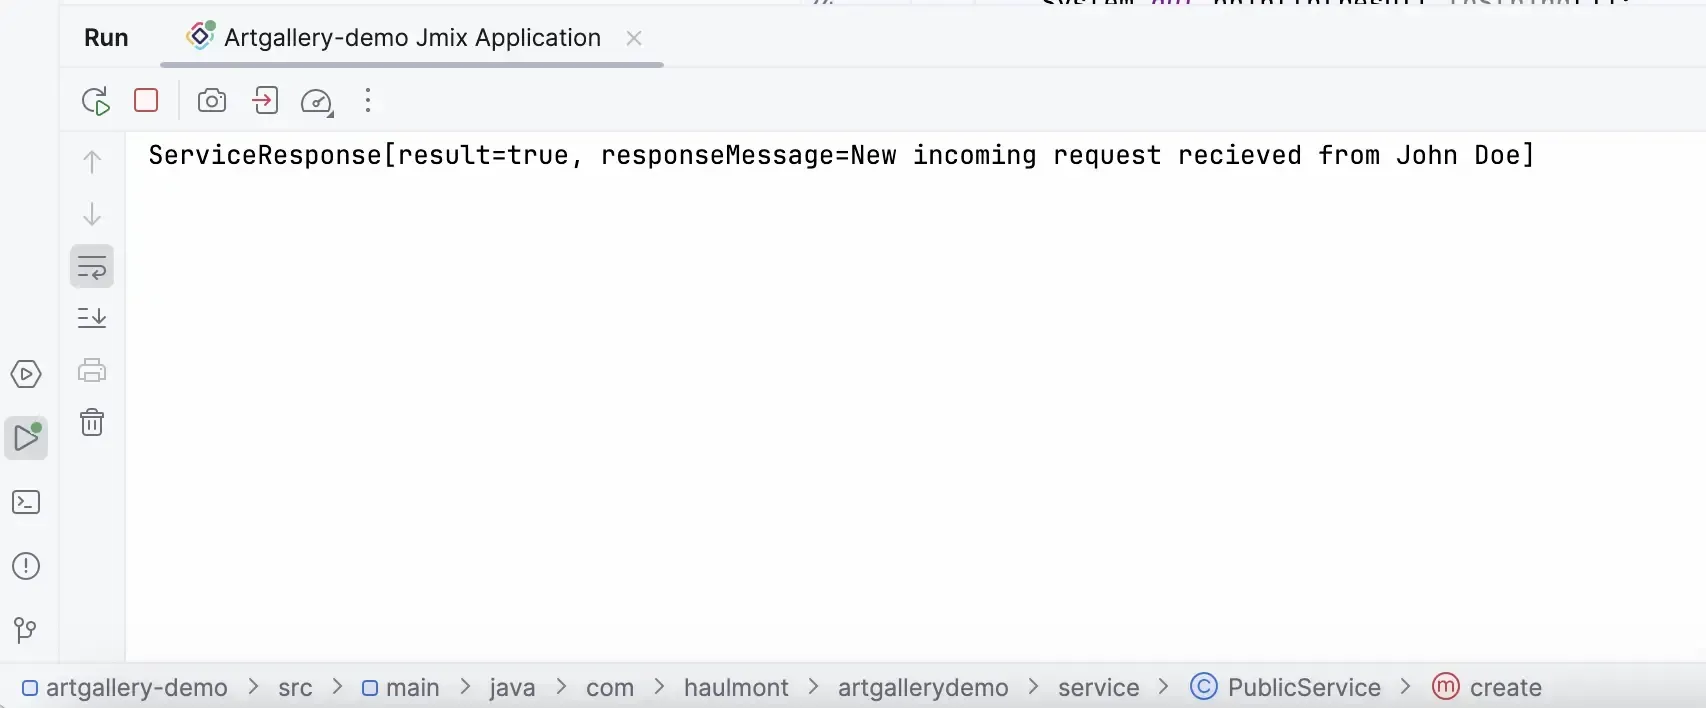
It’s good to see the submission come through, but we also need to save it in the database for later review. That's our next goal.
logging.level.org.springframework.security = info
Changing “info” to "debug" or "trace" will provide detailed information in the terminal about the ongoing processes.
Storing Incoming Data
Inside the service package, let's create another service called DataService. The steps to create this service are the same as for PublicService. The code is as follows:
@Service

public class DataService {


    private final DataManager dataManager;


    public DataService(DataManager dataManager) {

        this.dataManager = dataManager;

    }


    public void createPublicRequest(String name, String email, String portfolio) {

        // creating a new Public Request entity based on incoming parameters from PublicService

        PublicRequest newPublicRequest = dataManager.unconstrained().create(PublicRequest.class);

        newPublicRequest.setName(name);

        newPublicRequest.setEmail(email);

        newPublicRequest.setPortfolio(portfolio);

        dataManager.unconstrained().save(newPublicRequest);

    }

}
The createPublicRequest method creates a new PublicRequest instance and sets its attributes. This process is handled through Data Manager – the primary Jmix interface for CRUD operations on entities.
Next, you'll need to inject DataService service into the PublicService we created earlier and call the method:
@RestService("public")

public class PublicService {


    private final DataService dataService;


    public PublicService(DataService dataService) {

        this.dataService = dataService;

    }


    private record Request(String name, String email, String portfolio) {}


    private record ServiceResponse(boolean result, String responseMessage) {}


    @RestMethod

    public ServiceResponse create(Request request) {

        ServiceResponse result = new ServiceResponse(true,

            "New incoming request received from " + request.name());

        dataService.createPublicRequest(request.name, request.email, request.portfolio);

        return result;

    }

}
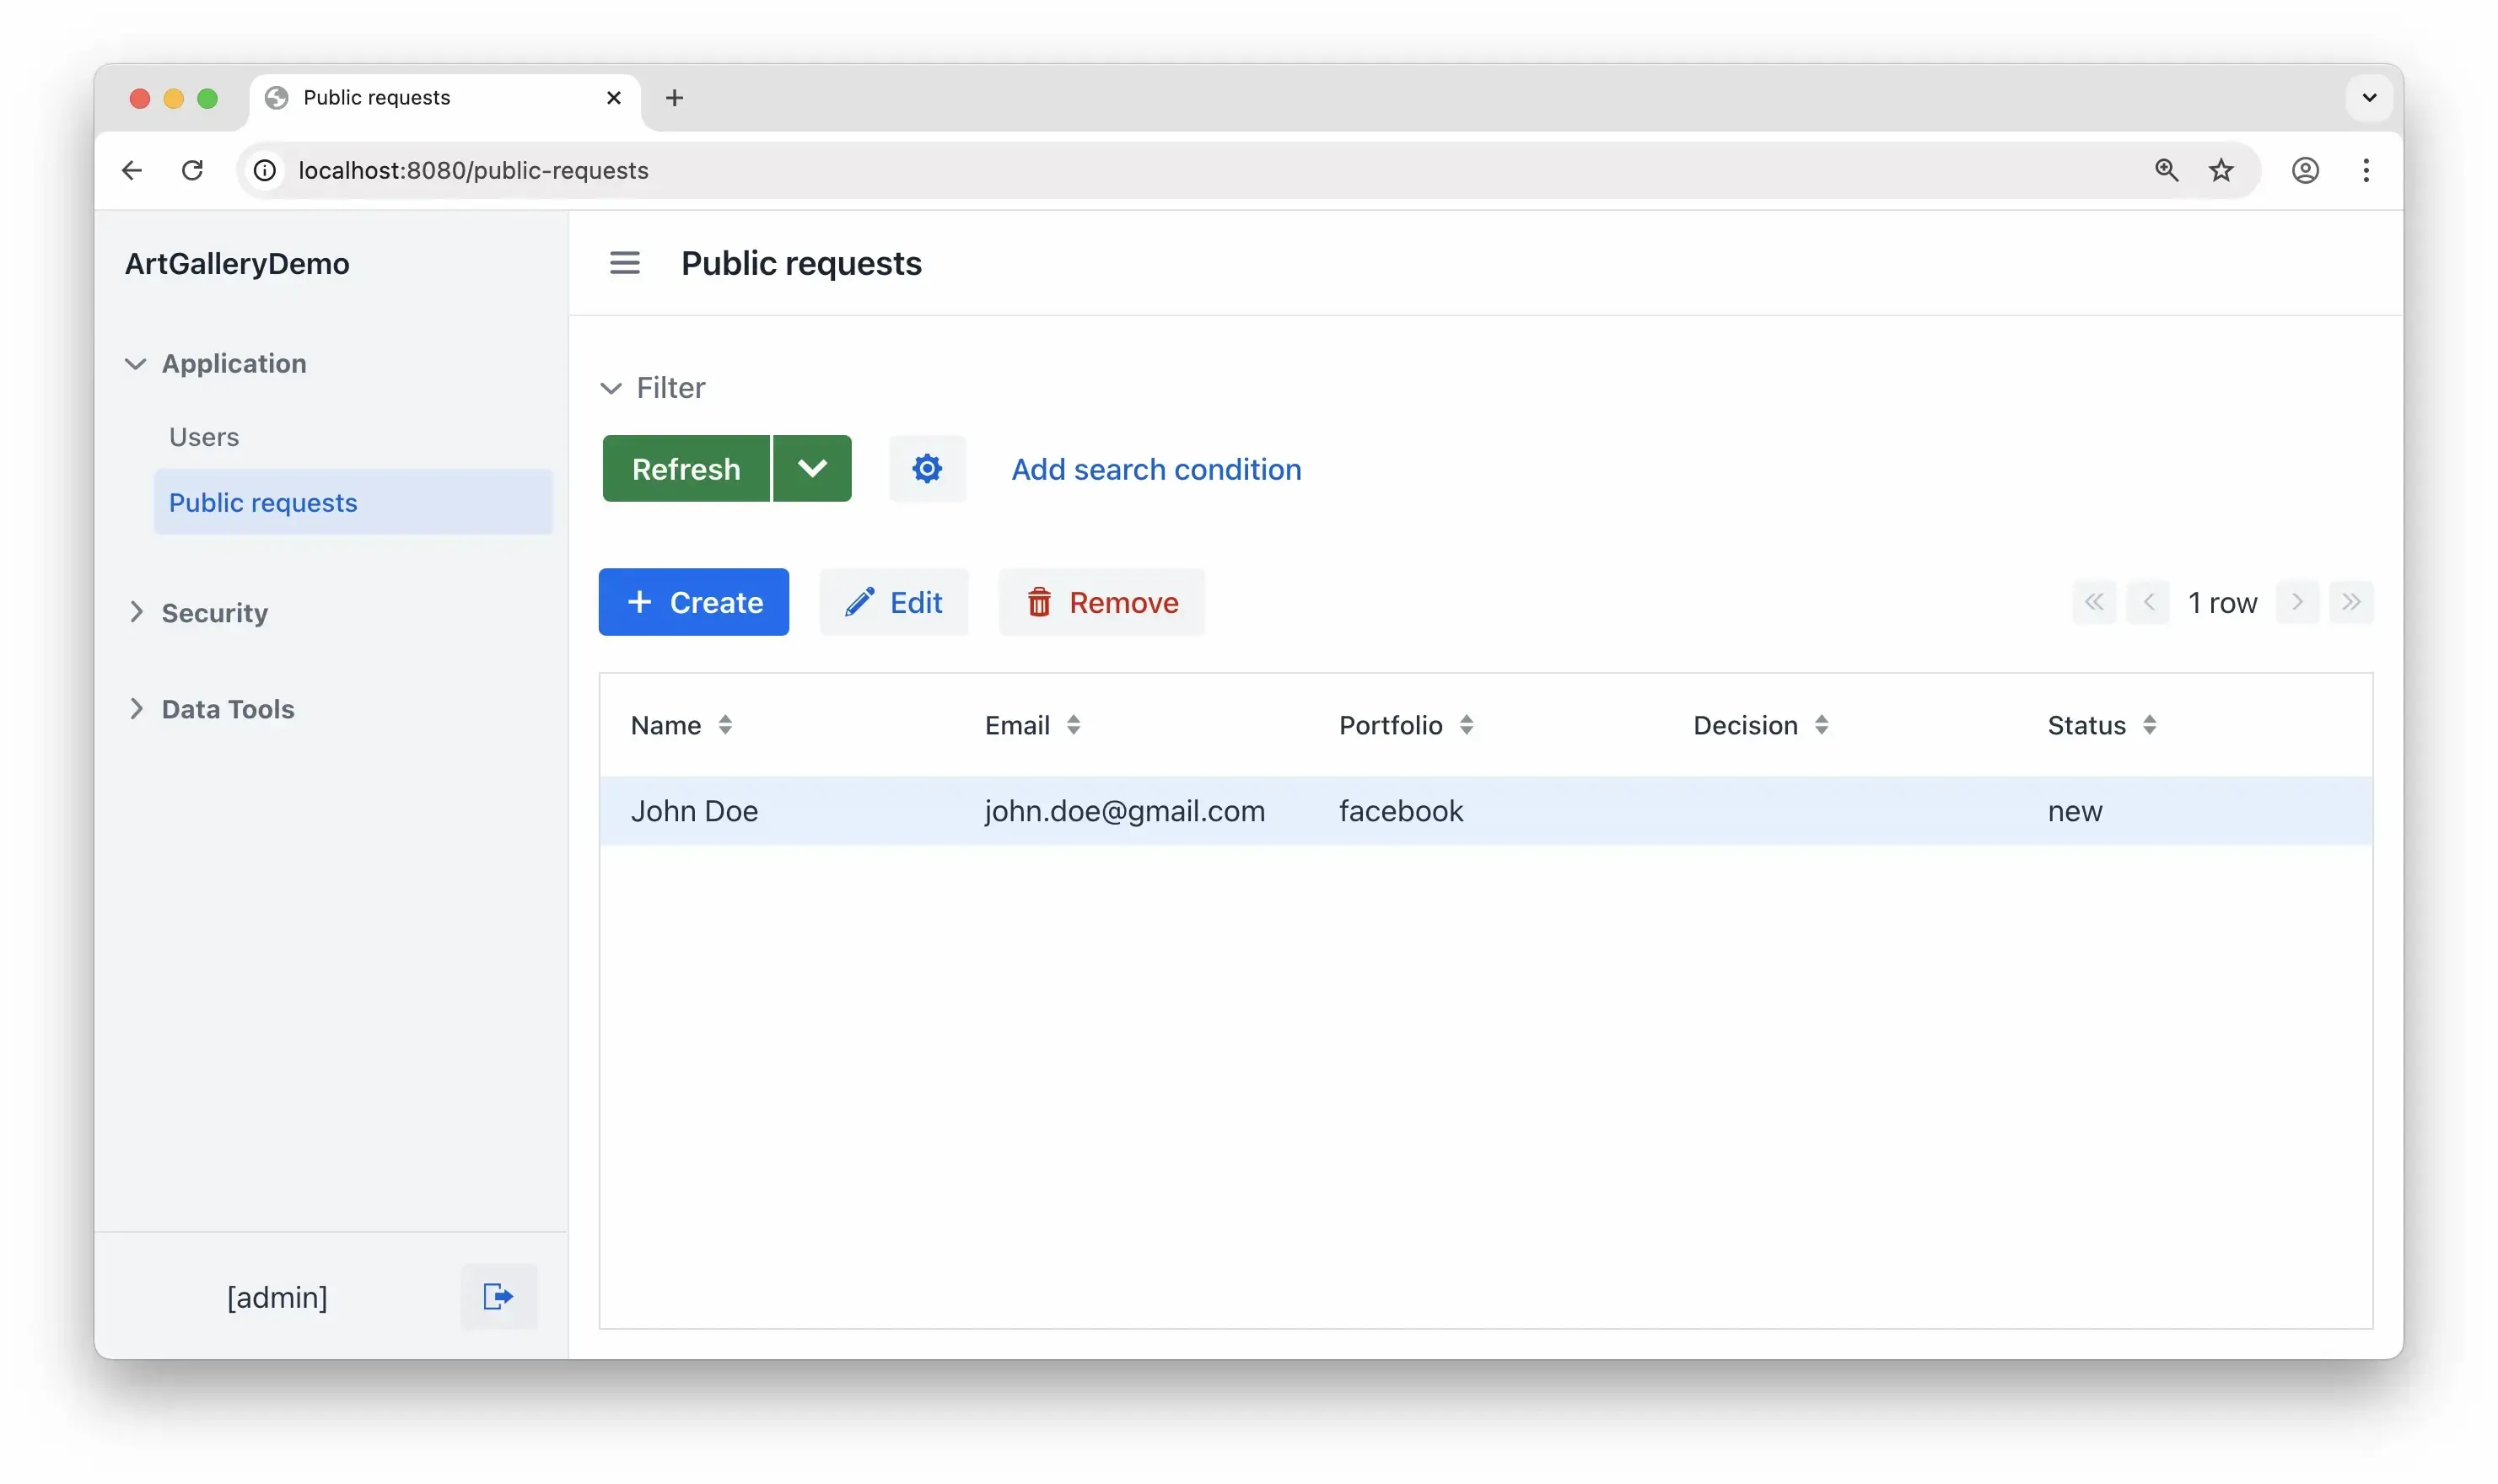
Now restart the application and try sending another submission. You should see both the confirmation in the terminal and a new table record.
Business Process
With the website and backend now interacting, our next step is to ensure these interactions take place at certain moments within a business process. Doing so will help us build an efficient workflow.
Creating Process Diagram
To create a business process, head to Modeler found in the BPM menu section. Use drag and drop to create this simple process diagram:
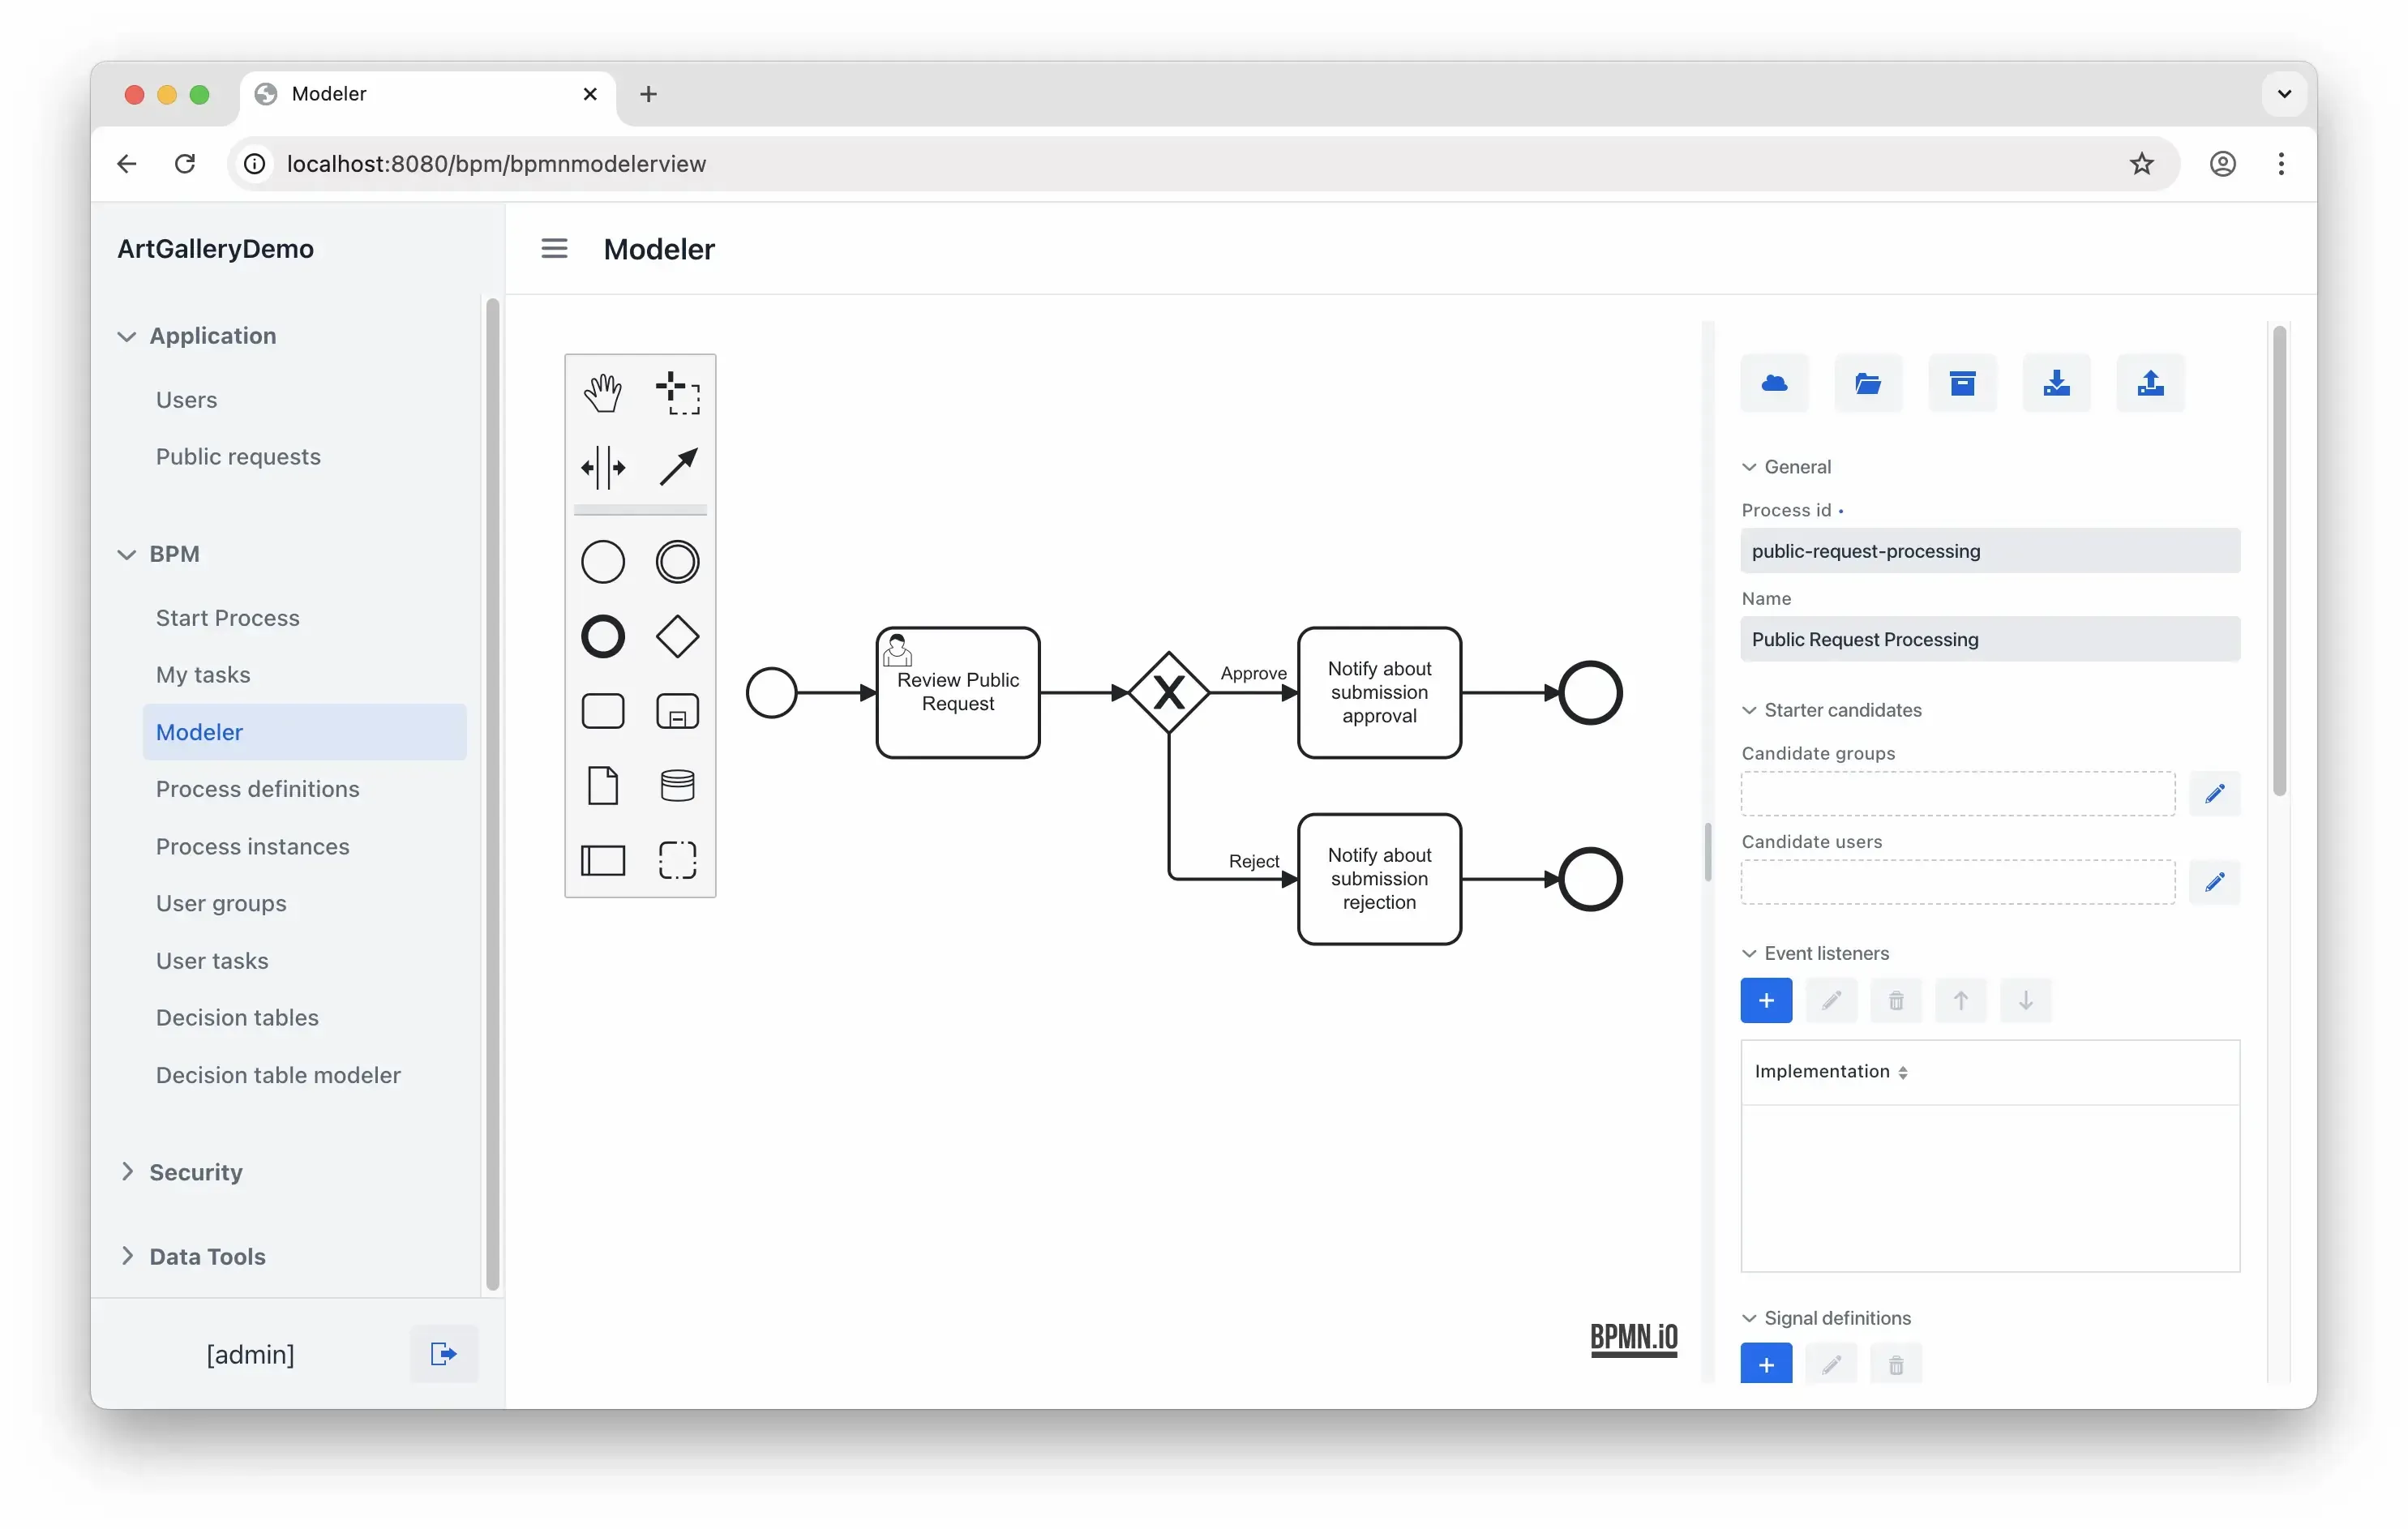
Here are the elements you should place on the canvas from left to right, along with their meanings:
- Start Event: Automatically initiates a process instance when a new request is submitted.
- User Task: A human-managed task for reviewing the submitted request. (To change the task type to "User," select it and click the wrench icon.)
- Exclusive Gateway: A decision point with two possible outcomes: "Approved" or "Rejected."
- Task (x2): These are meant for sending a notification based on the decision.
- End Event (x2): Mark the end of the flows.
Configuring Elements
None of the elements are currently configured. Follow the instructions below to configure them one by one.
Start Event
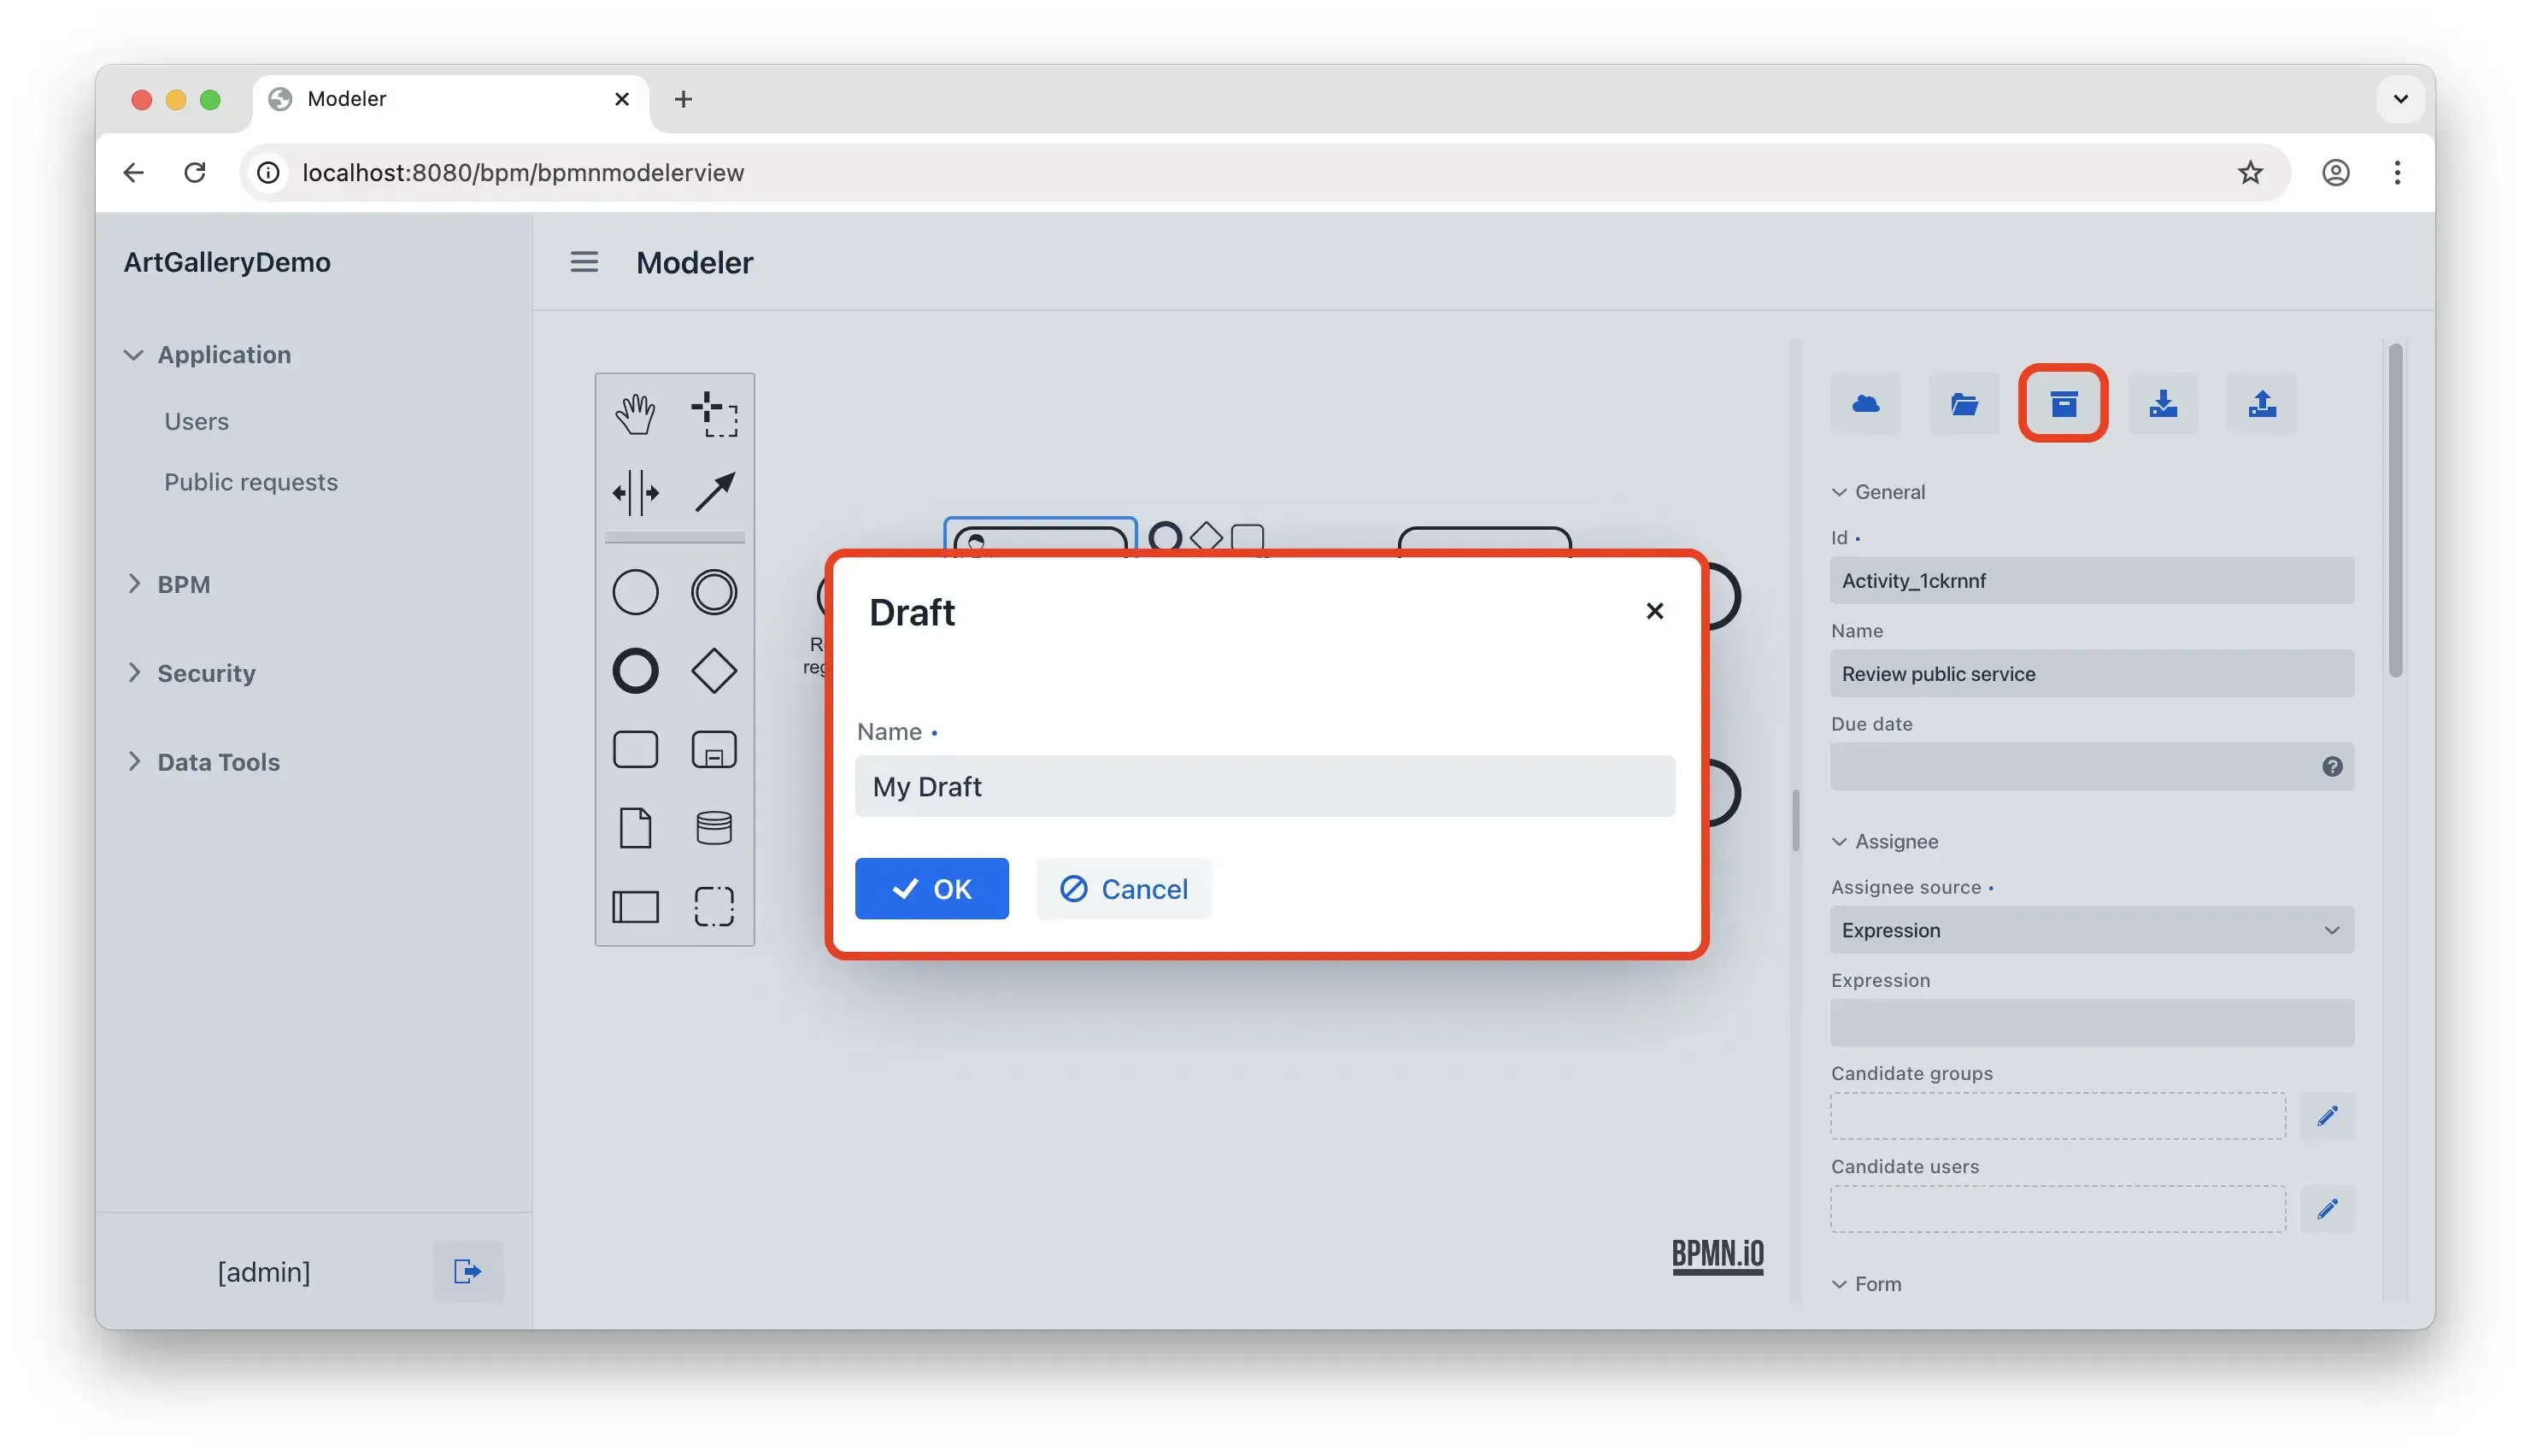
When starting a process manually initiating a process, you need the option to choose a PublicRequest instance to work on. Let’s configure the start event to display a simple dialog with a dropdown list of available instances.
Select the Start Event element on the canvas. Use the right panel to configure its Form properties as shown:
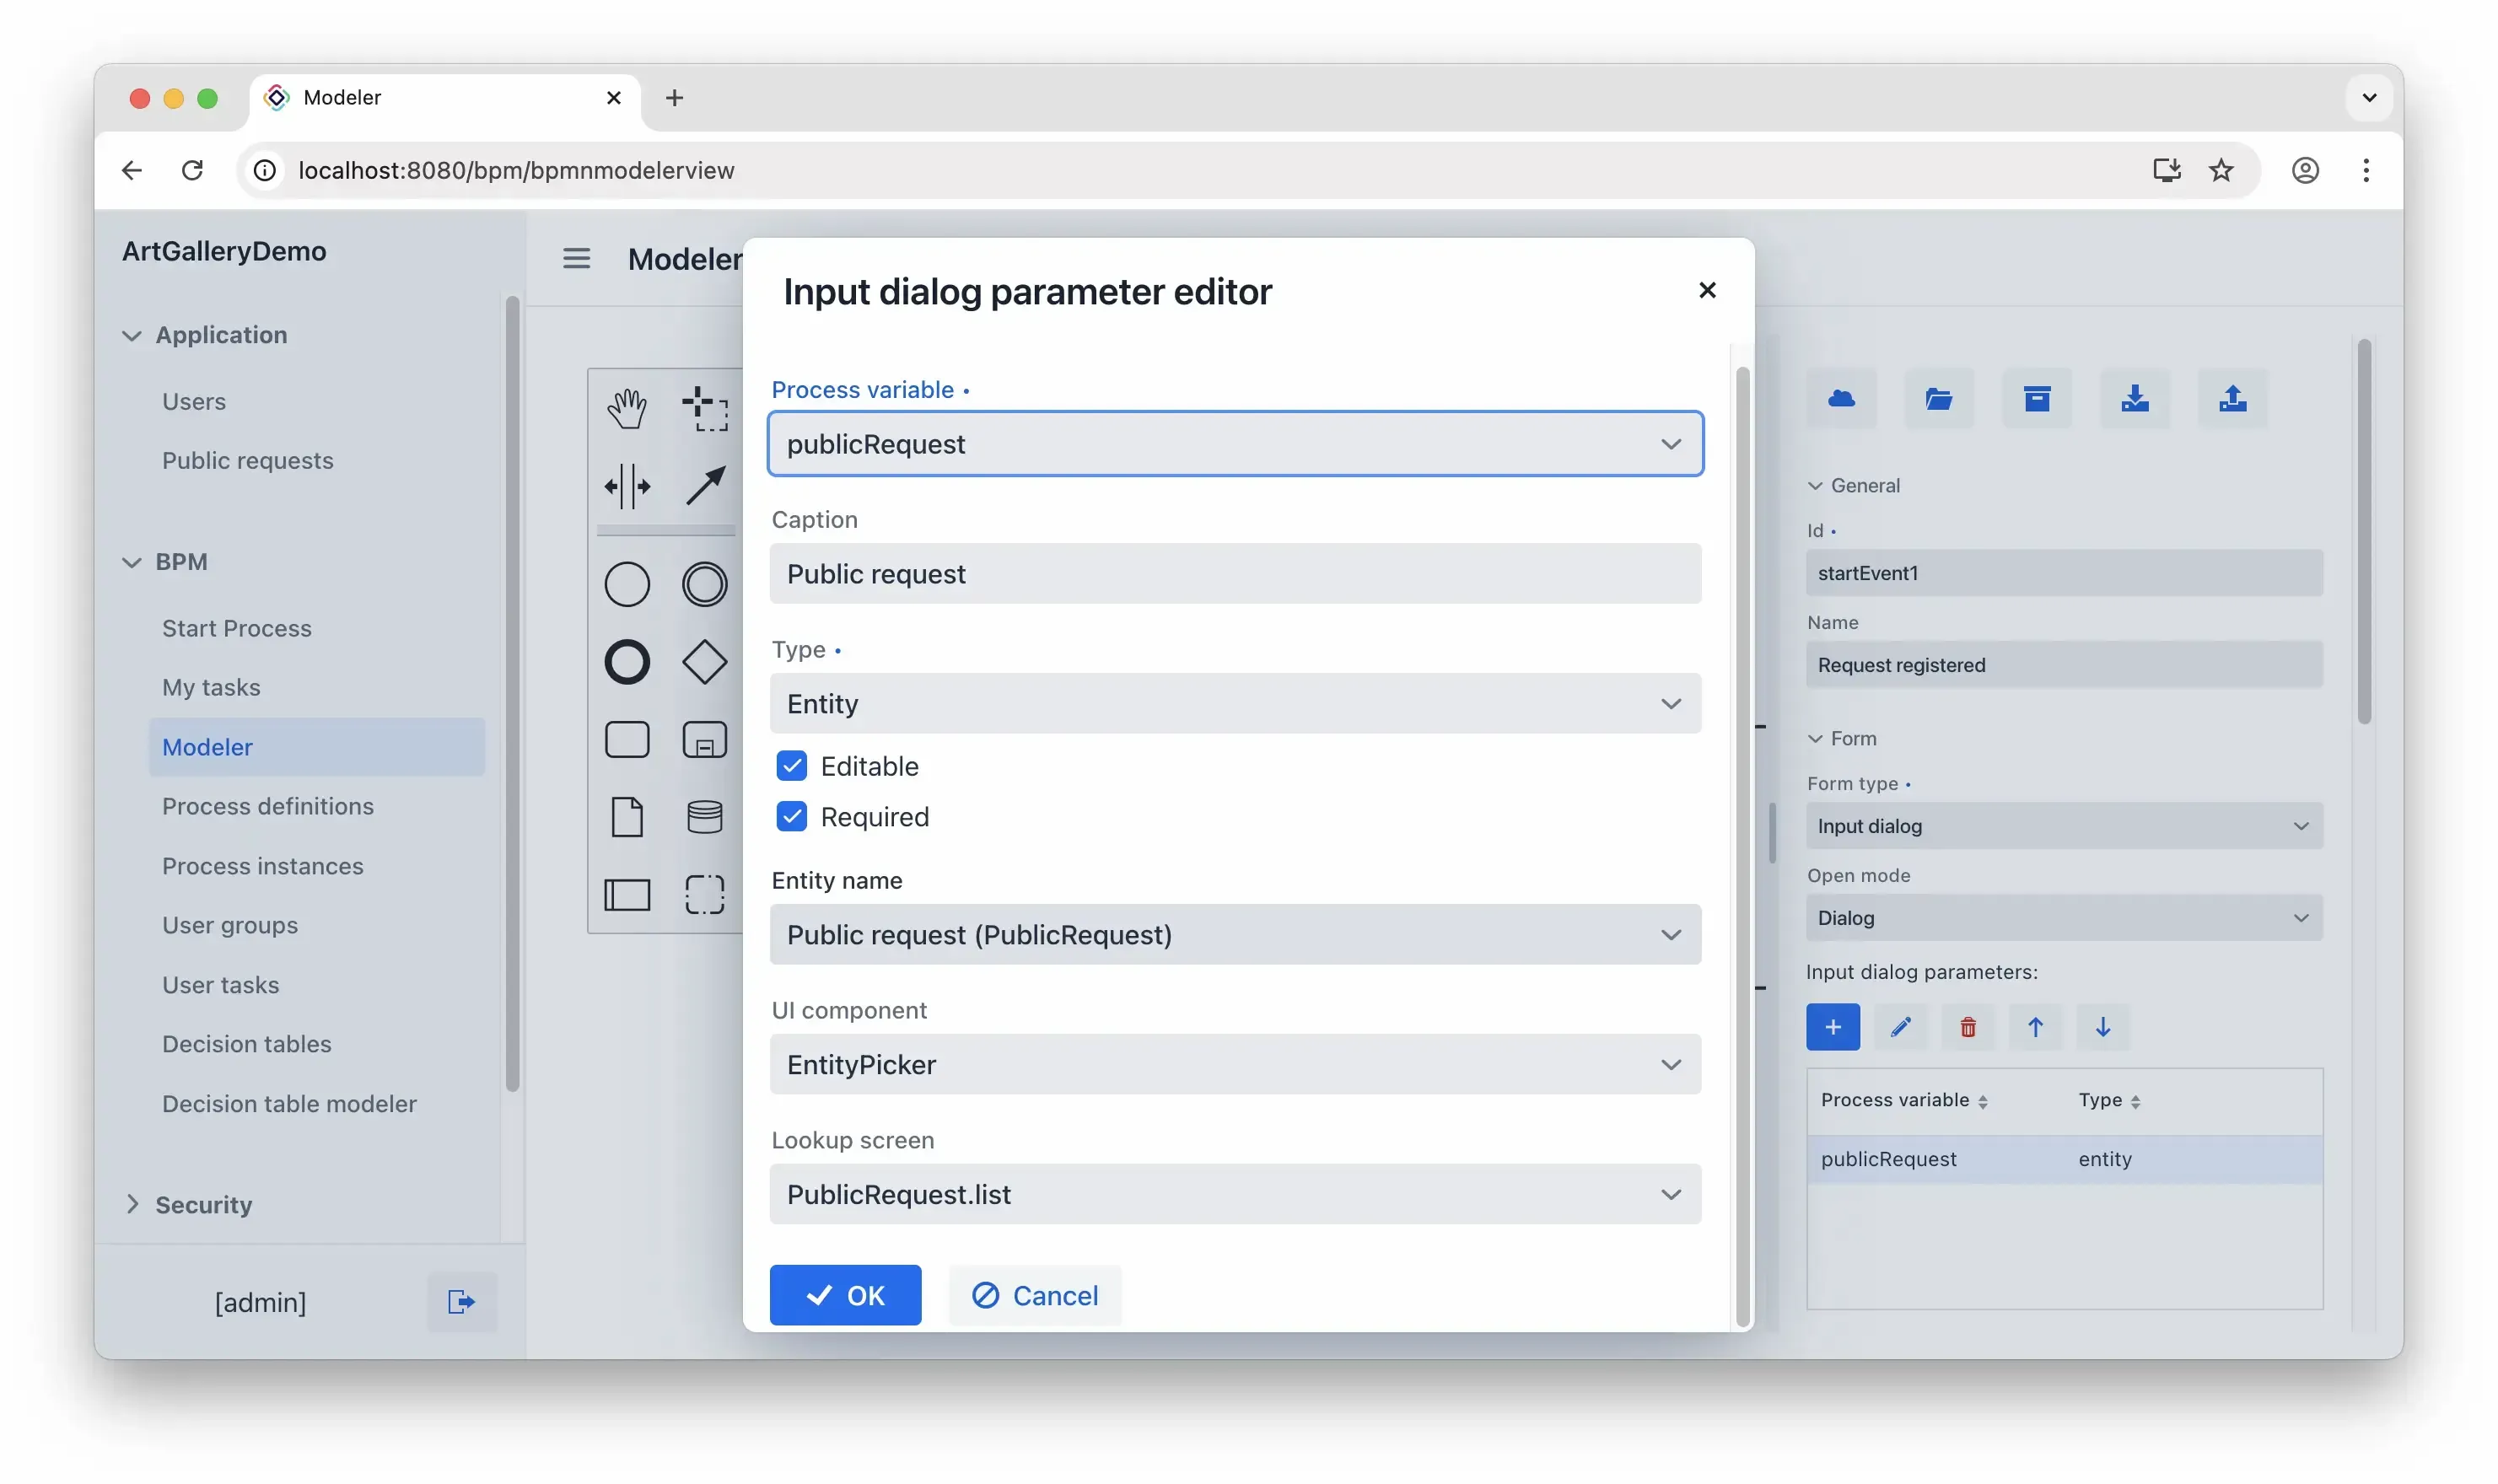
If you're curious about the publicRequest process variable, this configuration does more than just create a dialog – it also generates a process variable that carries data from the PublicRequest entity through the process.
Now, it’s really important to save your process! Otherwise, you might lose your progress since the next step will have us refresh the page.
User Task
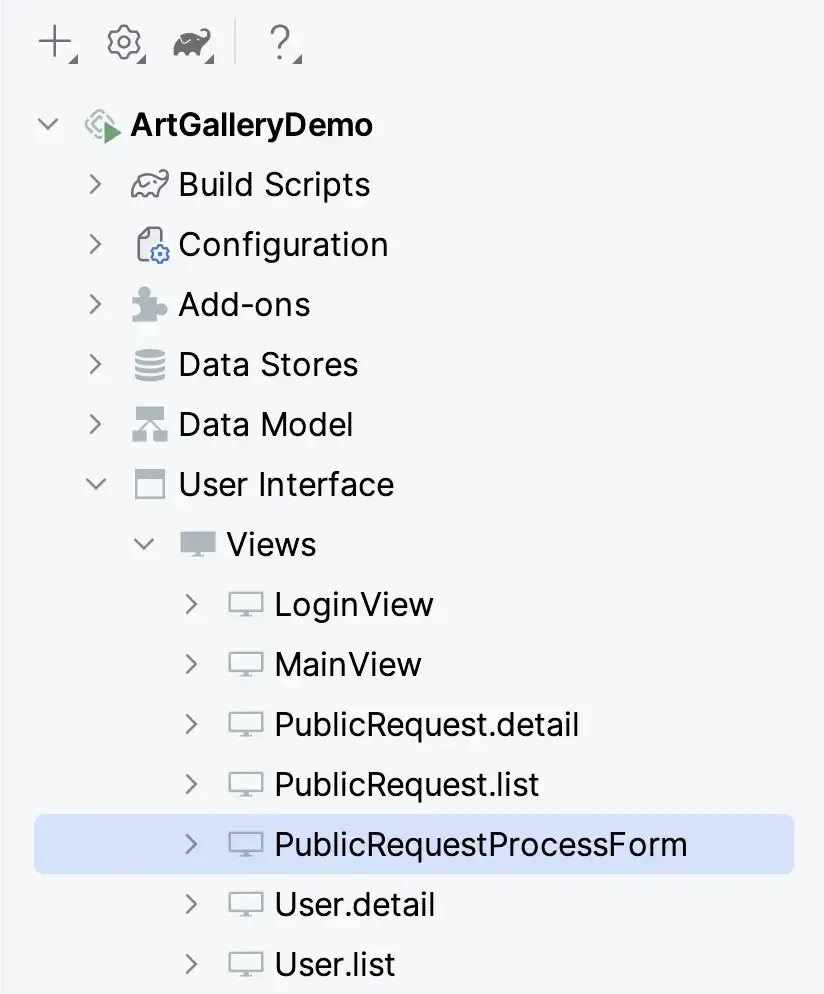
The start event uses a simple input dialog, but this task will use a dedicated view. Let’s return to Jmix Studio and create one using the BPMN process form template.
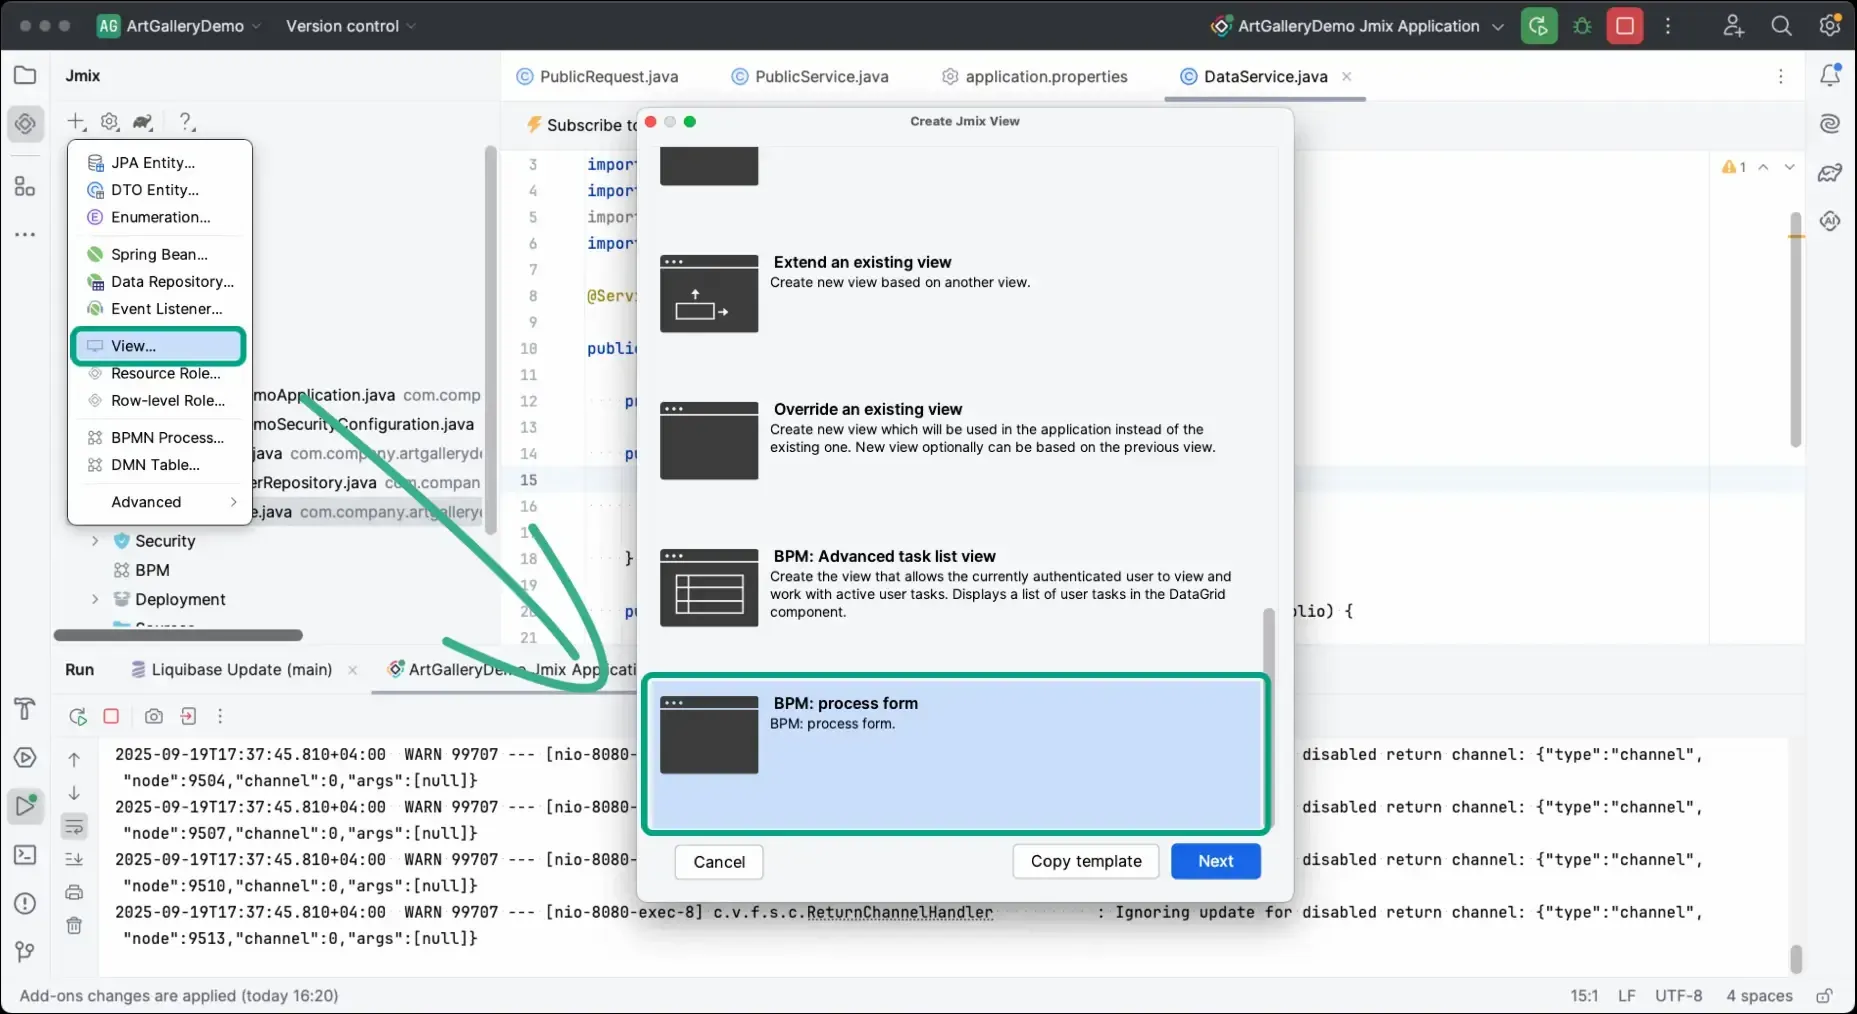
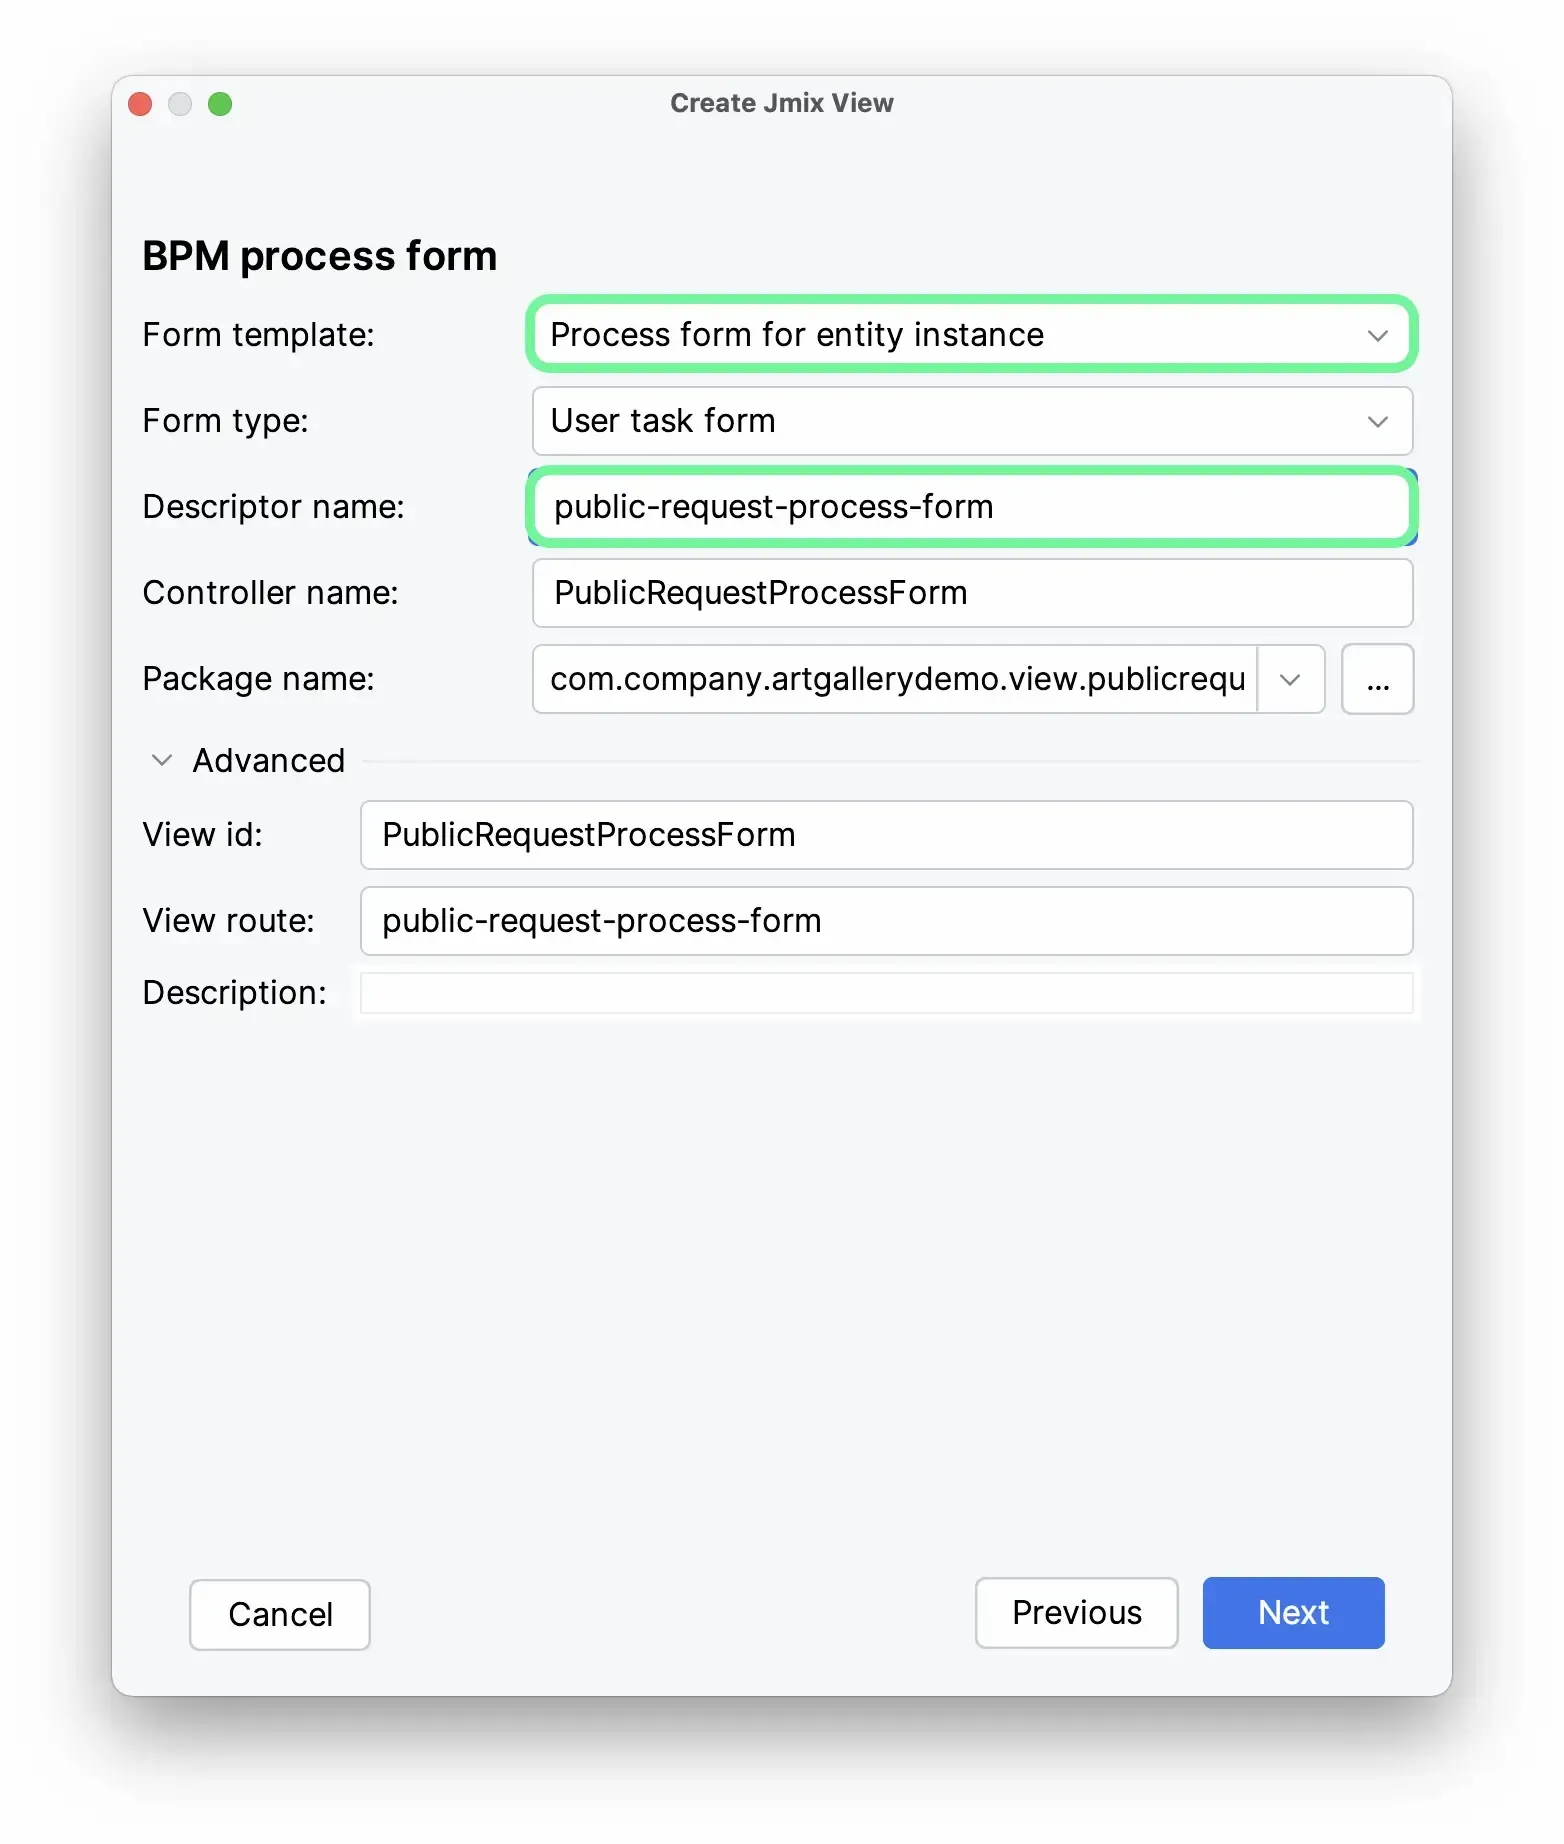
The view creation wizard will guide you through the process. Start by selecting “Process form for entity instance” as the form template and provide a meaningful name for the descriptor.
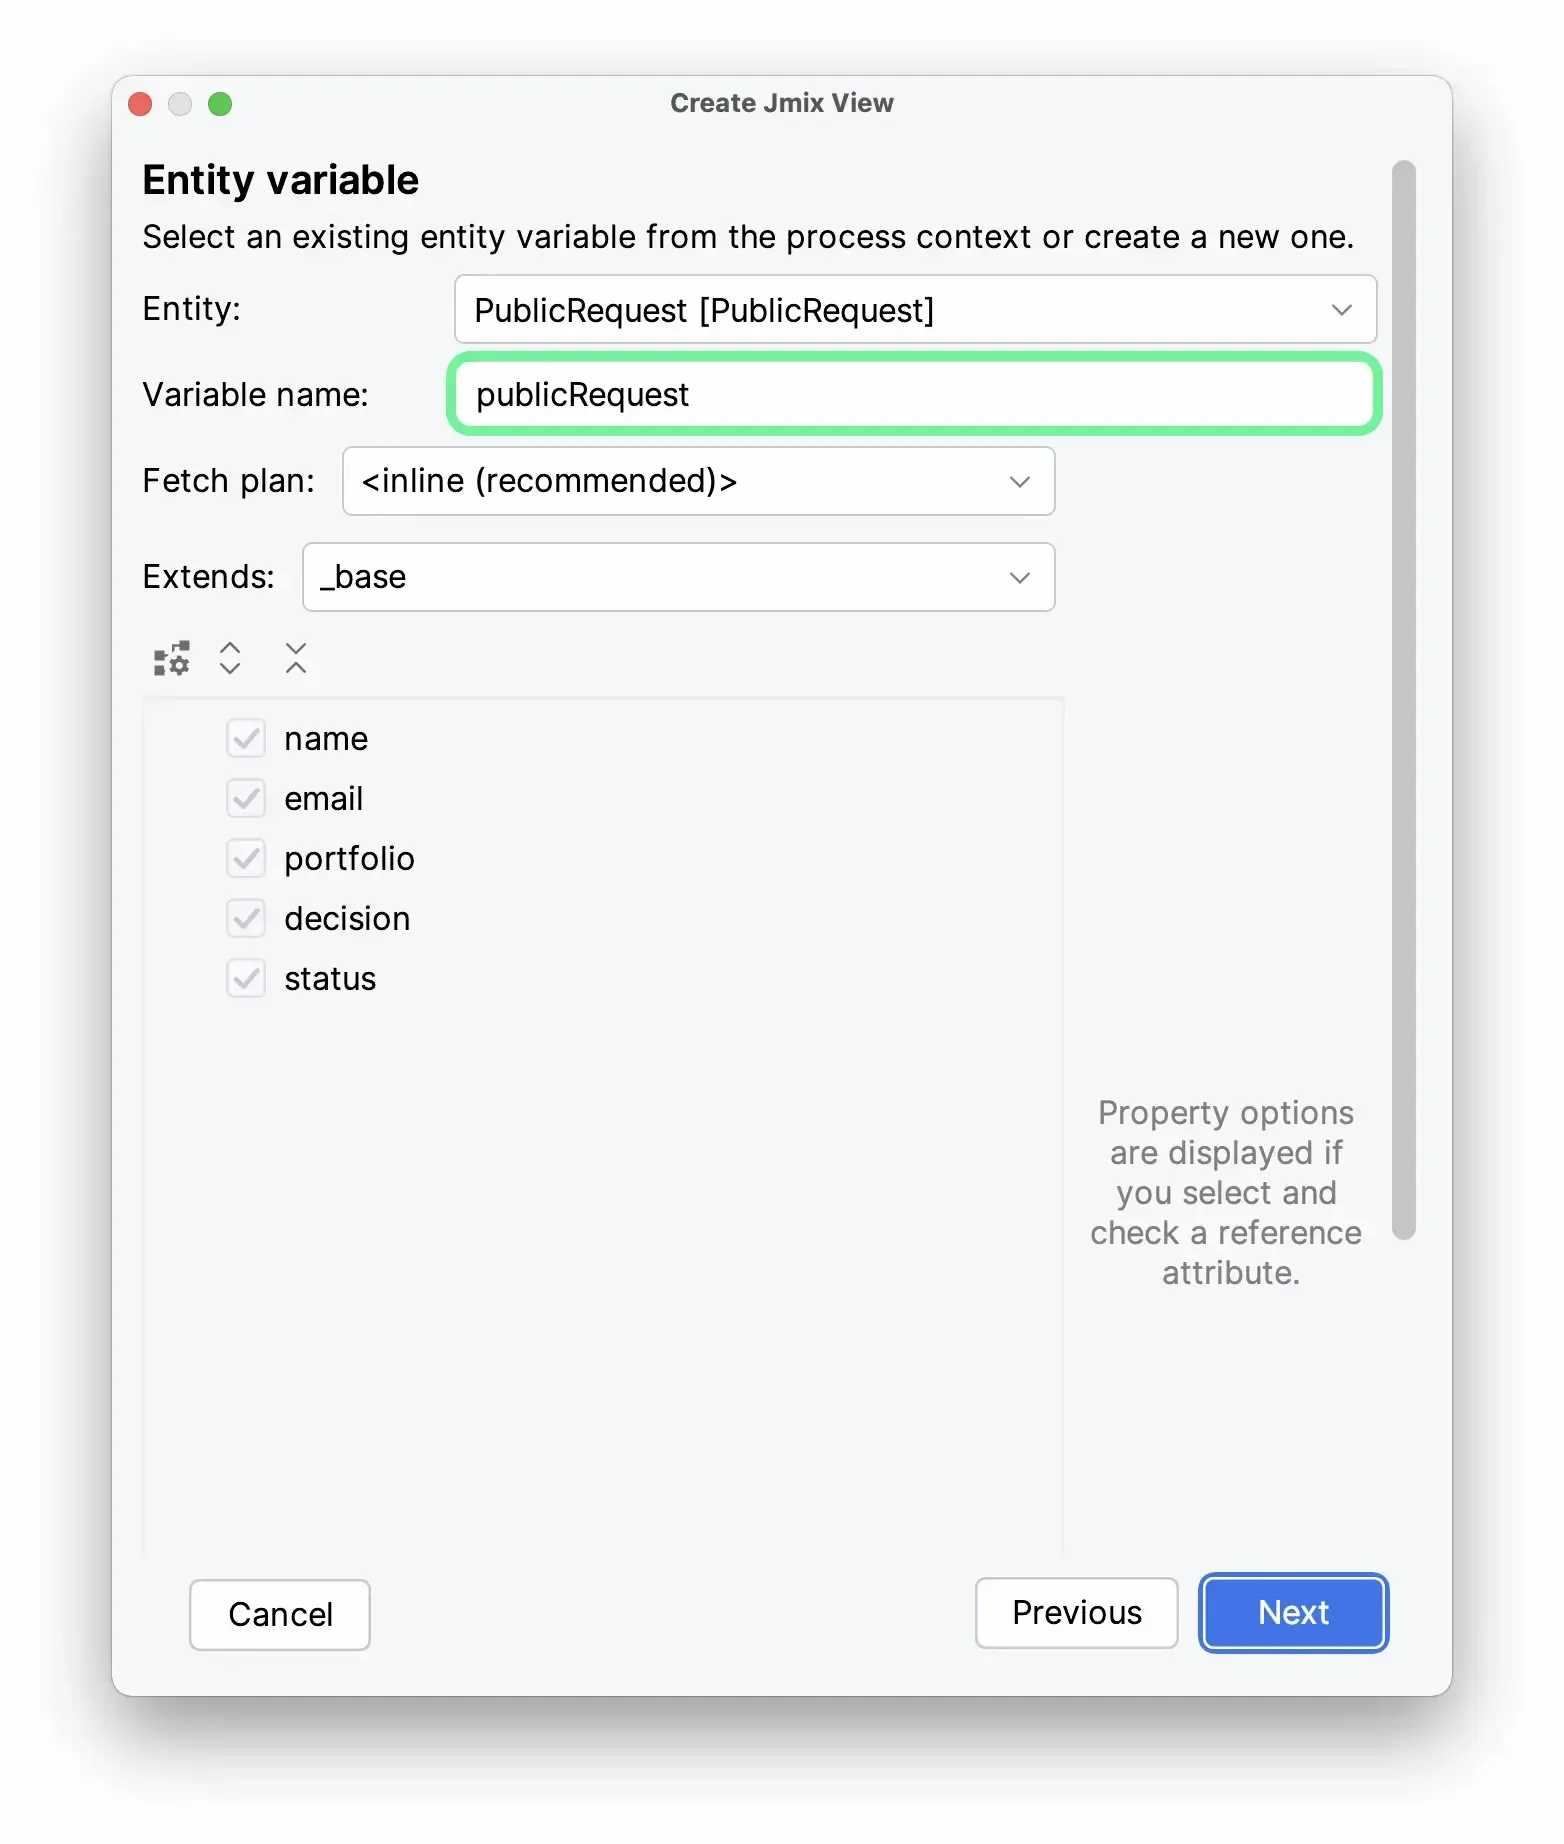
On the next step, select the publicRequest process variable in the respective field:
No changes are needed for the remaining steps in the wizard, so feel free to click Next to move through them. As a result, you should see the new view added.
Essentially that is a standard Jmix view. The difference is that it has a few annotations that allow it to function as a form within the process.
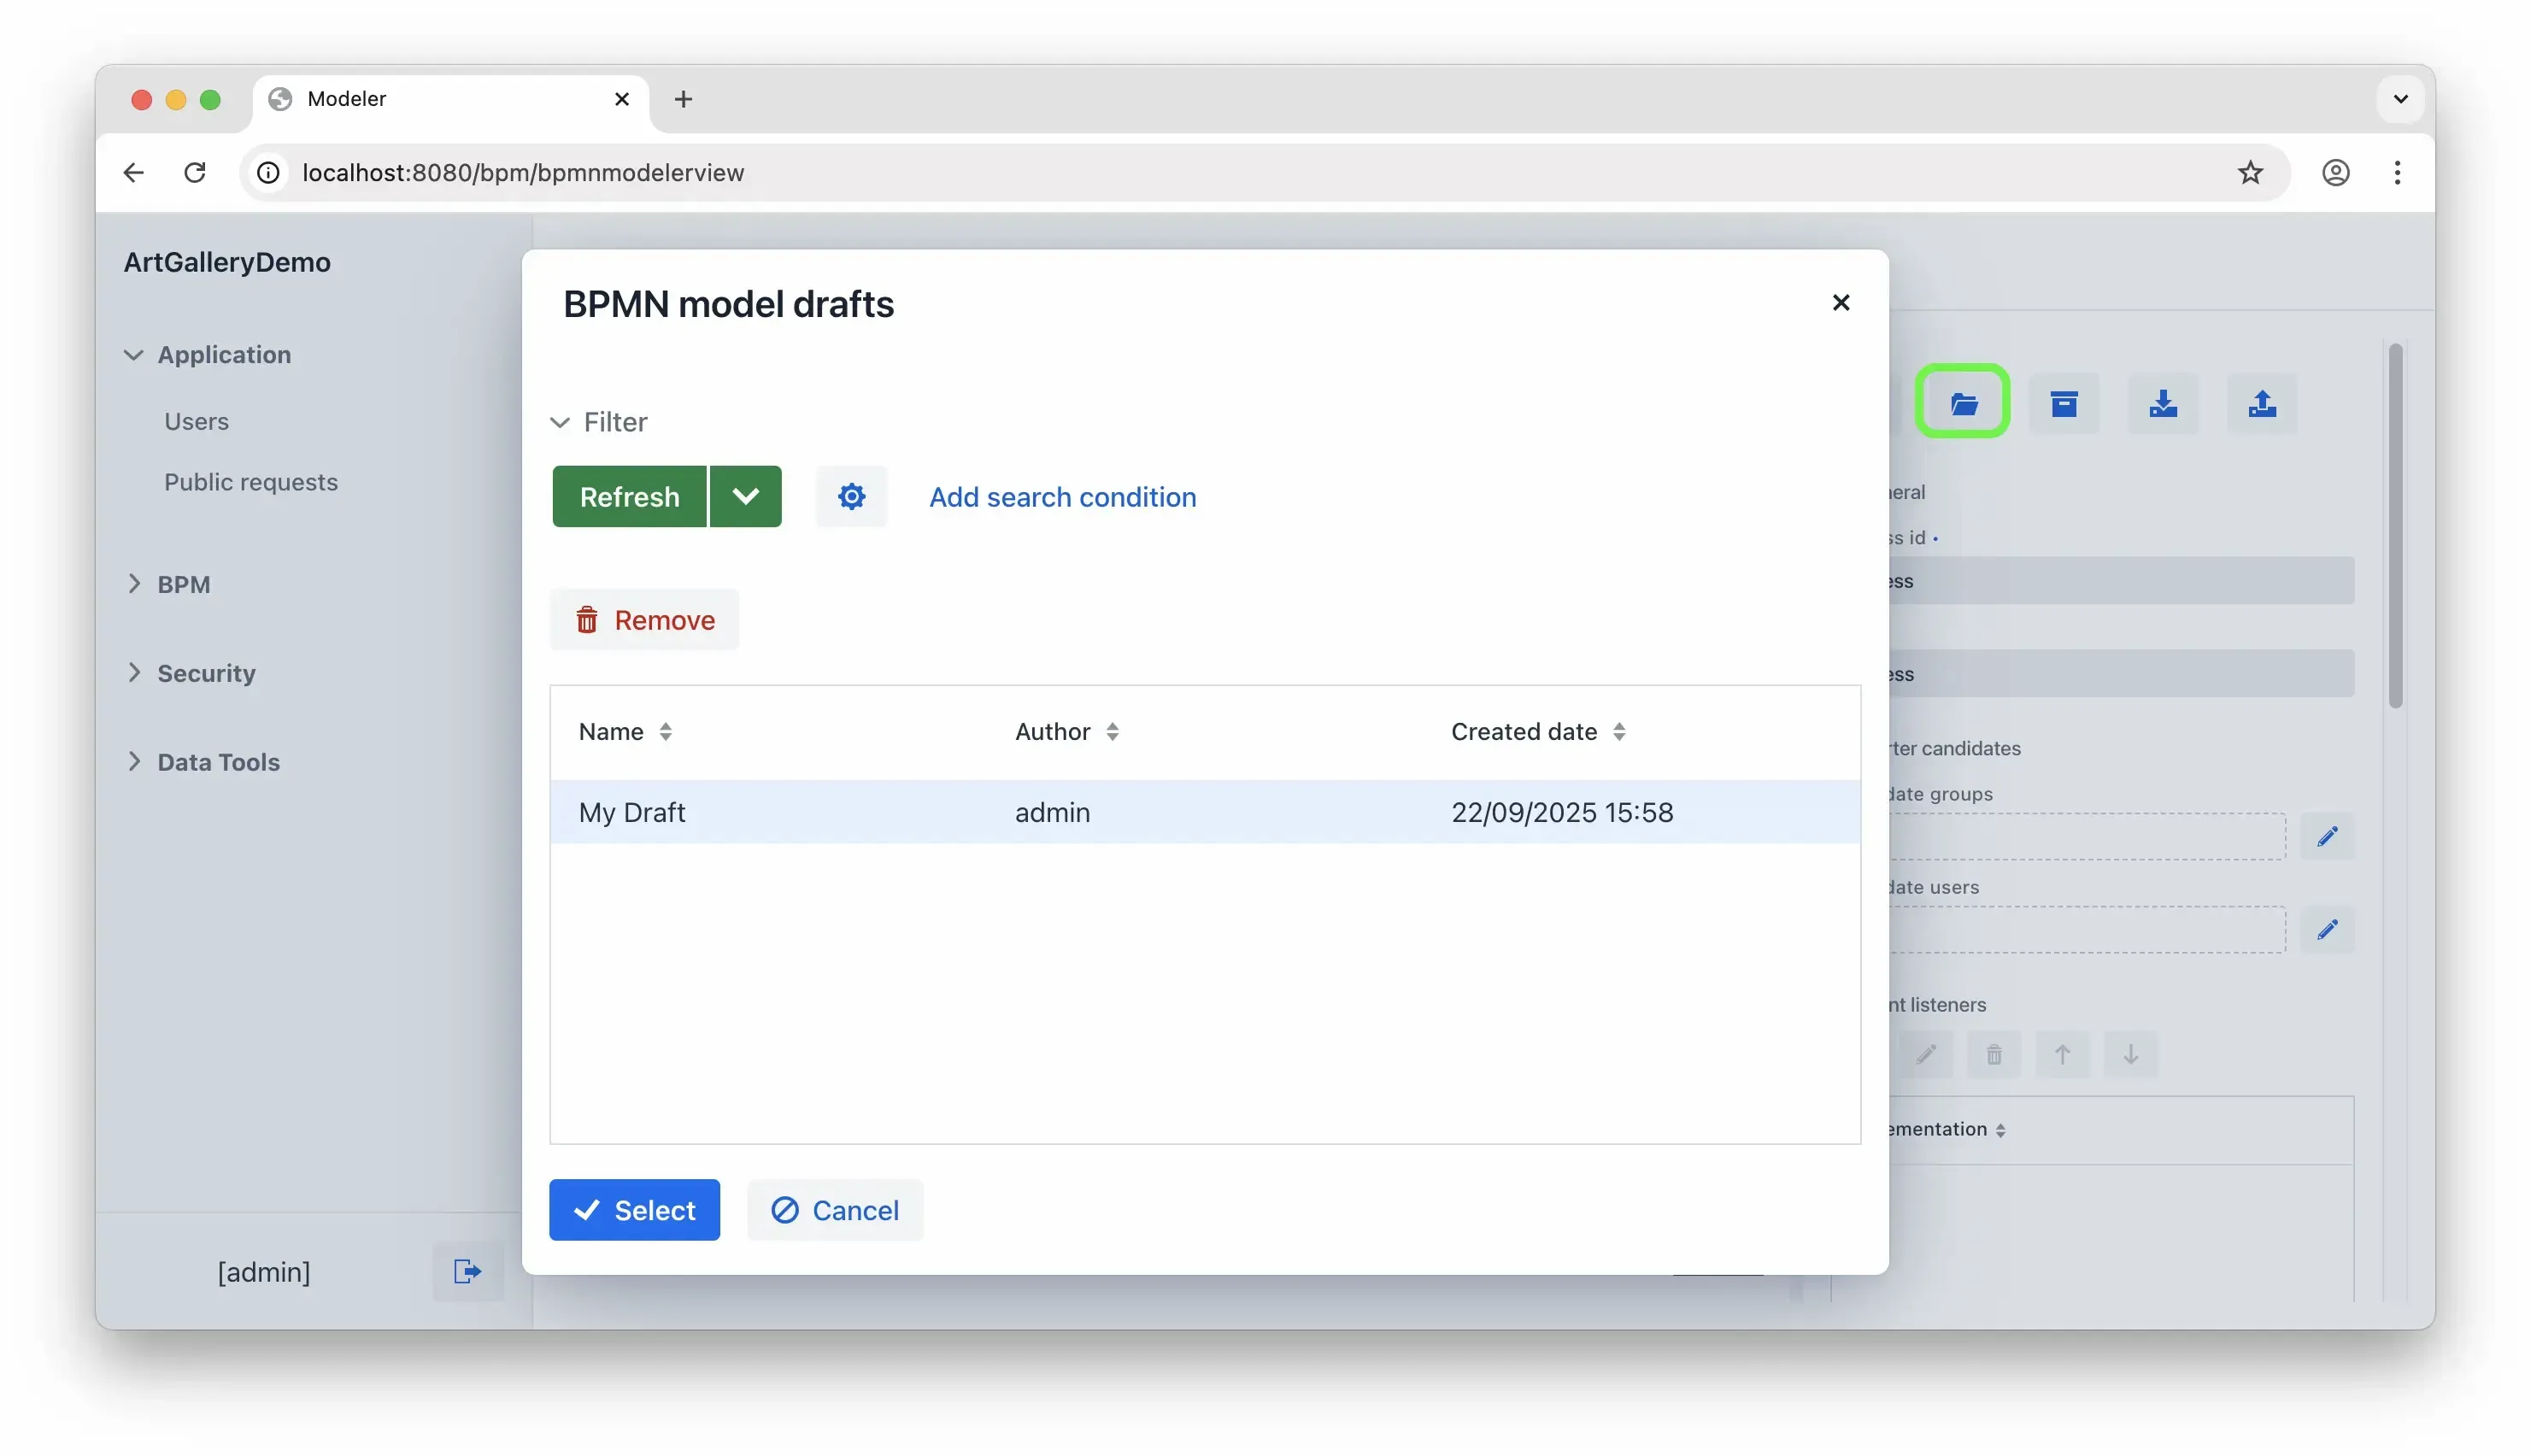
Return to the application and refresh the page so that the new view gets hot-deployed. This step is important to get it ready for integrating into the process. Refreshing will clear the canvas, but that has been accounted for. Just restore the model from the draft to continue.
Select the User Task. In the right panel set Assignee properties as shown:
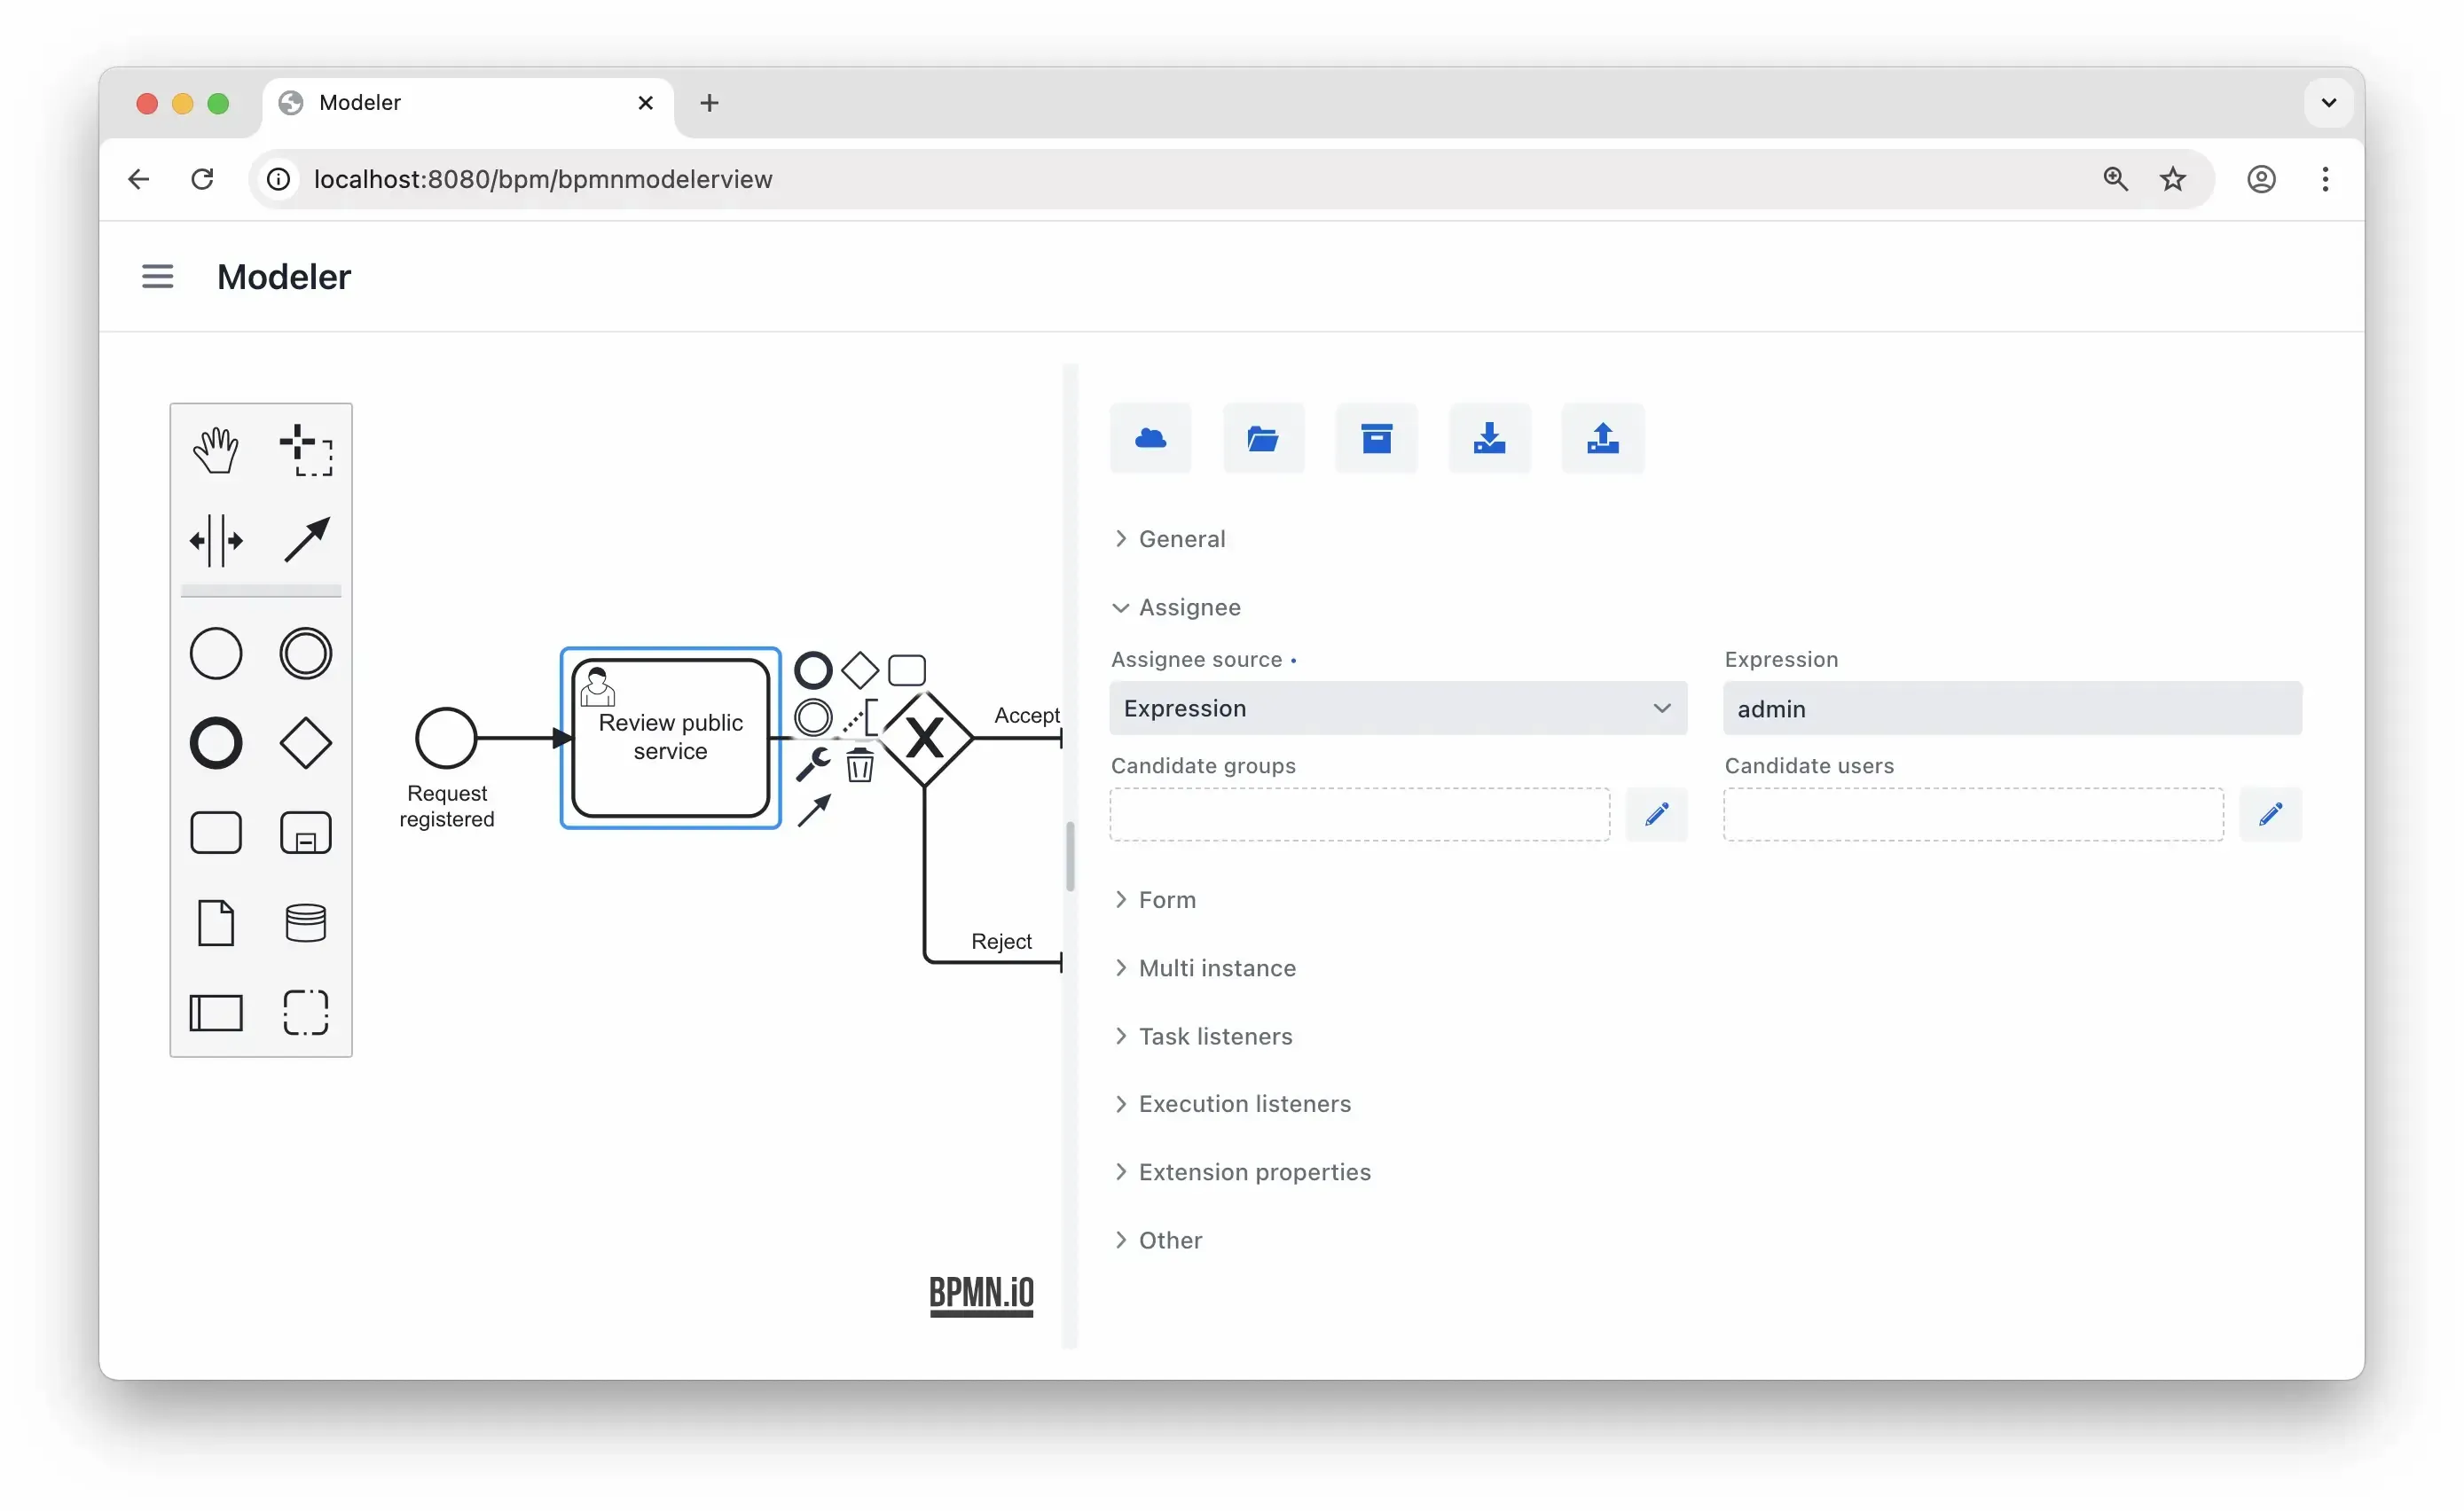
To keep it straightforward, all tasks go to admin, the only user of the application.
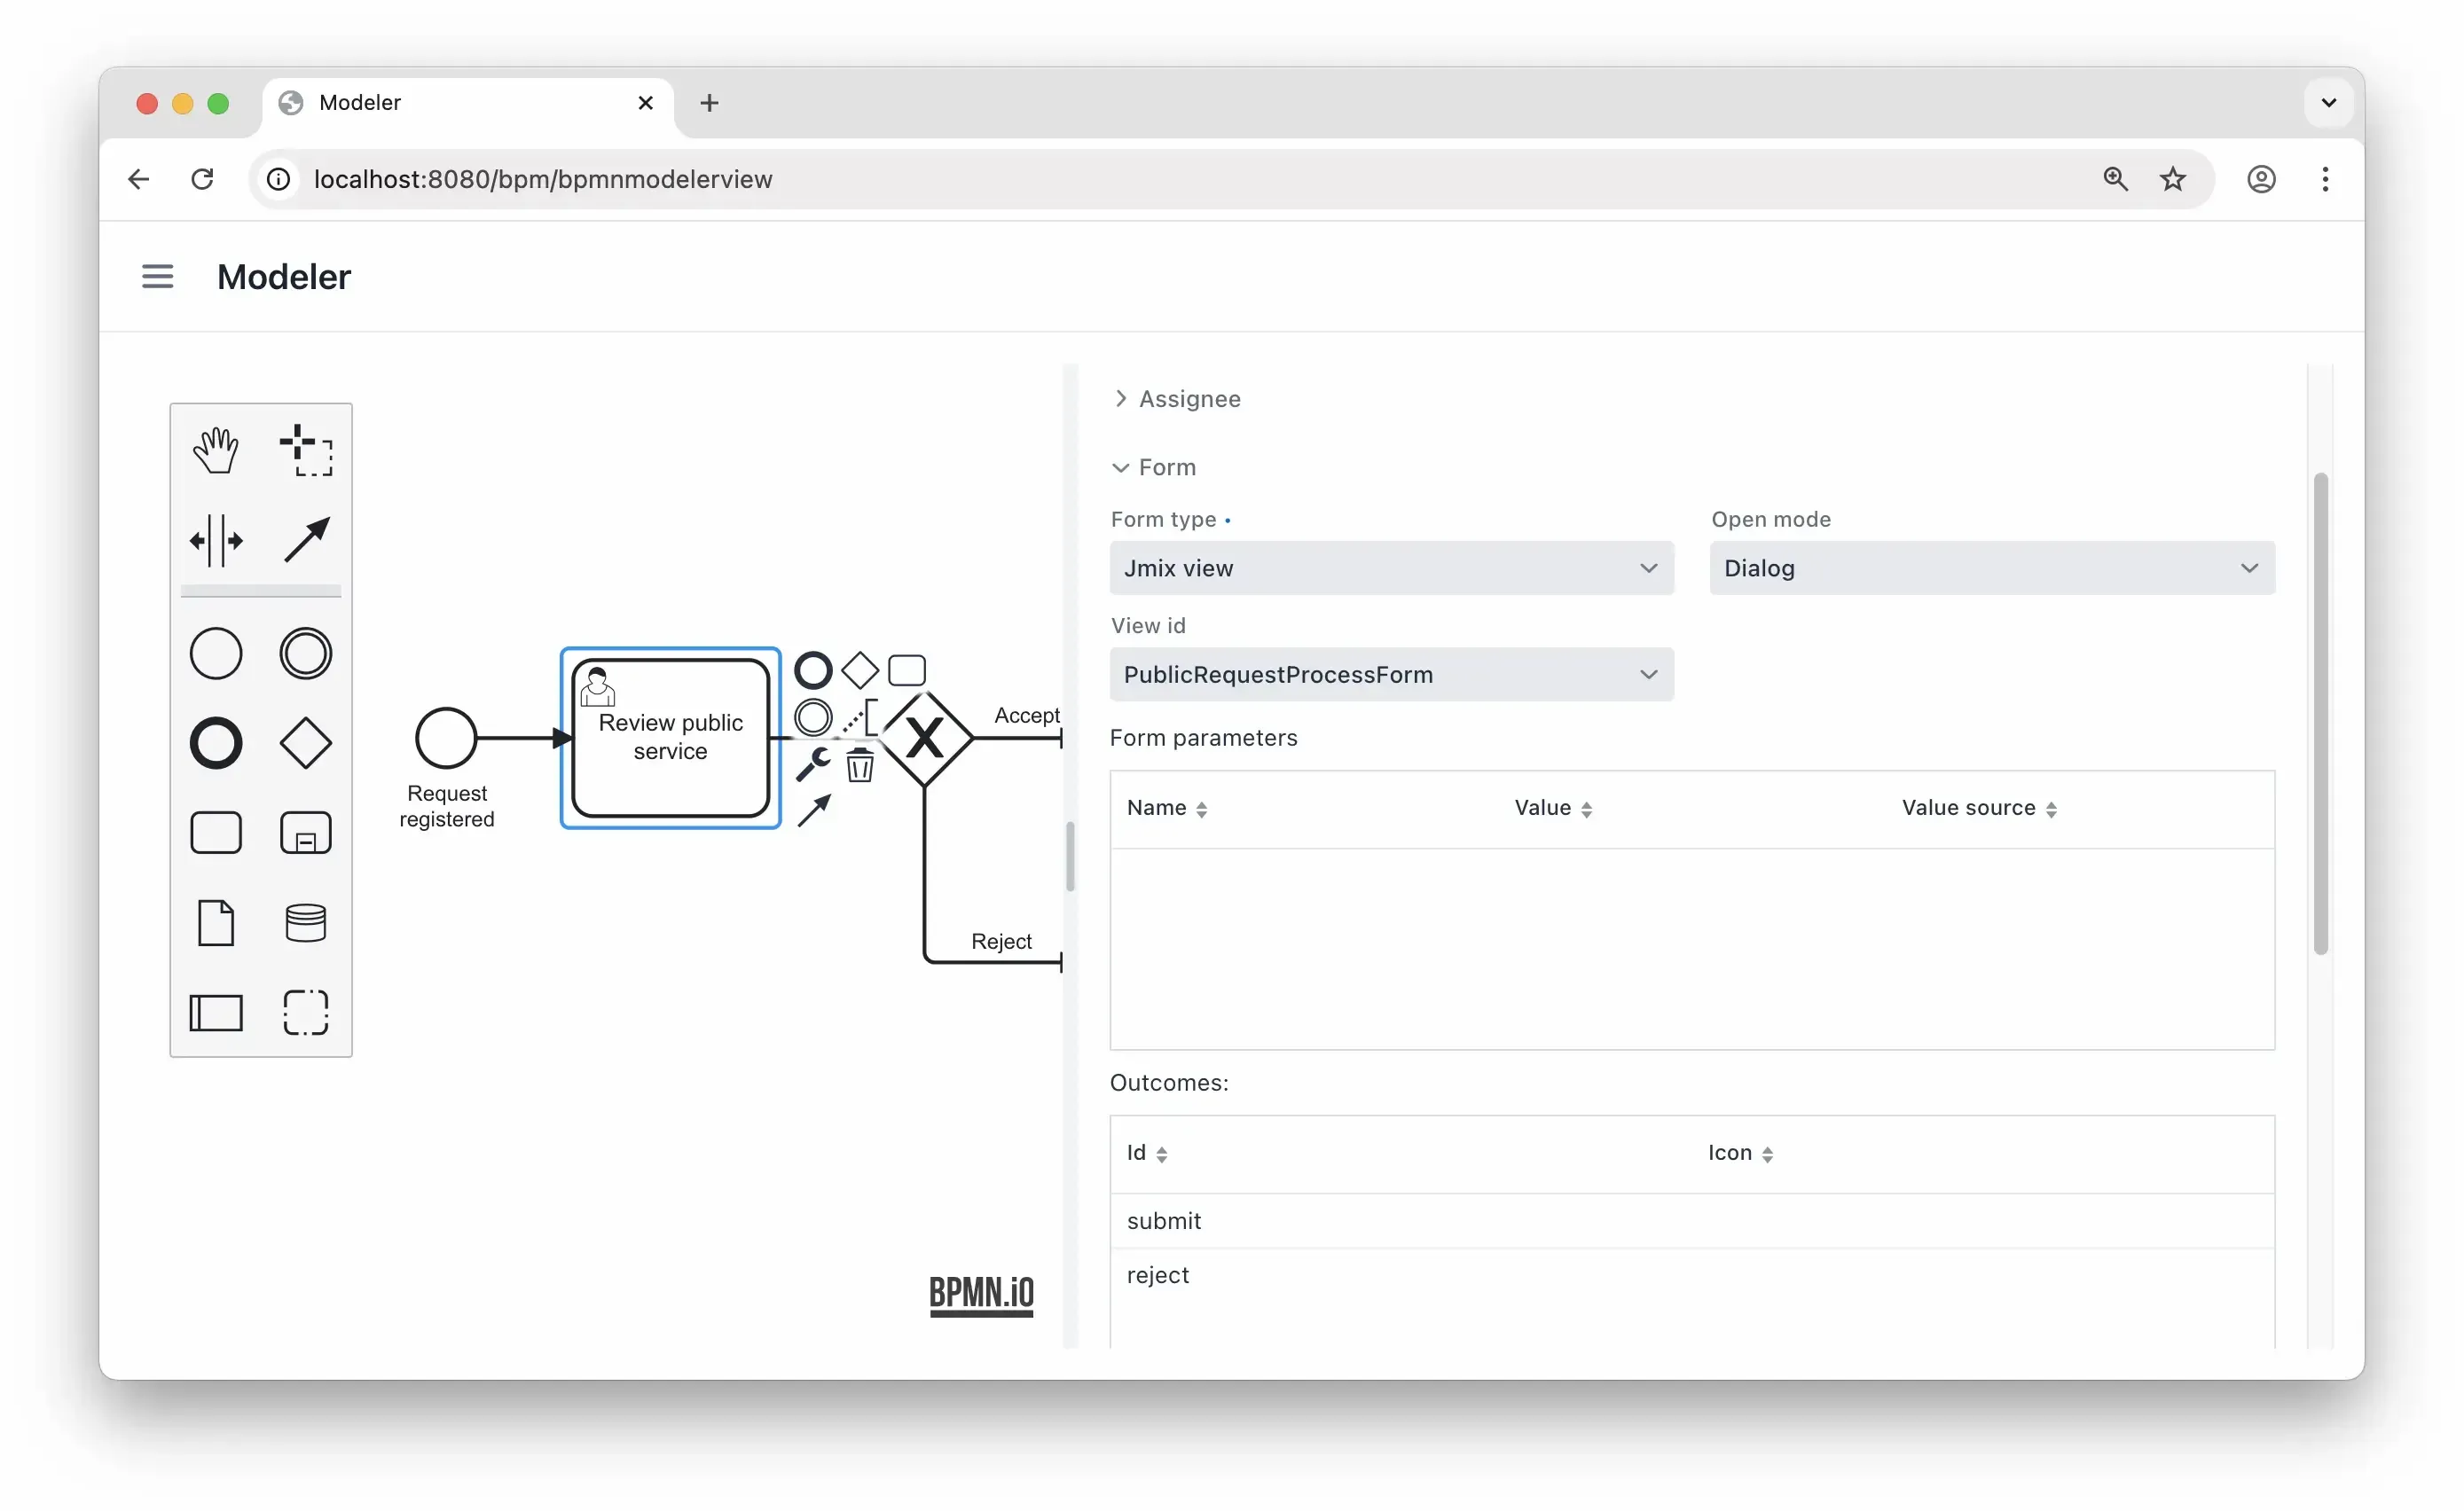
Lastly, set the process form properties. To guide this element to display the correct view, just enter its ID.
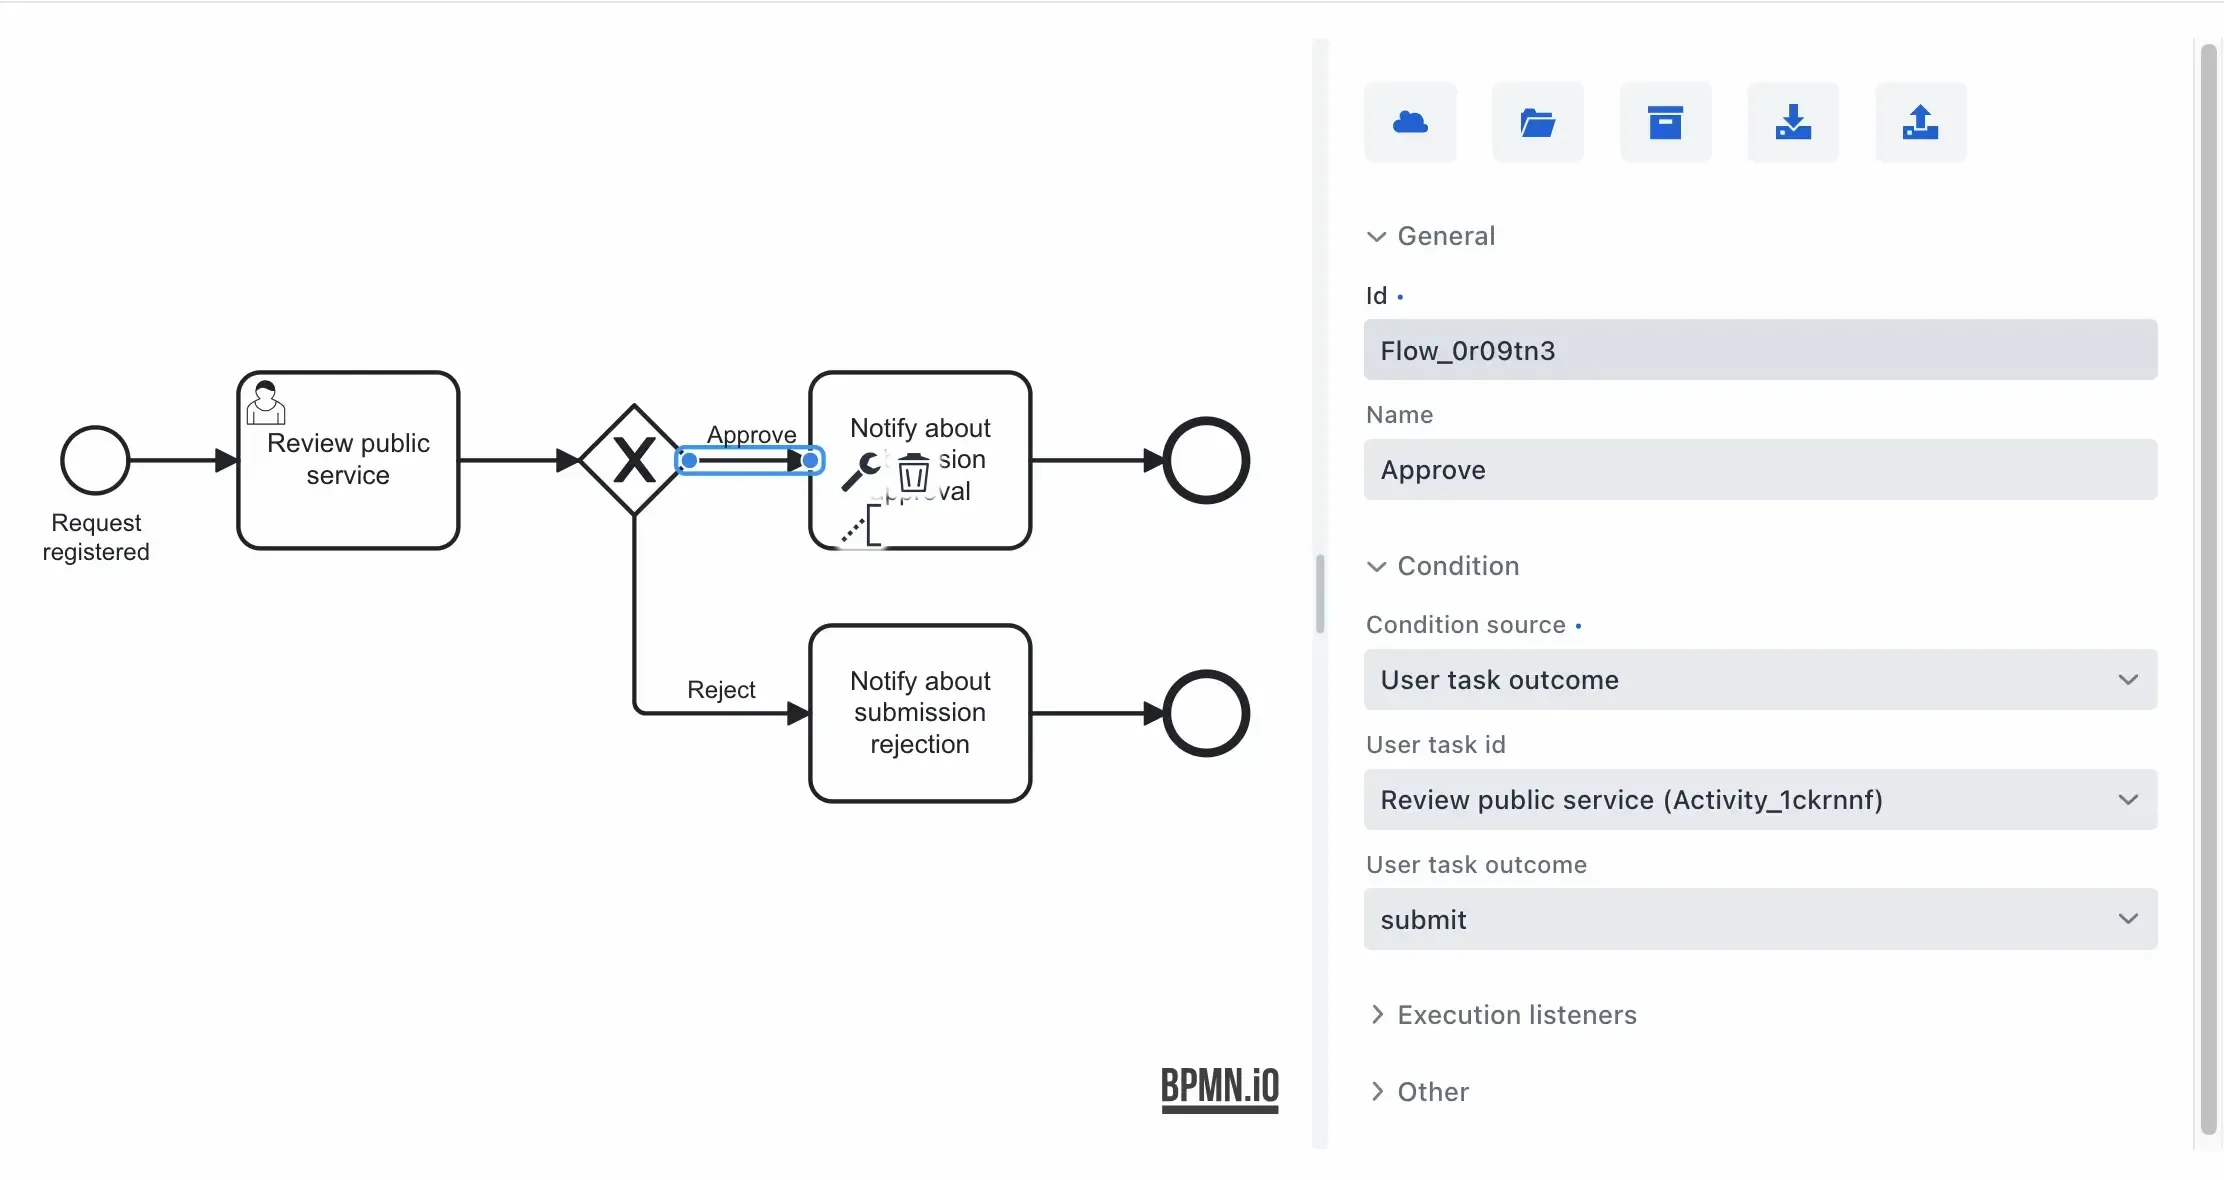
Exclusive Gateway
The exclusive gateway doesn’t require any configuration by itself, but its outcomes must be configured. Click on the approval path arrow to define its name, condition source, and outcome.
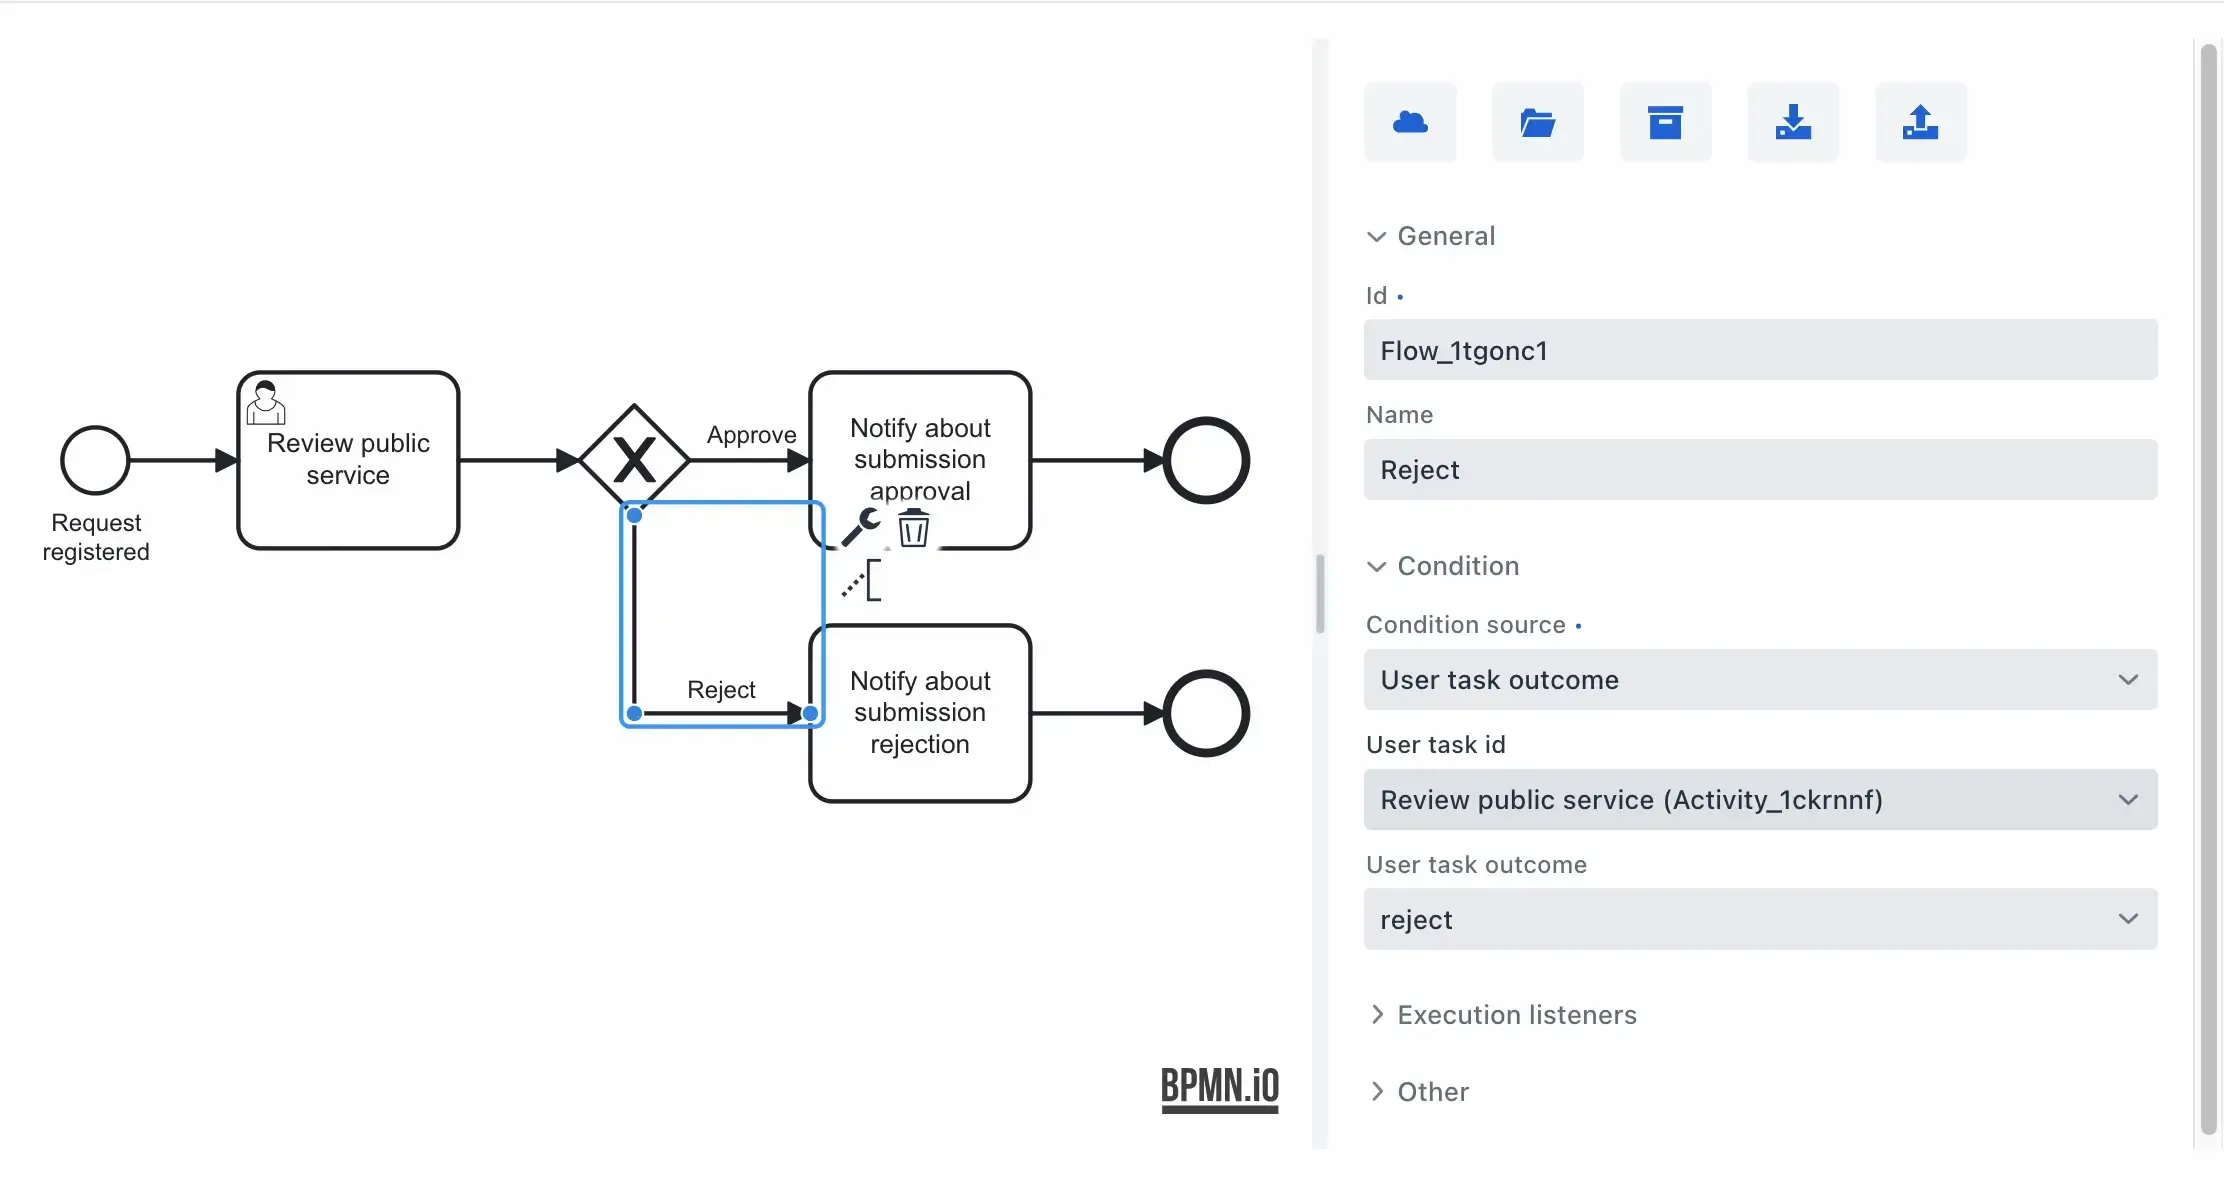
Set up the flow for rejecting submissions in a similar manner:
Tasks for sending notifications
To stay on track, sending notifications is not covered in this tutorial. However, to help you bring this functionality to your project, Jmix provides ready to use functionality for sending in-app notifications and emails.
End Events
No additional configuration is needed.
Deploy the Process
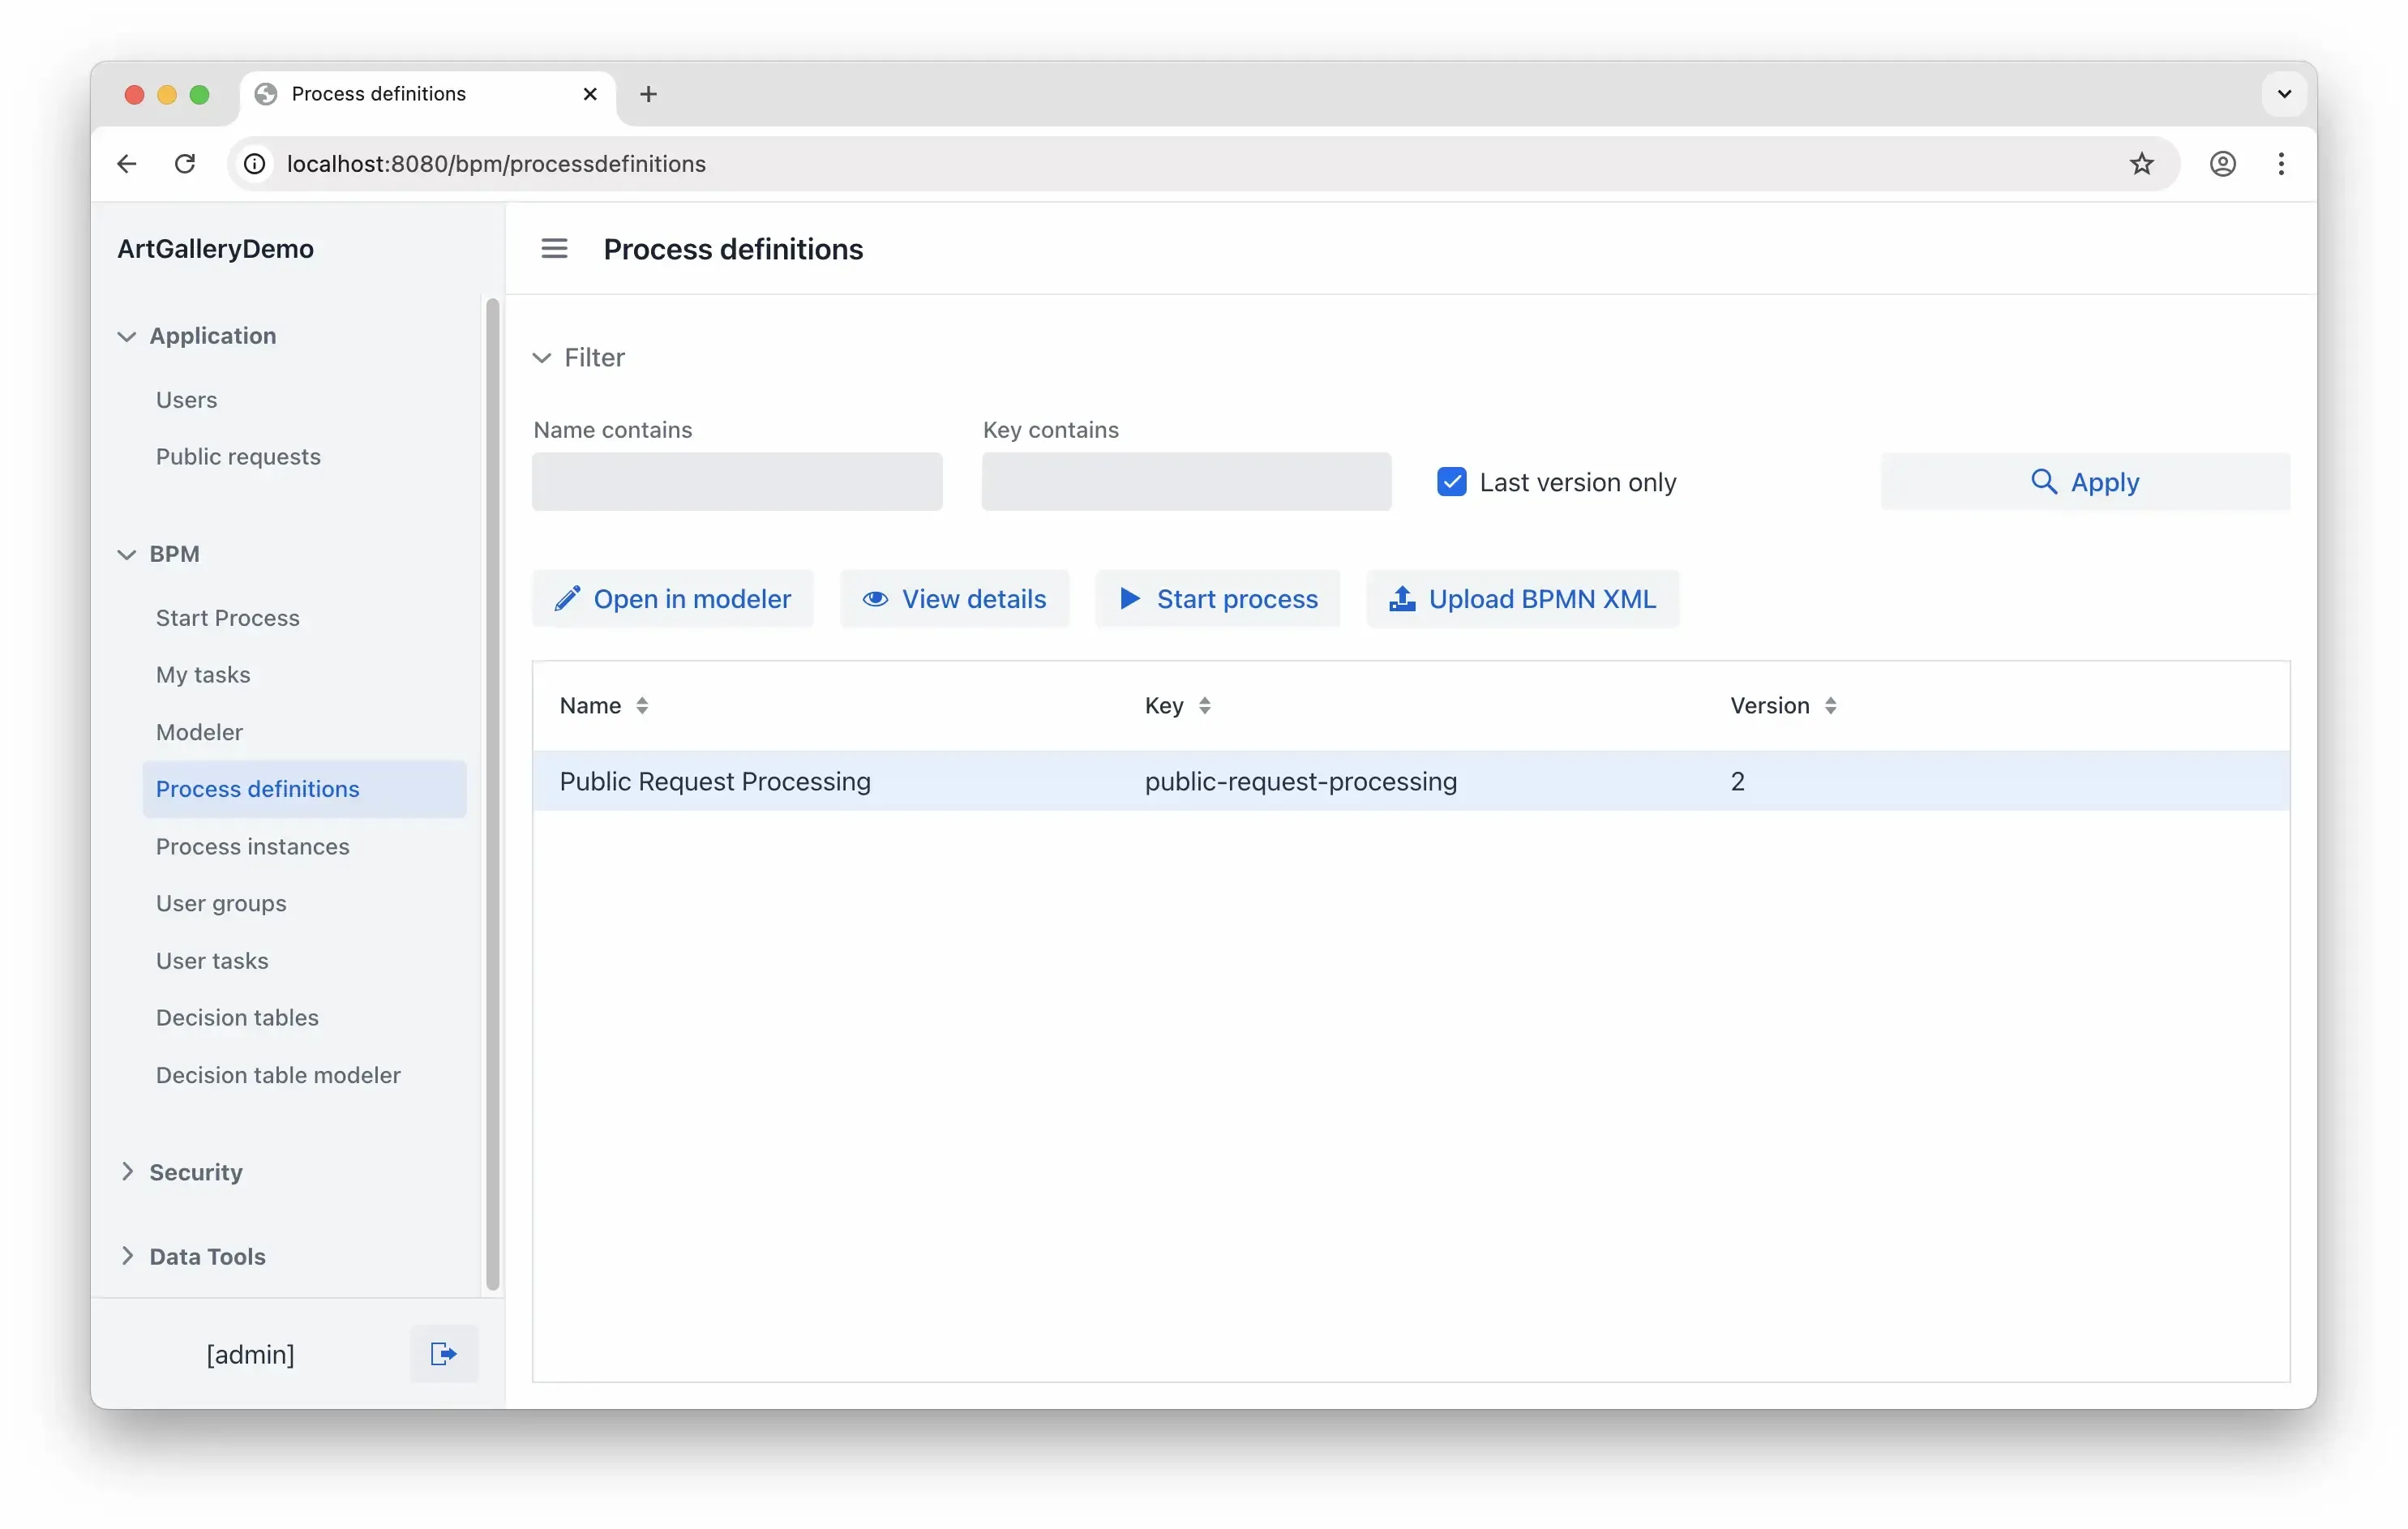
Once all the elements are configured, proceed to deploy the process. Click the Deploy Process button in the top right of the Modeler view.

To verify successful deployment, see if the process appears on the Process definitions view
This view provides the option to manually start the process, but let’s make an extra effort to do this automatically.
Autostart Process on New Submission
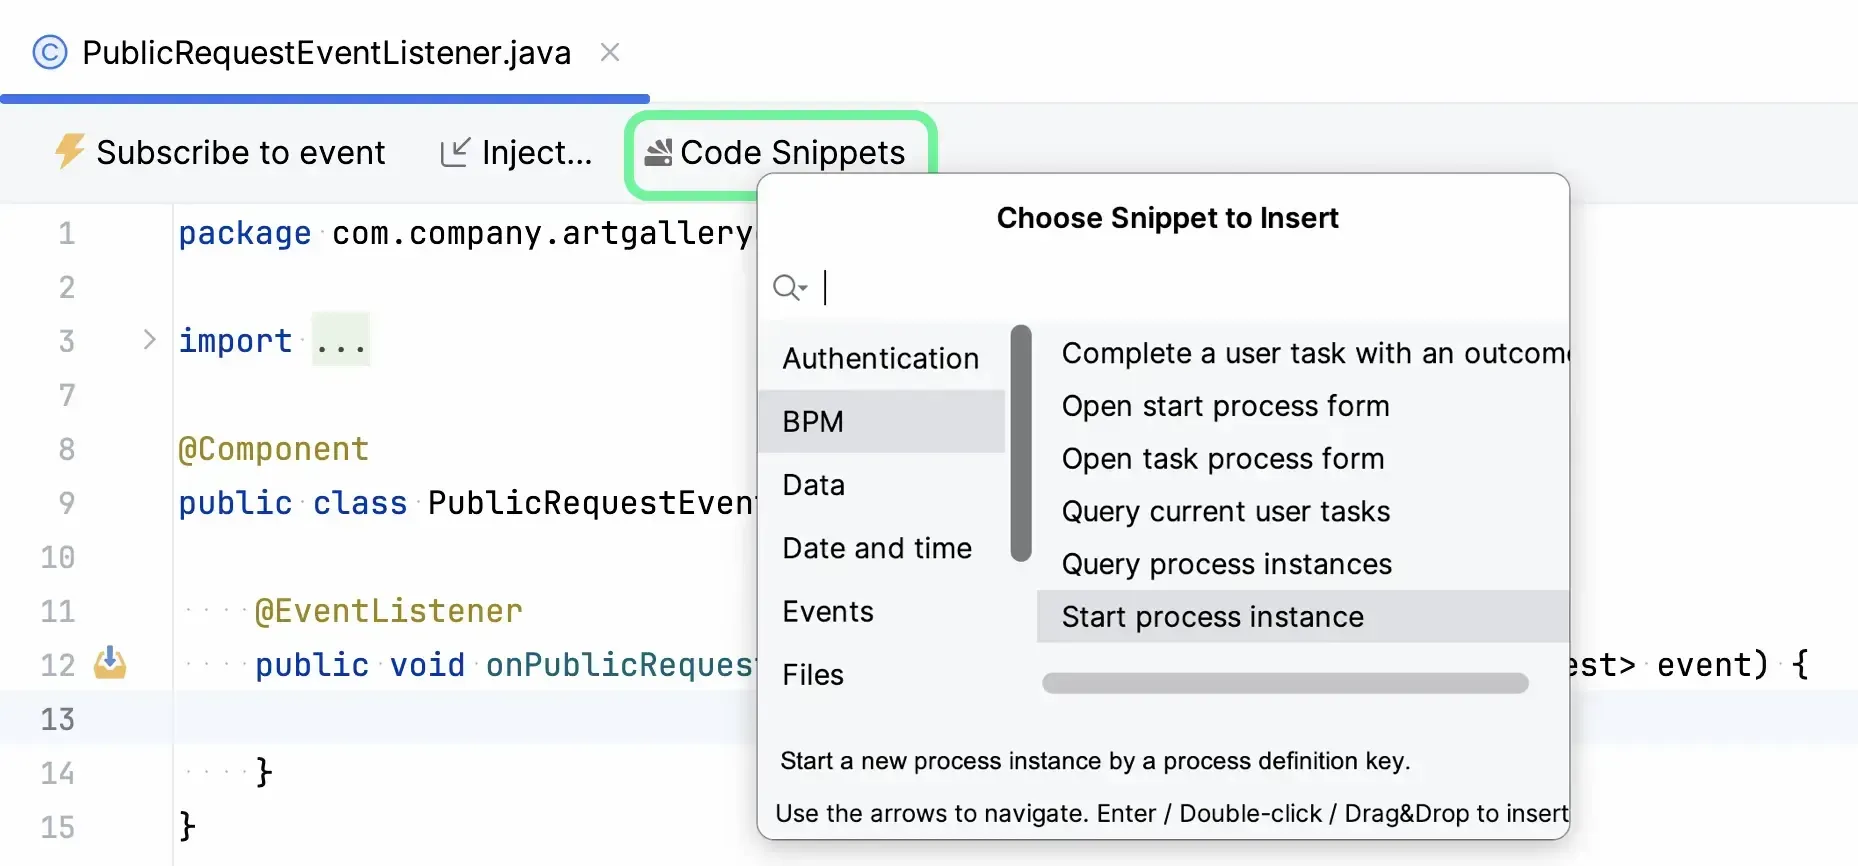
A process instance can automatically start when a new submission is saved. To set this up, add a listener for the EntitySavingEvent for the PublicRequest entity. Use the Event Listener tool in the Entity Designer to generate it:

Jmix Studio will generate a Spring Bean for you. After that, include the logic to initiate a new process instance for incoming requests. The code is as follows:
@Component

public class PublicRequestEventListener {


    private final RuntimeService runtimeService;


    public PublicRequestEventListener(RuntimeService runtimeService) {

        this.runtimeService = runtimeService;

    }

    @EventListener

    public void onPublicRequestSaving(final EntitySavingEvent<PublicRequest> event) {

        if (event.isNewEntity()) {

            Map<String, Object> variables = new HashMap<>();

            PublicRequest publicRequest = event.getEntity();

            variables.put("publicRequest", publicRequest);

String businessKey = publicRequest.getName() + " " + publicRequest.getEmail();

            ProcessInstance processInstance = runtimeService.startProcessInstanceByKey("public-request-processing", businessKey, variables);

        }

    }

}
Running the Process
It’s time to see the process in action start to finish. Just make sure to restart the application and the process is deployed – it must appear on the Process definitions view. Then ready, follow the steps.
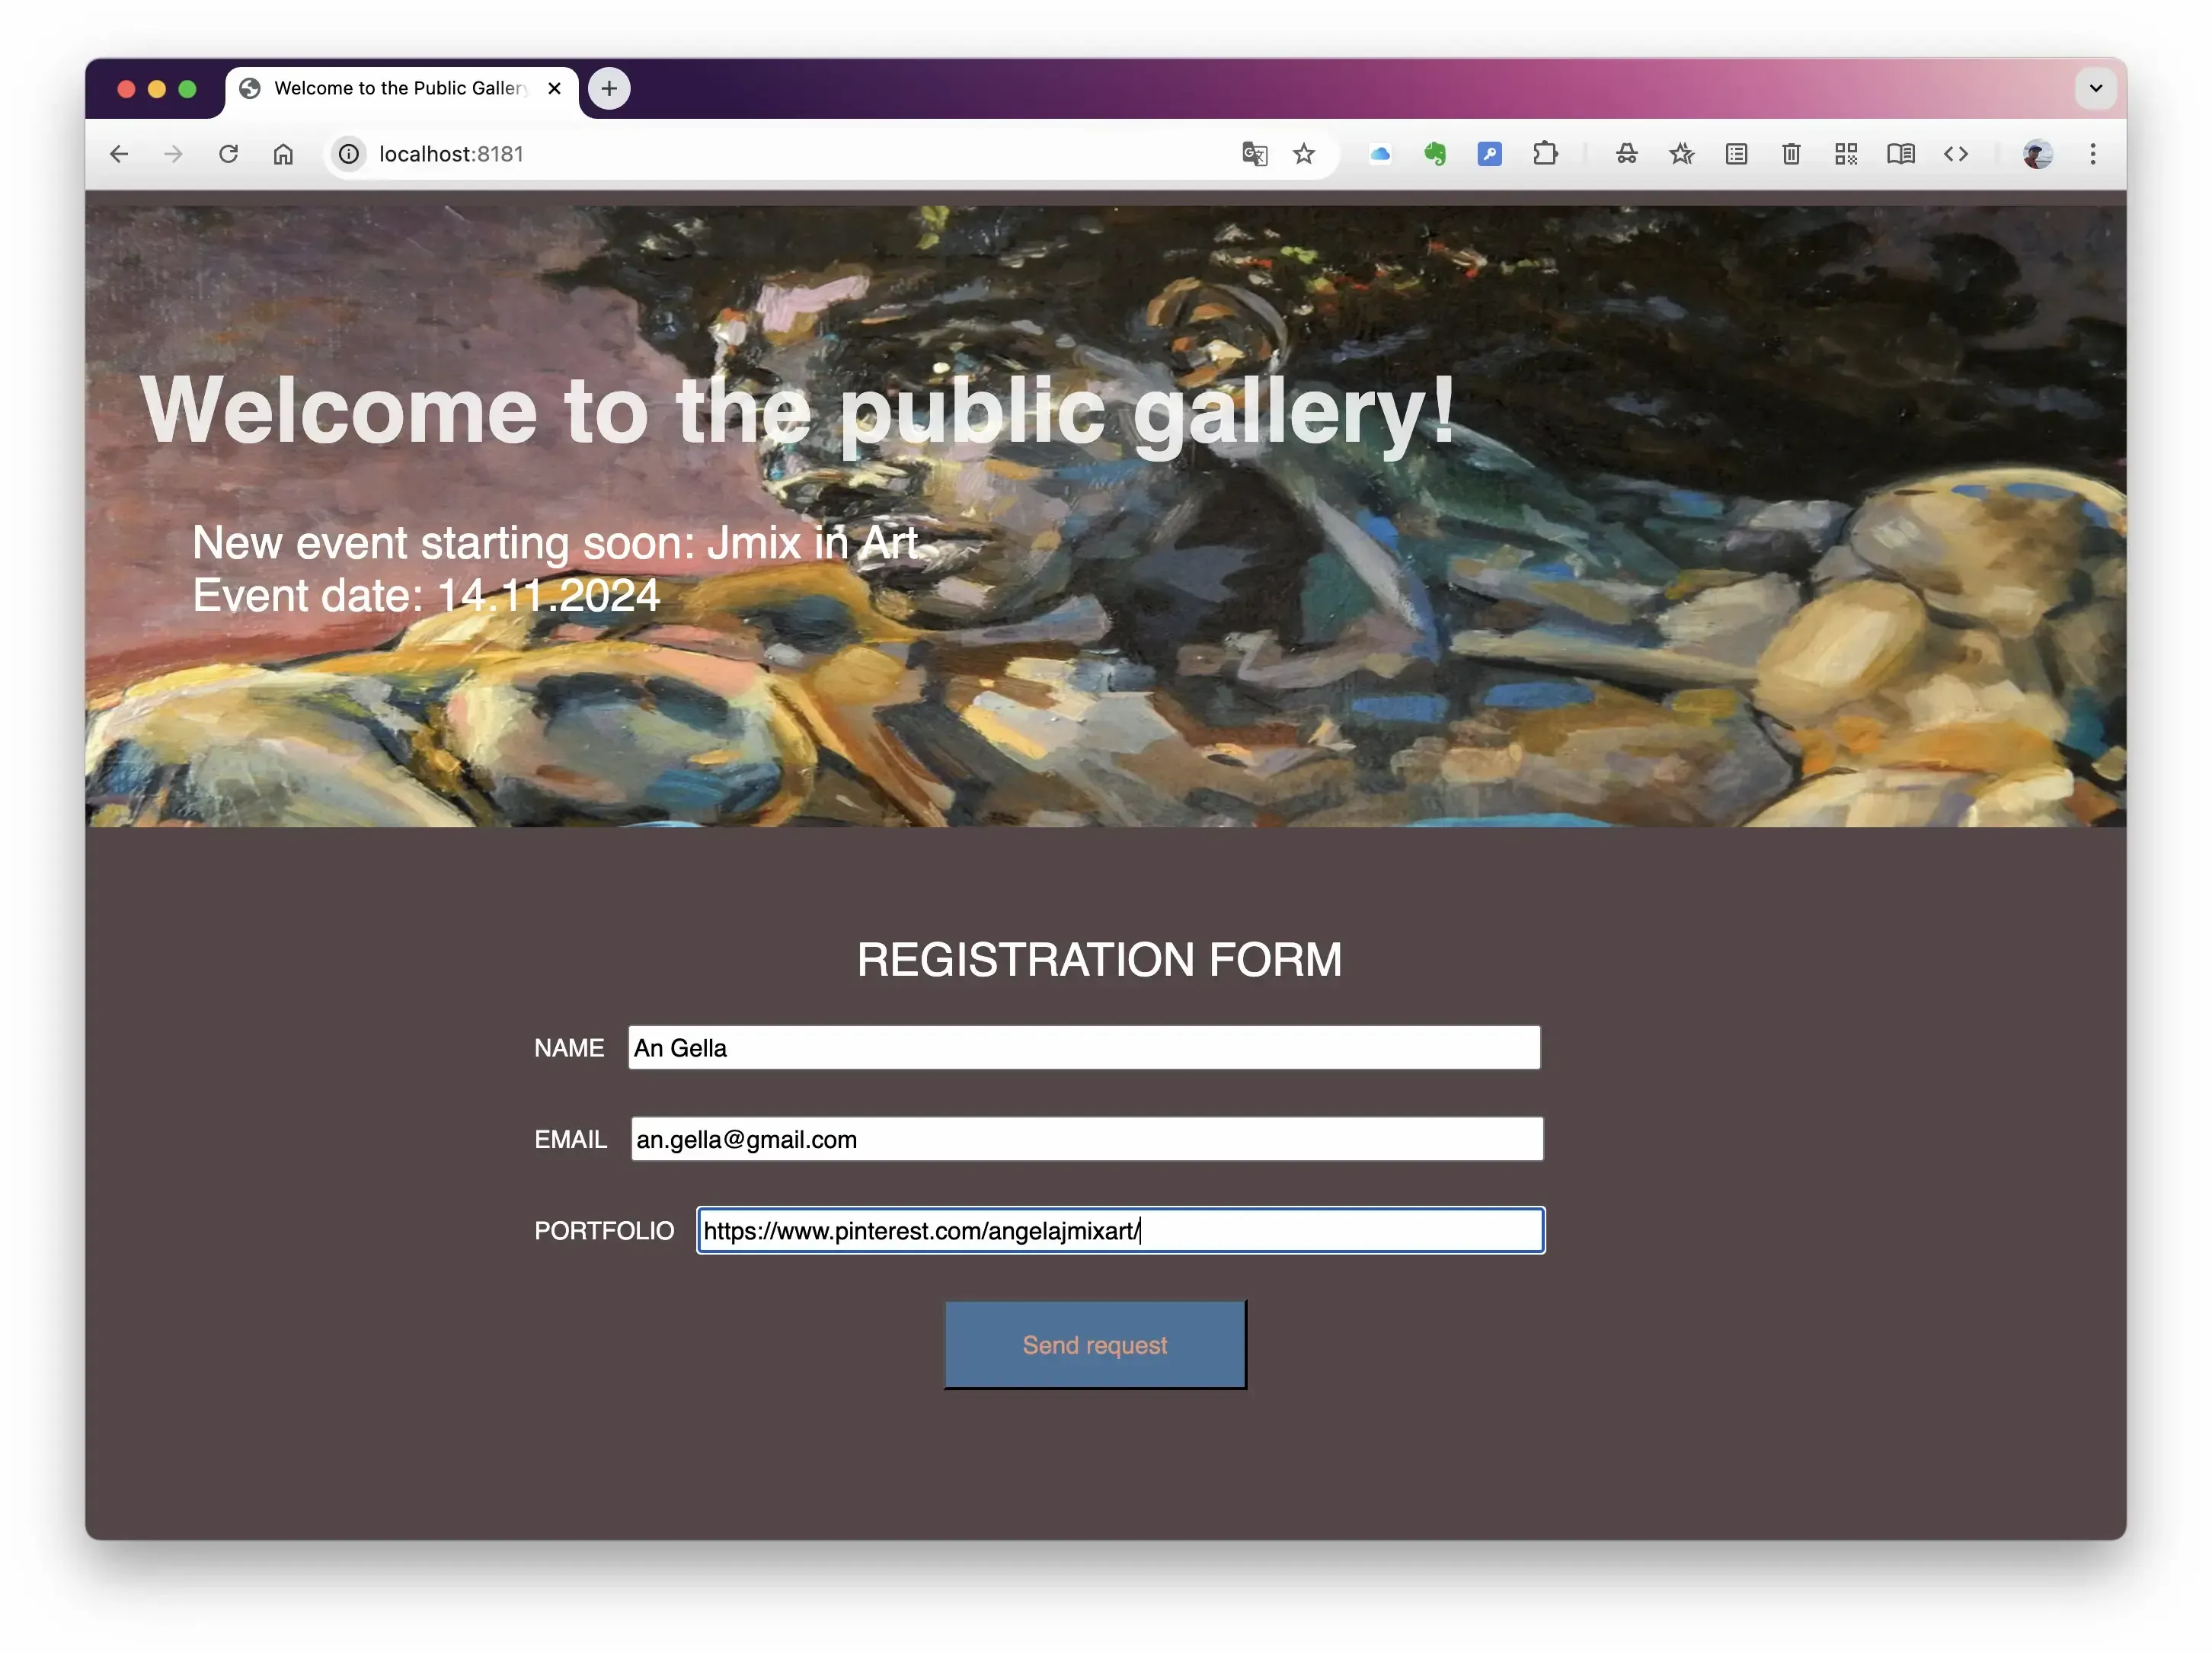
Step 1: Submitting a request
Open the registration form in your browser and enter the details for the imaginary artist. I’m using An Gella as my example. Then, click the Send Request button.
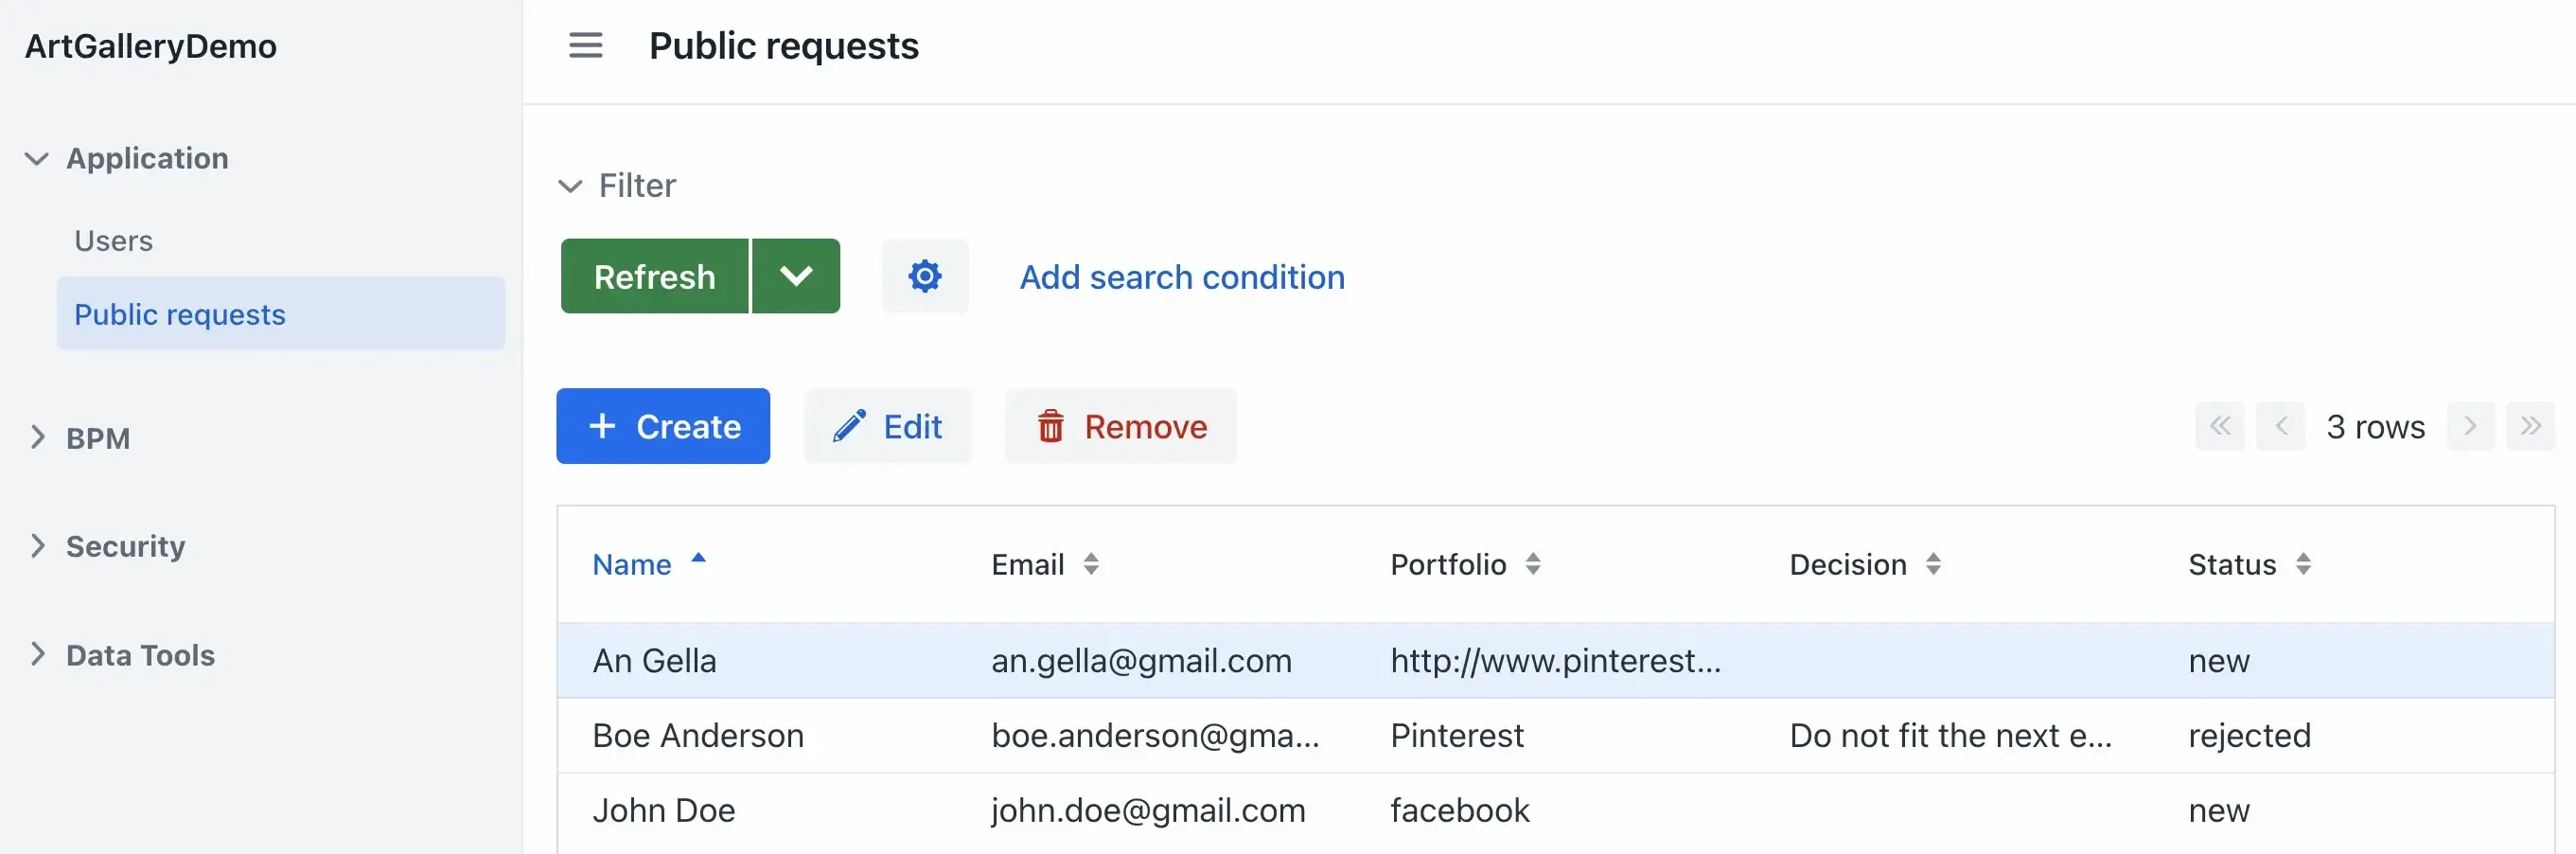
Step 2: Request saved
In the Jmix application, go to Public requests and see if An Gella’s request is on the list. This is also to confirm that the data is saved to the database.
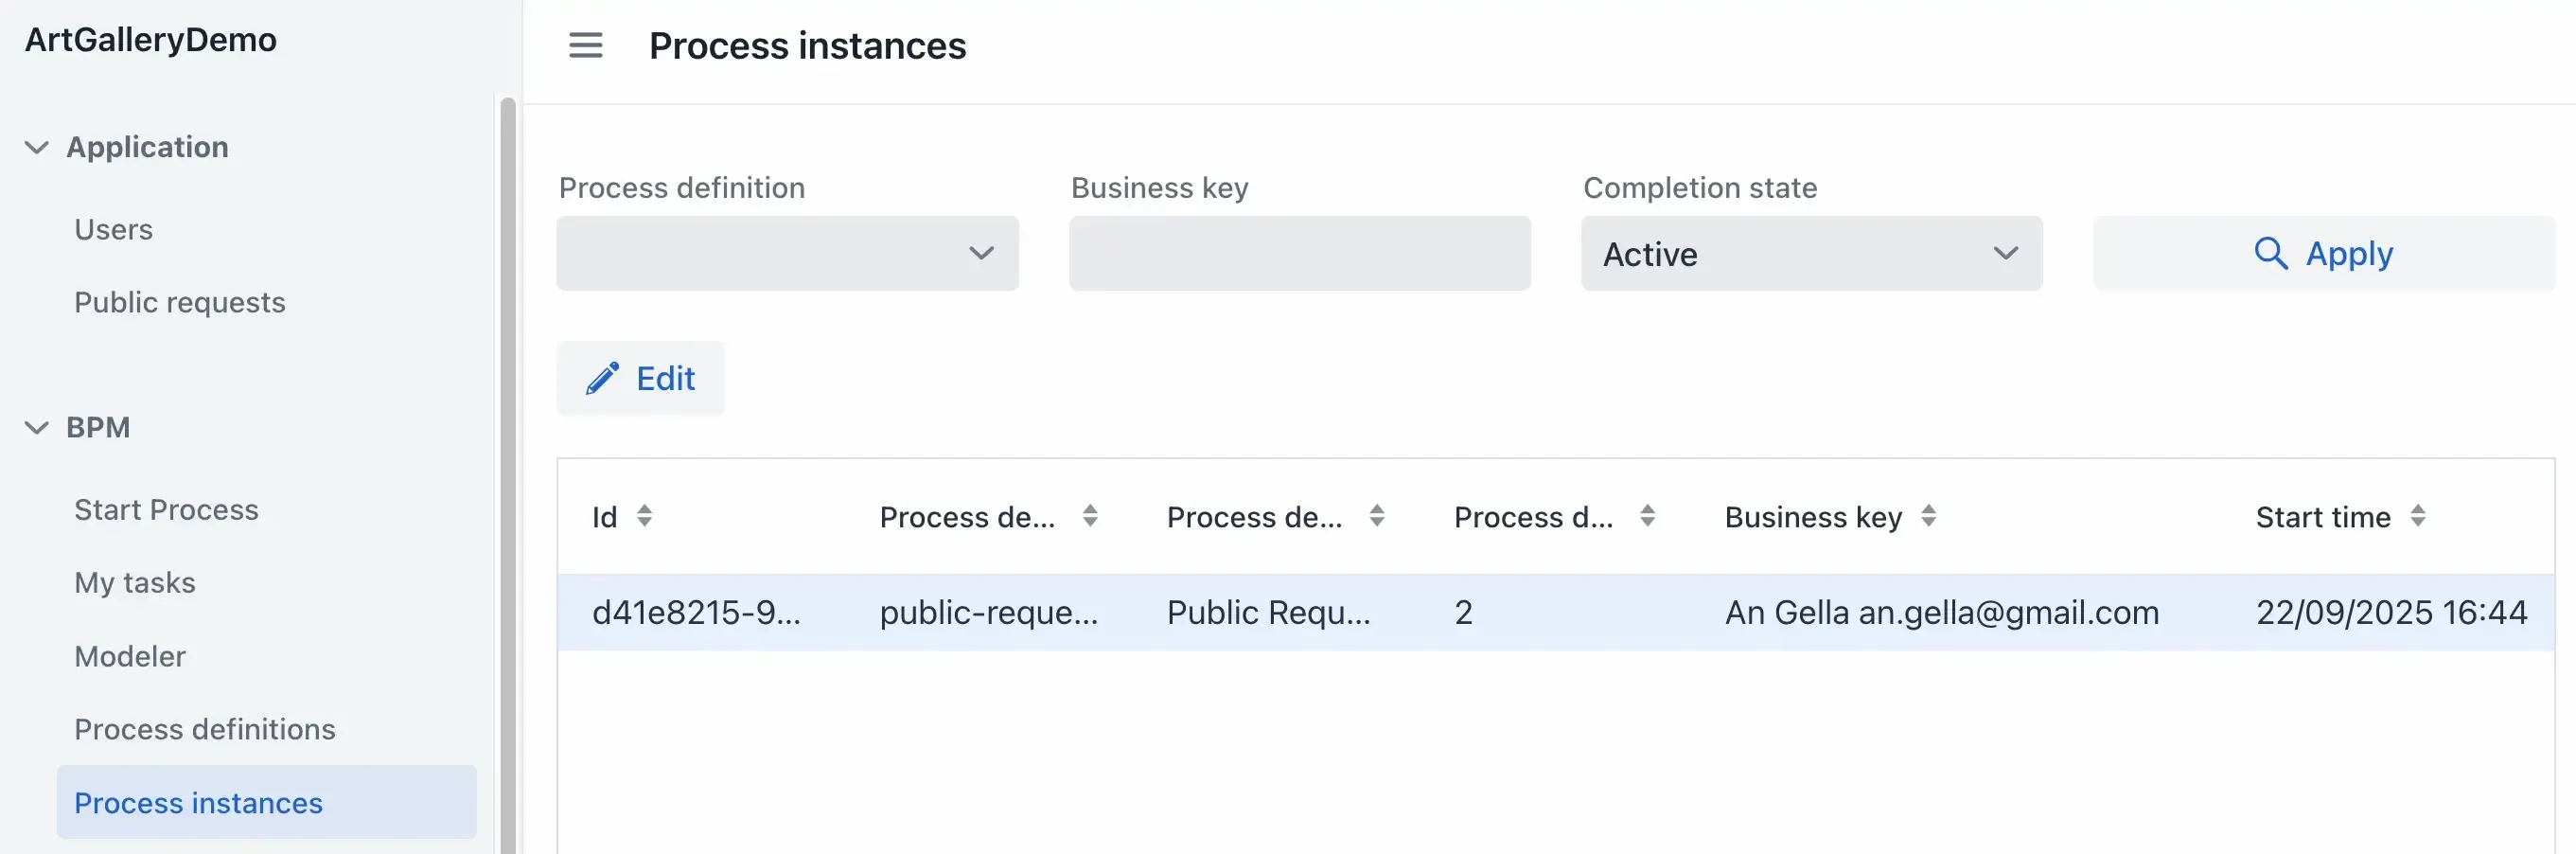
Step 3: Process instance starts
A process instance should have started as well. Go to the Process Instances view and filter for processes with the Completion state set to active. You should see the new process instance created to review An Gella’s submission.
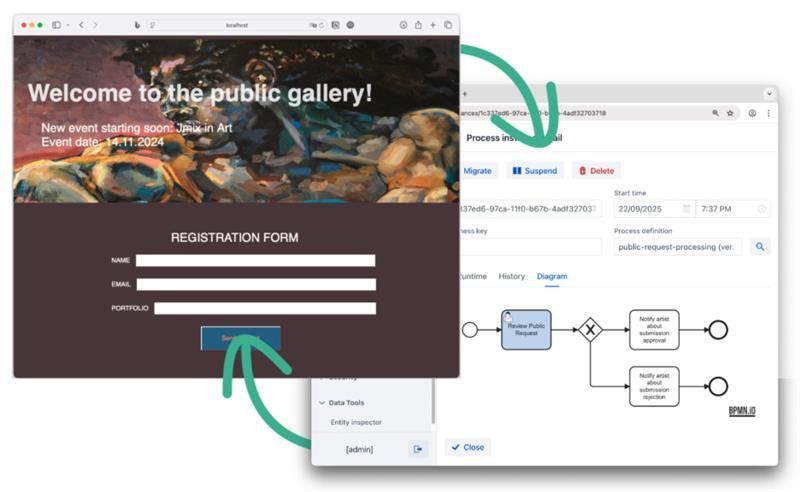
Double-click on this instance to learn more. In the view that opens, switch to the Diagram tab to check the process state.
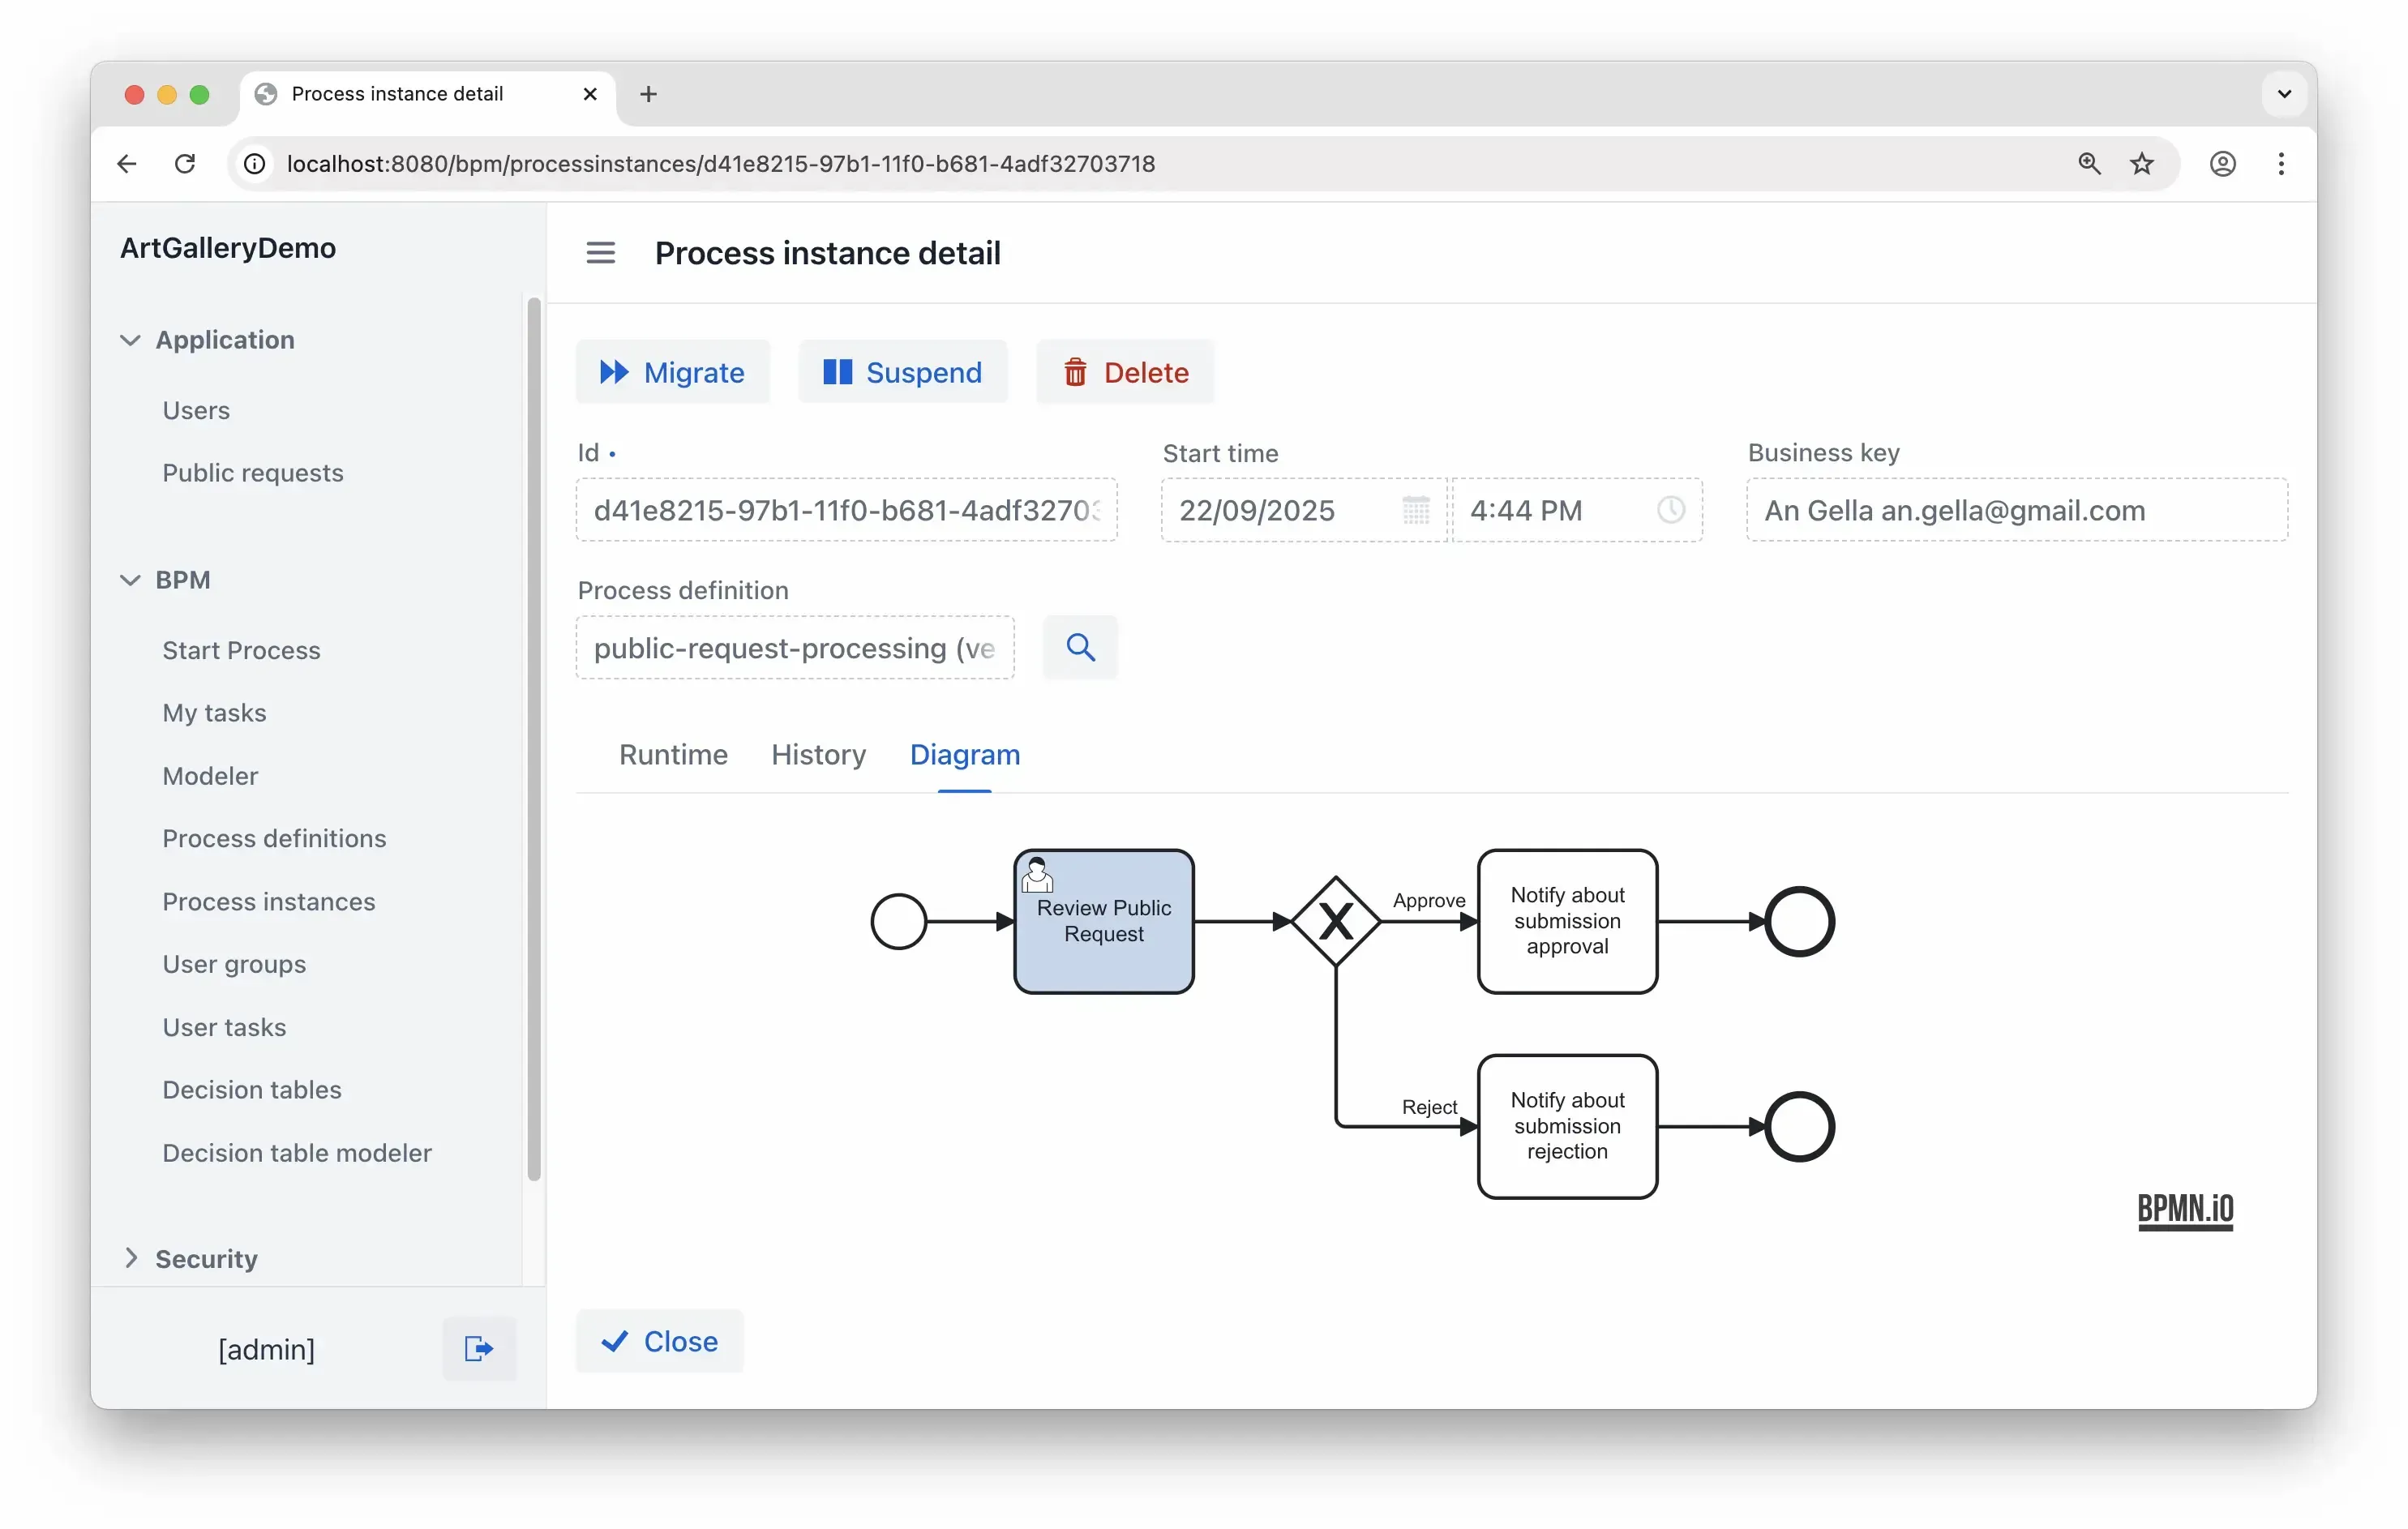
The highlighted element shows that the submission is now under review.
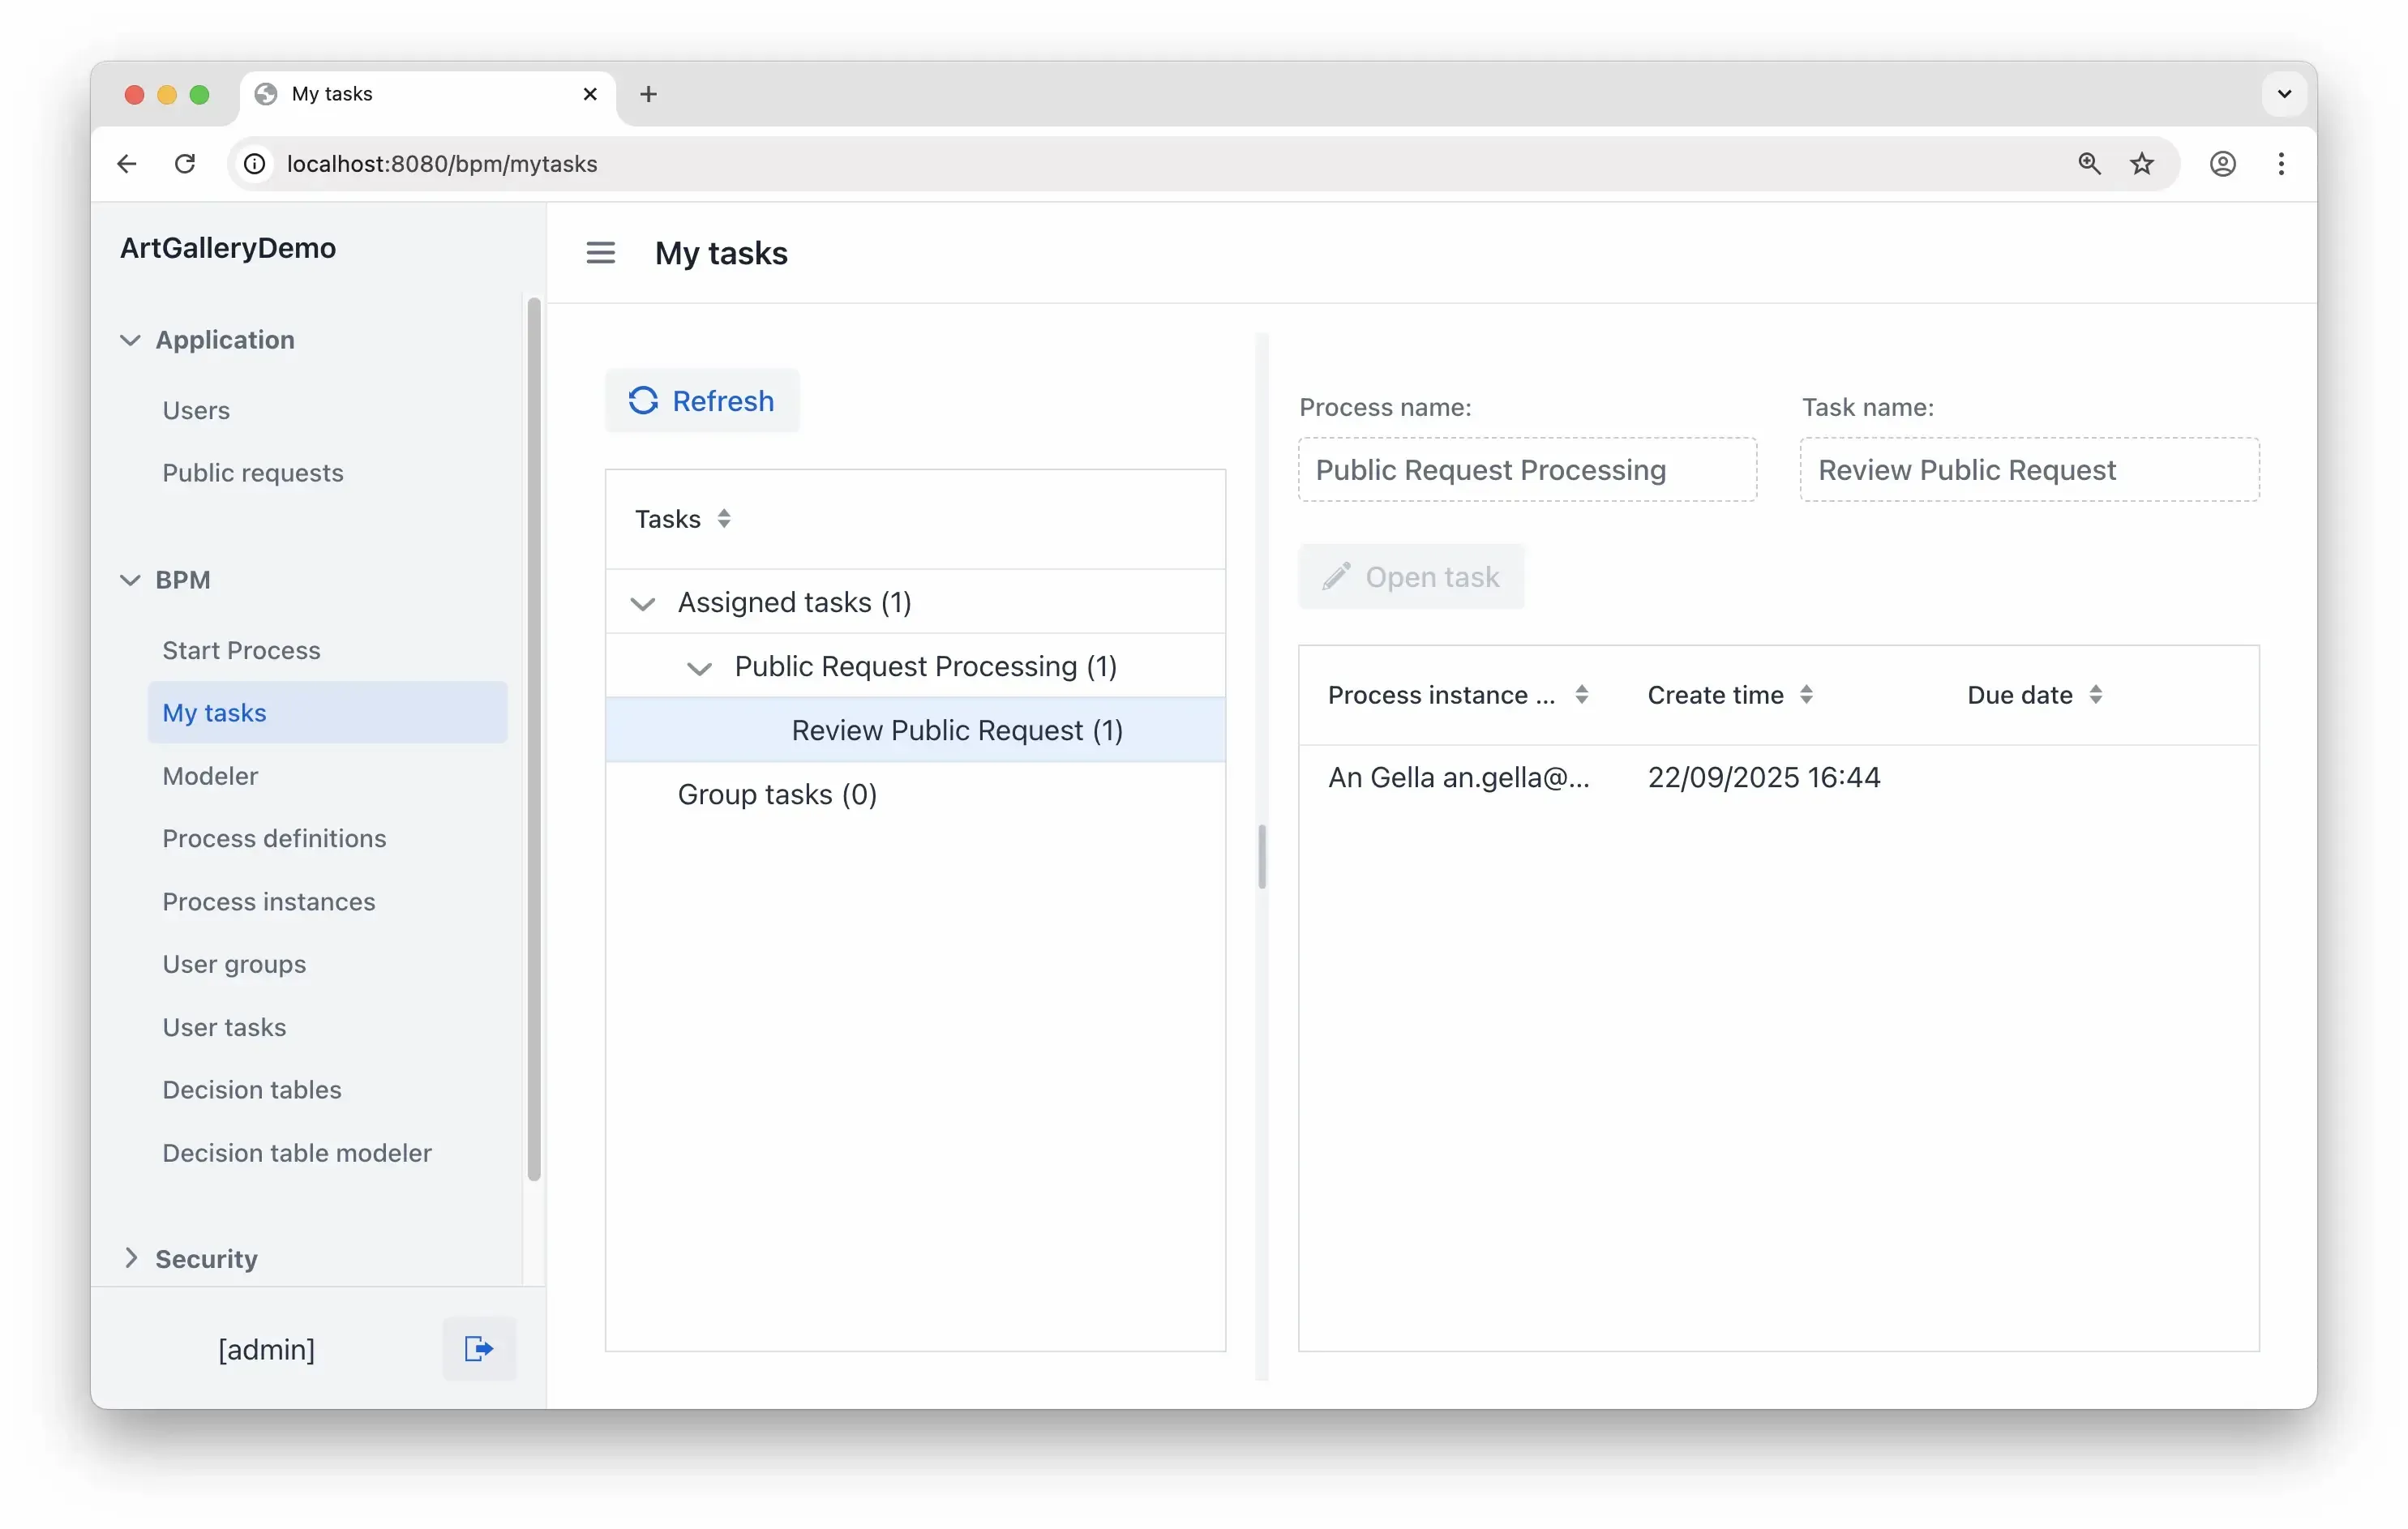
Step 4: User receives a task
To keep it simple, we assigned admin to do the review, as the only user of the app. Take a look at My Tasks to see if it has been received.
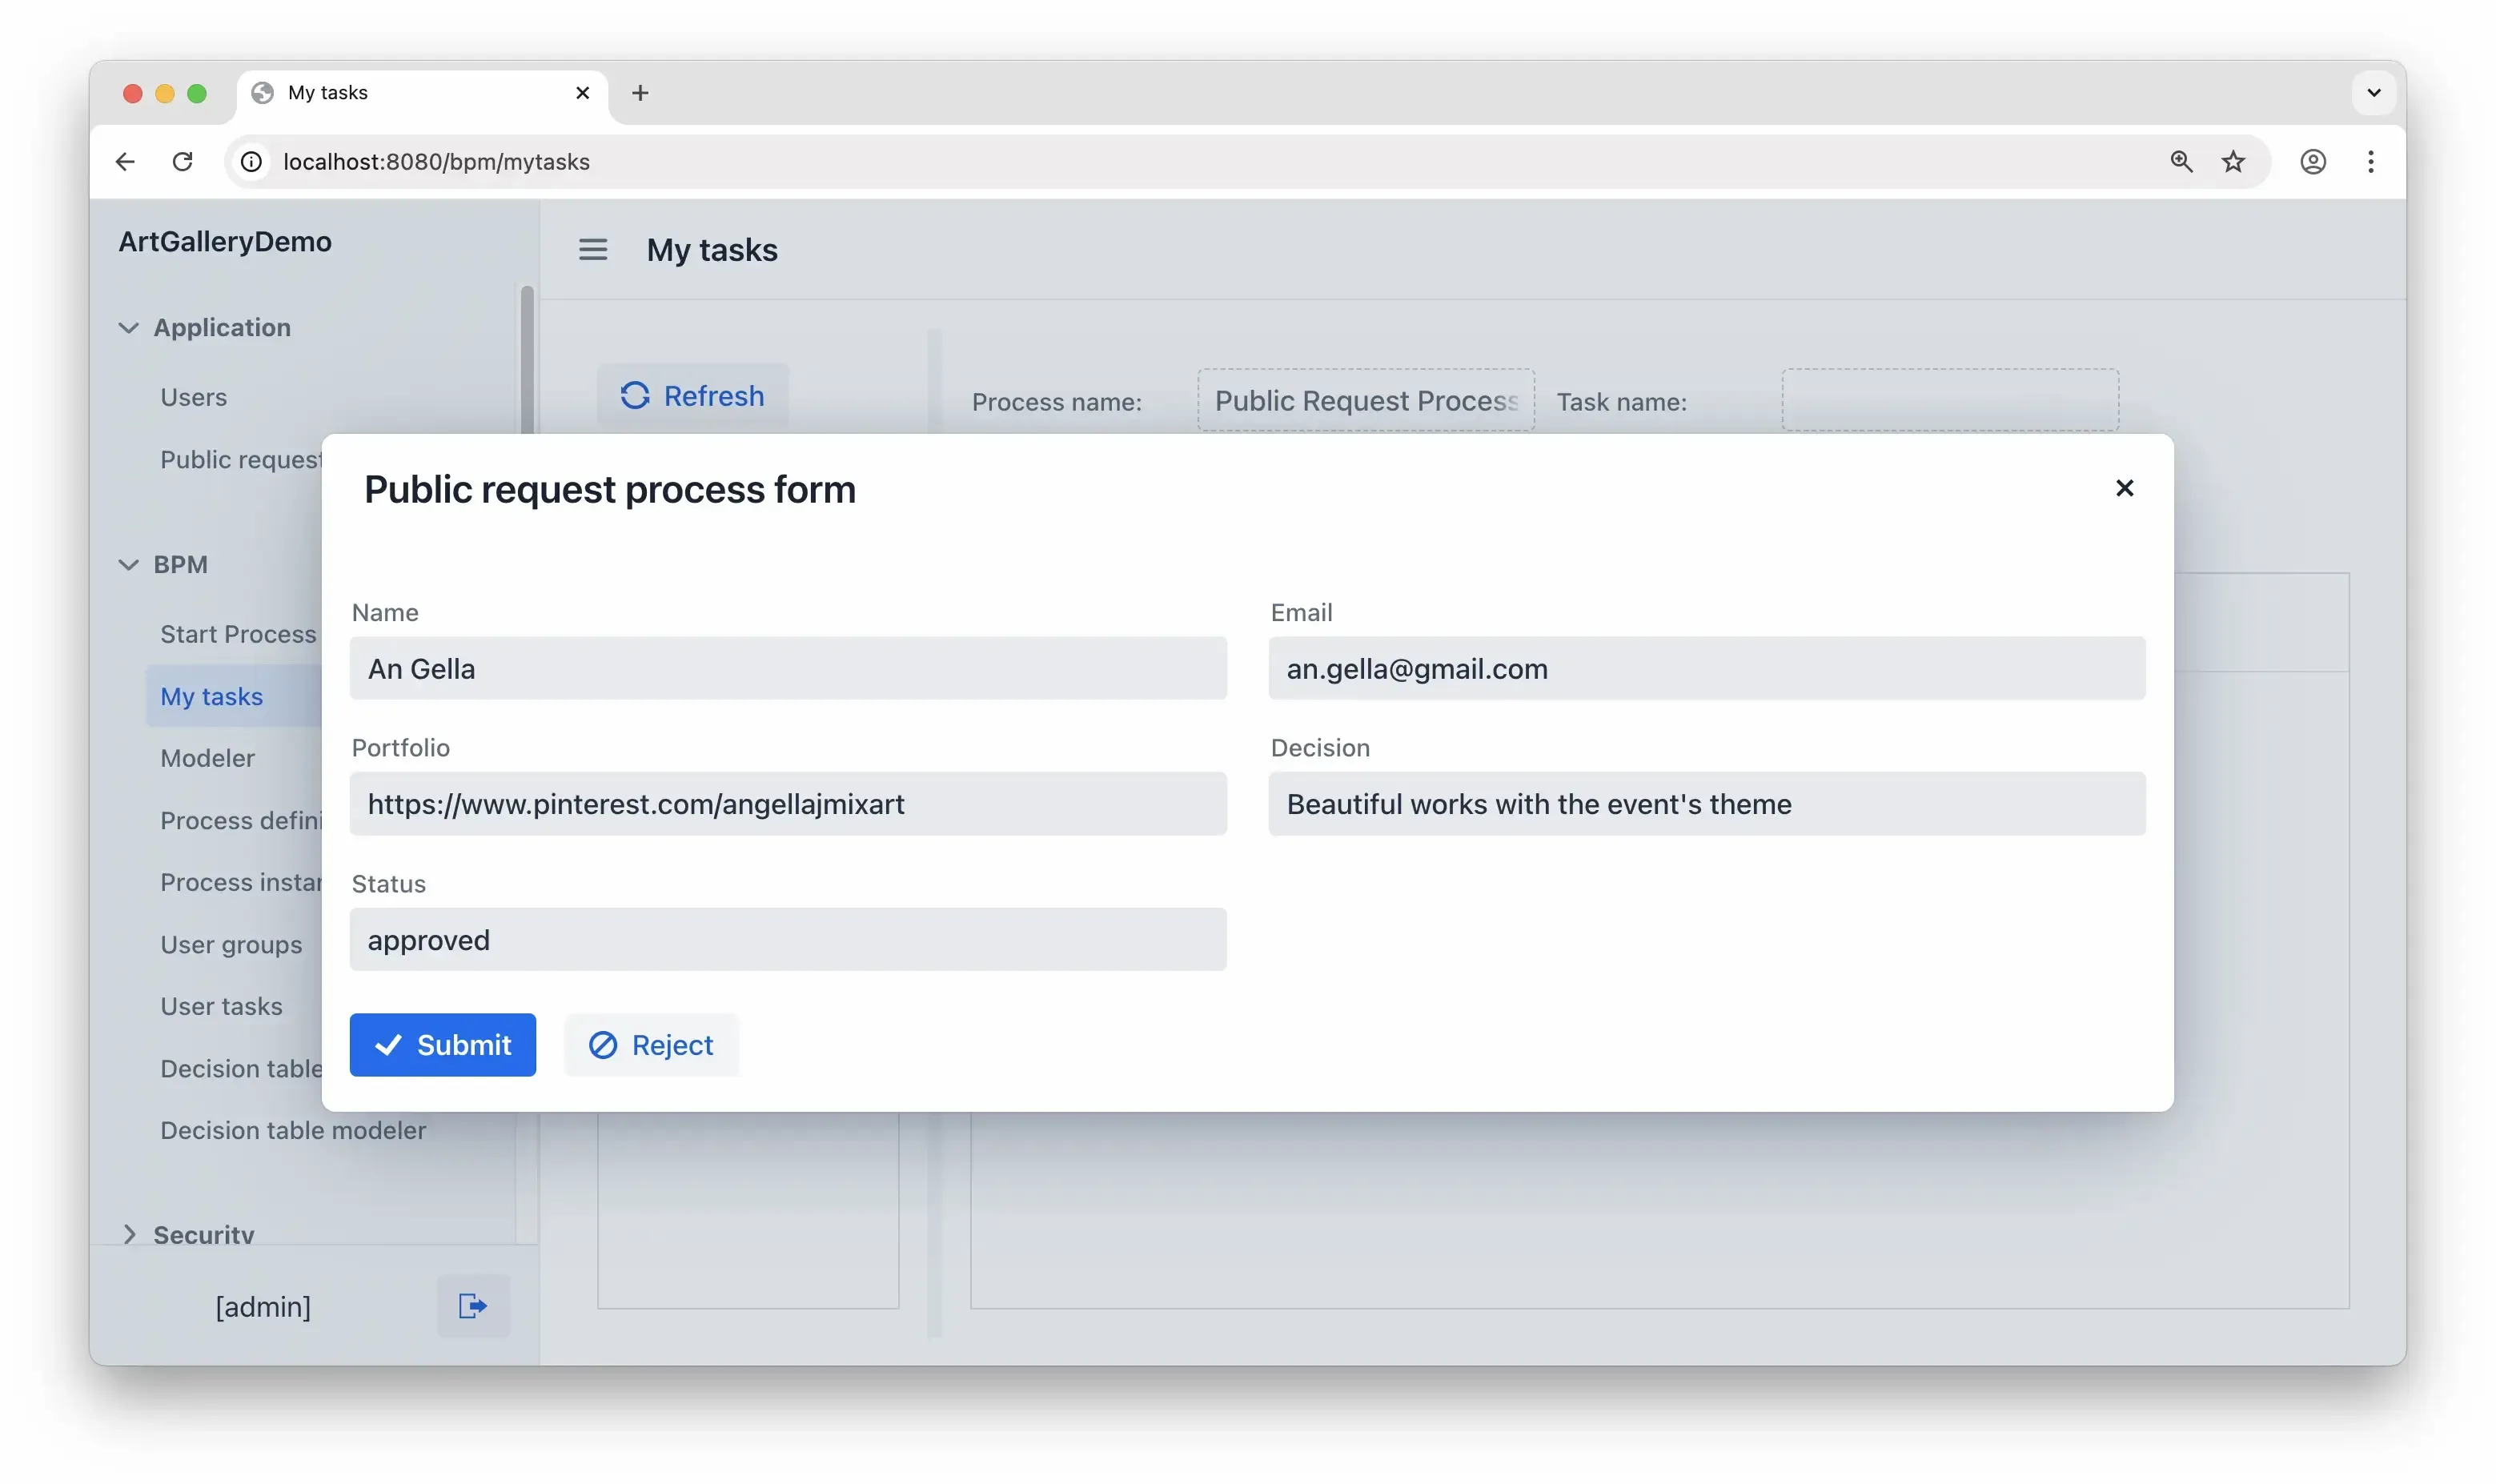
Step 5: Making decision
As you open the task, you’ll see the artist's contact details along with the information they decided to share. Once you’ve reviewed it, you can leave a short comment and change the status. Clicking one of the buttons sends the application along one of the paths: approval or rejection.
Step 6: Process complete
The process is now complete given the notification part was left unconfigured for this tutorial. But even if it was set up, it wouldn’t necessarily require user input, as automation is possible for most tasks in BPM.
Conclusion
Let’s take a moment to go over the key points. So far, we have:
- Created a website with GrapesJS tool for receiving incoming requests
- Deployed the website to NGINX webserver
- Created a backoffice Jmix application for processing requests
- Created a REST controller
- Implemented a service that stores the data
- Designed and integrated a business process
This tutorial may present a simplified scenario but lays a solid foundation for your future projects. With some dedication you can evolve it into a production-ready application in just a few weeks!
If you have any questions, feel free to start a topic in the community forum, send us a message in the Slack channel, or chat with the Jmix AI Assistant. Keep going!
Useful links
- The video version of the tutorial, in case you prefer watching and listening to reading.
- GrapesJS, an open-source, multi-purpose, Web Builder Framework to build HTML templates without any coding knowledge.
- How to use the NGINX Docker official image
- Jmix BPM Docs – all you need to build a process-driven web application powered by an open-source Flowable BPM engine with Jmix.
- Jmix REST API Docs – a generic REST API that allows you to work with data, business services, and files without REST controllers’ boilerplate code.