Introduction to Working with Data in CUBA
This guide walks you through the CUBA APIs for programmatically interacting with the database through the DataManager API.
What we are going to build
This guide enhances the CUBA petclinic example to show different use cases regarding programmatic data access with the DataManager API. In particular, the following use cases will be covered:
-
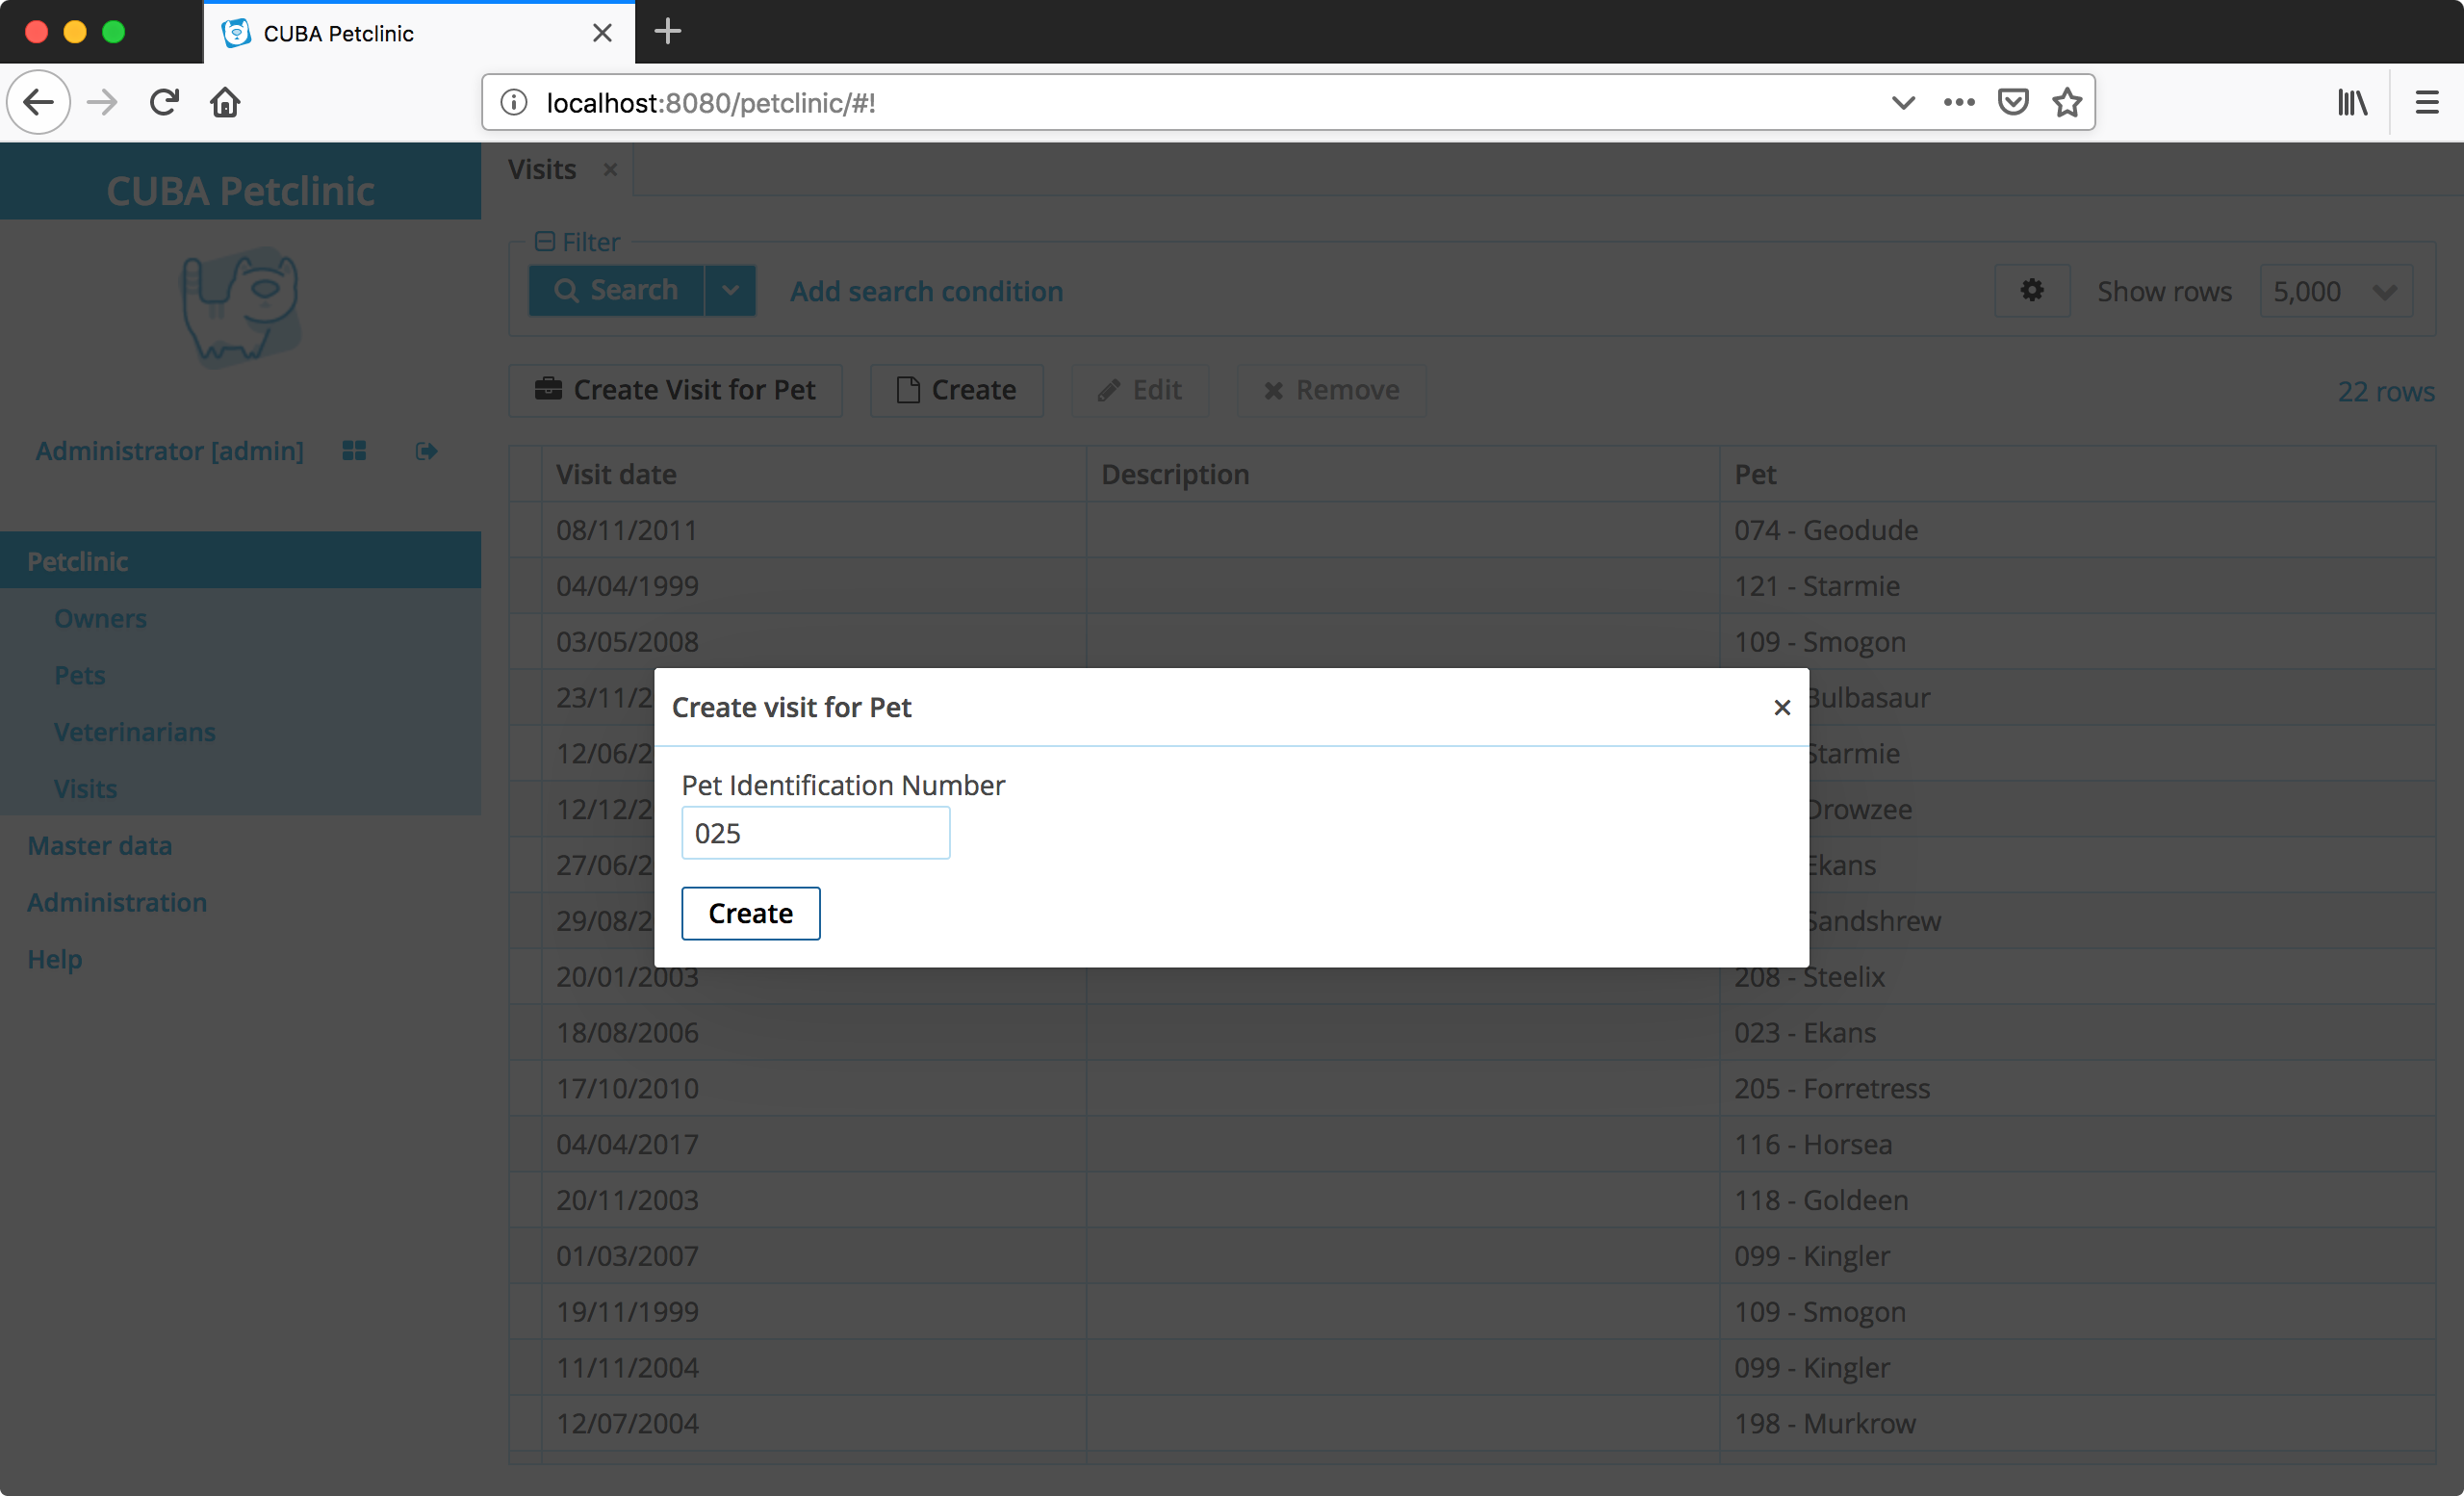
automatic creation of a Visit for a given Pet Identification Number
-
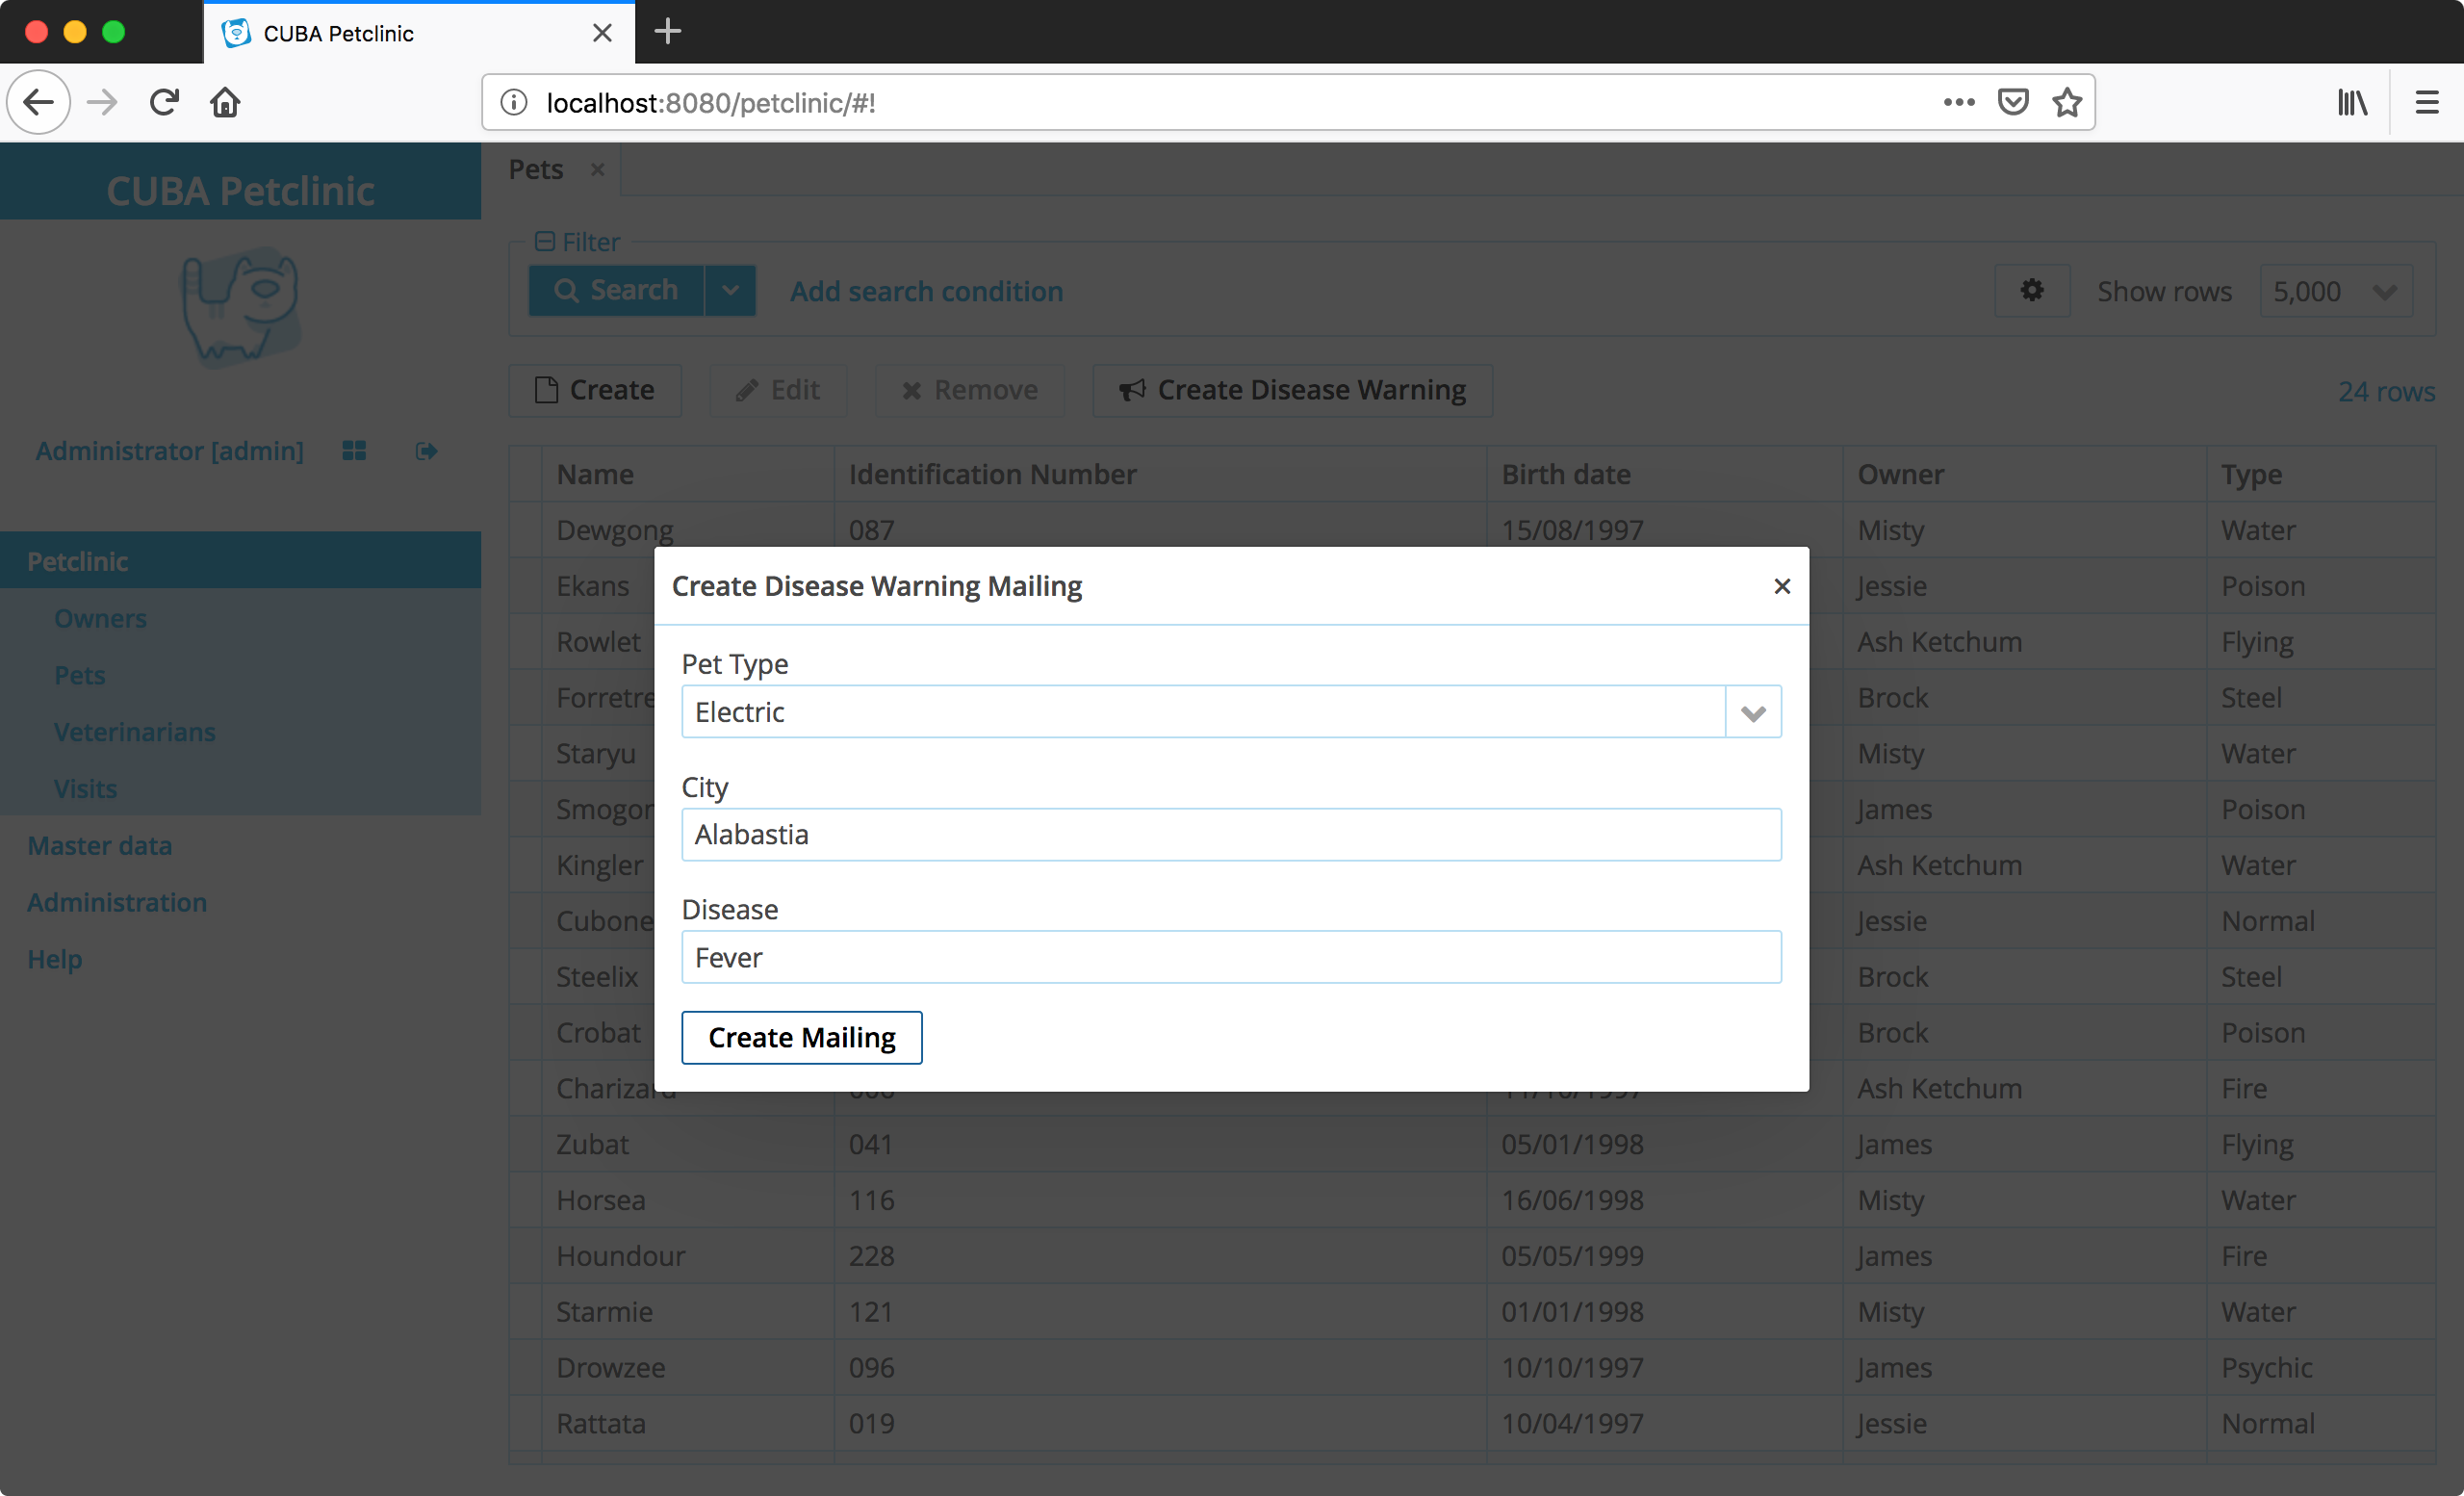
automatic "Disease Warning Mailing" for endangered pets

Requirements
Your development environment requires to contain the following:
-
CUBA Studio as standalone IDE or as an IntelliJ IDEA plugin
Download and unzip the source repository for this guide, or clone it using git:
Example: CUBA petclinic
The project that is the basis for this example is CUBA Petclinic. It is based on the commonly known Spring Petclinic. The CUBA Petclinic application deals with the domain of a Pet clinic and the associated business workflows to manage a pet clinic.
The underlying domain model for the application looks like this:
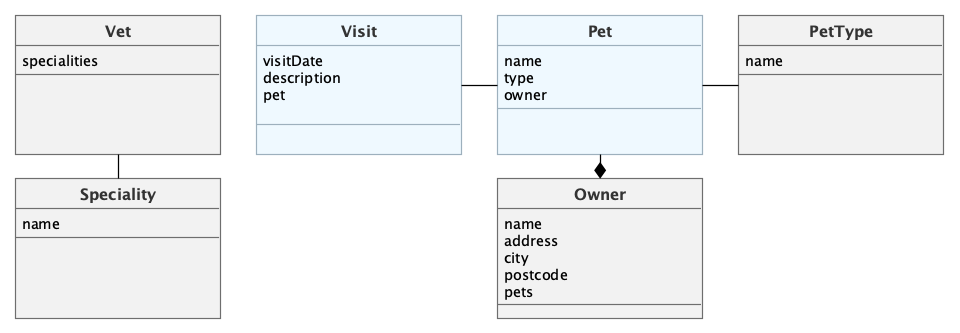
The main entities are Pet and Visit. A Pet is visiting the petclinic and during this Visit a Vet is taking care of it. A Pet belongs to an Owner, which can hold multiple pets. The visit describes the act of a pet visiting the clinic with the help of its owner.
Programmatic Data Access Interactions
Oftentimes it is necessary to interact with the database in a programmatic manner. In a CUBA based application, these cases are not as omnipresent as in other frameworks due to its declarative nature of data-binding for UIs, but still, there are a lot of cases where data has to be loaded from the database or stored in the database as part of a business process.
The main interaction point that CUBA provides is the DataManager API. This API allows the developer of a CUBA application to load and store data in the database through the general abstraction of entities.
DataManager is an Abstraction on top of the Java Persistence API (JPA). It hides away certain details that are not required on a day-to-day basis.
It also adds certain capabilities that are not available out-of-the-box in JPA. Those capabilities are mainly the Views concept as well as the application of security constraints. More information about differences between JPA and DataManager can be found in the docs on DataManager vs. EntityManager.
Load Data with Datamanager
DataManager has multiple ways to load data from the database. In this guide, the two main options are covered: load a single item as well as multiple items based on Queries.
Single Item
The first option is to load a single Entity instance from the database. This option is often required if reference data needs to be read from the database in order to execute some logic for that entity instance or with the help of that entity instance.
In the case of the Petclinic example, there is some business logic which should create a new Visit for a given Pet by its Identification Number.
The source code that loads the Pet instance by its Identification Number is located in VisitServiceBean.java in the example application. The usage of the DataManager API looks like this:
@Inject
private DataManager dataManager;

/**
 * loads a Pet by its Identification Number
 *
 * @param identificationNumber the Identification Number to load
 * @return the Pet for the given Identification Number if found
 */
private Optional<Pet> loadPetByIdentificationNumber(String identificationNumber) {
    return dataManager.load(Pet.class)
            .query("select e from petclinic$Pet e where e.identificationNumber = :identificationNumber")
            .parameter("identificationNumber", identificationNumber)
            .optional();
}
DataManager has a fluent API which allows chaining operations on the load operation in order to define parameters to the execution. In this case, the interaction starts with dataManager.load(Pet.class). Then the JPQL query is defined, and the associated parameters are configured with the parameter values.
The optional() method executes the load operation and fetches exactly one item that matches the criteria. If there are no results the corresponding result is Optional.empty().
Alternatively it is possible to use one() instead of optional(). In this case the Pet instance is returned directly. But in case no result is found the method throws an IllegalStateException.
It is up to the application developer to decide if the query can return one or possibly multiple results. In this case, it is only possible to create an Identification Number once, we can be sure that the query will return at most one item.
In this case, the attribute identificationNumber is not the primary key of the entity. But it represents a globally unique identification number given by proper Pet authorities - therefore it is modeled uniquely within the application.
If the task is to load a Pet by its primary key (id) the query is easier to create as the query part is not needed: dataManager.load(Pet.class).id(id).optional();
Multiple Items by Query
The next very common option is to load multiple items defined by a query.
The Petclinic application has the capability to let the user send out Disease Warning Mailings. The user has to define the location of a known disease as well as the type of Pet that is endangered by this disease. The system will find all endangered Pets and send out a Mailing to the owners.
The part which finds the endangered Pets looks like this with the use of the DataManager API:
@Inject
private DataManager dataManager;

private List<Pet> findEndangeredPets(PetType petType, String city) {
    return dataManager.load(Pet.class)
            .query("select e from petclinic$Pet e where e.owner.city = :ownerCity and e.type.id = :petType")
            .parameter("ownerCity", city)
            .parameter("petType", petType)
            .view("pet-with-owner-and-type")
            .list();
}
The query part is a little more complicated compared to above, but the same pattern applies. The differences in this example are the usage of the list() method as we expect multiple Pets from the database query. Also, a specific view has been used, because not only the Pet data but also the Owner data has to be loaded in order to send out the Mailings.
the query methods also supports different shortcut variants for defining the JPQL query like query("e.owner.city = ?1", ownerCity). More information on the shortcuts can be found in the docs.
|
Write Data with DataManager
DataManager is also responsible for writing data into the database. There are also different ways to achieve it based on the case at hand.
Single Item
The first most commonly used case is to update or create a single item in the database. There are no major differences between creating and updating an entity from the usage perspective.
When revisiting the example from above, where a new Visit for a given Pet ID is created, we only looked at the part which loads the Pet by its Pet ID. In this case, we are more interested in the creation part of the Visit entity. The source code to create and save a Visit looks like this:
@Inject
private DataManager dataManager;

private Visit createVisitForPet(Pet pet) {

    Visit visit = dataManager.create(Visit.class); (1)

    visit.setPet(pet);
    visit.setVisitDate(timeSource.currentTimestamp());

    return dataManager.commit(visit); (2)

}| 1 | an entity instance is created with all initializations in memory |
| 2 | the entity instance is stored in the DB |
The creation of an instance through DataManager does the initialization of the instance as well. It is important not to create an instance via new Visit() but rather through this Factory method, so that CUBA can do all the required initialization (like @PostConstruct annotated methods e.g.).
Once the entity instance was created, the data of that entity has to be set through its corresponding setter methods. In this case, the database instance of the Pet is set as well as the current date as the visit date.
The process of storing an entity instance contains a few steps like security checks, execution of Entity Listeners and so on. The return value of the commit method is the stored instance with all the properties set that have been added during the storage phase.
| There is a couple of other convenience API methods for storing entites. For more information about those variants see the DataManager API reference. |
Transactions & Commit Context
The example from above shows how to store a single item in the database. Although this is oftentimes sufficient, a lot of cases require to store multiple items in a single transaction. The default example for this is the bank transfer from one account to another. In this case, it is crucial that the update of both accounts happens together or not at all, but never only one of them.
The DataManager API always encapsulates the database operation in a transaction. This means that by default the commit(visit) call is executed in one transaction. Another call to commit would create another transaction.
To execute updates on multiple entity instances there is the concept of a CommitContext. The commit context defines all entity instances that should get created / updated and removed. The DataManager accepts a CommitContext object as an alternative to an entity instance. In this case, all entity instances that are held by the commit context will get transferred to the database within one transaction.
The CommitContext has two main methods: addInstanceToCommit as well as addInstancesToRemove which allow defining which items should be added / updated as well as removed within one transaction.
In case multiple visits should be updated within one transaction, the usage of CommitContext looks like this:
@Inject
private DataManager dataManager;

private void createVisitForPet(Pet pet) {

    Visit todaysVisit = createVisitInstance(pet);
    todaysVisit.setVisitDate(today());

    Visit followUpCheckVisit = createVisitInstance(pet);
    followUpCheckVisit.setVisitDate(nextWeek());

    CommitContext commitContext = new CommitContext();

    commitContext.addInstanceToCommit(todaysVisit); (1)
    commitContext.addInstanceToCommit(followUpCheckVisit);

    dataManager.commit(commitContext); (2)
}| 1 | addInstanceToCommit allows adding entity instances to the commit context |
| 2 | commit can take a CommitContext instance for storing multiple entity instances in one transaction |
Sometimes the fact that DataManager API always creates a new transaction is not the desired behavior. Instead, an already running transaction should be re-used. In this case, a very similar API called TransactionalDataManager can be used. It behaves basically the same as the regular DataManager with the difference that it allows to join an existing transaction as well as enabling programmatic transaction handling.
Summary
The Data Manager API is a CUBA abstraction that allows an application developer to fulfill common use-cases for working with databases. It has multiple operations to allow for regular create, read, update and delete operations (CRUD). Entity instances can be stored directly or within a Commit Context. Every operation will be encapsulated in a new transaction.