


When you build software, how do you know what your user wants? Not in the abstract sense of the term, but exactly – how do you know for sure? The only answer bringing you to this knowledge is that you have to either ask your users or let your users tell you. The more concrete, actionable, and raw feedback you want to get, the closer you get with your users.
For developers, this knowledge is probably one of the most valuable, as it is not coming through any form of indirection. There is no survey, no product manager that aggregated and interpreted the feedback or anything else that sits between you and your user.
But how can this communication channel be created? Email? Support Forum? Fine, but what if we can contextualize the conversation a little more and also make it on-the-spot? Inside the application with low friction to start such a conversation. The chance that someone will “just start chatting” with you seems very high. In particular, higher compared to someone heading over to your support forum, creating an account, searching for similar posts, trying to articulate the problem, uploading screenshots, etc. To get an answer (or no answer) three days later.
Let’s look into this topic and explore how you can enable such functionality inside your application. You could build such a support chat system directly into your app, but normally the user experience and quality will be not very good and the feature set will be comparably small as it is not directly related to your core domain. Second of all, building that right is going to be a tremendous effort.
Introducing Intercom
Luckily, there are solutions out there in the market that you can utilize. This increases the quality of the result drastically, but it also lets you focus on the core domain of your business. In this case, we will integrate Intercom into the Jmix Petclinic application as an example. Besides the chat system of Intercom, it has some more advanced customer support features. We will explore what we can use further from their offering to provide the users of the Petclinic a great customer support experience.
In our example use case, we will focus on the support that is provided to the Nurses of the Petclinic. We want them to have the ability to ask general questions about the Software, but also specific help when questions arise during the Treatment of Pets. For this, we will imagine Veterinarians sitting on the other side of the chat system (using the Intercom Inbox application) to help with support requests.
Integrating Intercom Messenger into the Petclinic
The first thing we need to do is to integrate the Intercom Messenger component into our Jmix application. Intercom provides the Messenger as a small JavaScript component that should be added to the website that wants to provide chat features. In our case of Vaadin, we need to integrate a JavaScript library as an Extension.
There are three parts of it:
- The client-side JavaScript code: intercom.js
- A State class that represents the data that can be exchanged from the Java API to the client side: IntercomState.java
- A server-side Extension class that binds together the client-side JavaScript code and provides a Java API: IntercomIntegration.java
More information about the implementation you can find in the README of the example project.
With that component in place, we create an instance of it within the Main Screen of the Petclinic application:
@UiController("petclinic_MainScreen")

@UiDescriptor("main-screen.xml")

@Route(path = "main", root = true)

public class MainScreen extends Screen implements Window.HasWorkArea {

  // ...

  @Subscribe

  public void onBeforeShow(BeforeShowEvent event) {

    IntercomIntegration intercom = new IntercomIntegration("<<intercomAppId>>");

    intercom.setUserEmail(currentUser().getEmail());

    intercom.setUserId(currentUser().getId().toString());

    intercom.extend(UI.getCurrent());

    intercom.setUserData("name", currentUser().getDisplayName());

    intercom.setUserData("background_color", "#867AEB");

    intercom.setUserData("action_color", "#4D3DE1");

  }

  private User currentUser() {

    return (User) currentAuthentication.getUser();

  }

  // ...

}
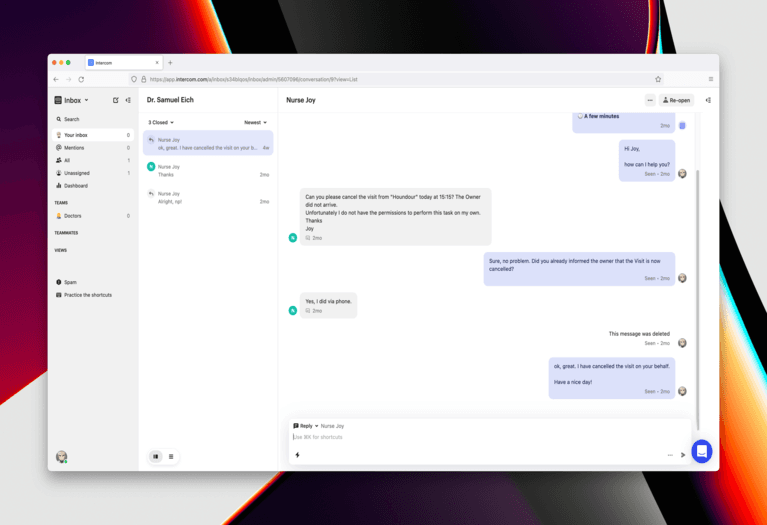
With that in place, the Petclinic has now a basic chat functionality. It is possible to start chat conversations from within Jmix.

By setting additional data as part of the initialization process, we also send contact information to Intercom like the Email Address, First name, and Last name of the current user. Within Intercom the conversations are visible as well, so that the Vet can use this UI to have an overview of all incoming support requests:
Contextual Information within the Intercom Inbox
Having the basic contact information available for the Vets is a good start. But to avoid switching back and forth between the Petclinic application and the Intercom Inbox, it would be good to have the context of the conversation. For the conversation with a Nurse, it might be information about upcoming Visits.
Intercom allows us to enrich the Inbox UI with more data as well as immediately trigger actions from within the Inbox. Let’s look at the first use case: showing upcoming visits that are assigned to the Nurse who has initiated the conversation.
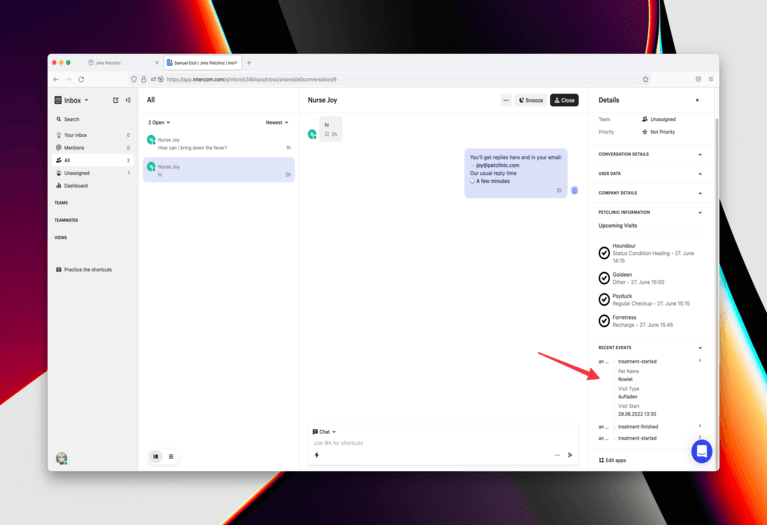
Let's start by looking into the result and then we will explain how we can achieve this:

As you can see on the side menu of the Inbox, we added an extra section called “Petclinic Information”. It displays upcoming visits of pets that are already assigned to “Nurse Joy”. When switching to another conversation, this side menu is updated according to the conversation partner.
Let’s look into how this is done from a technical perspective. When a conversation is opened, Intercom performs a webhook call to the Petclinic application. The result of that webhook request is a specific JSON response representing the UI that Intercom is rendering in the side menu.
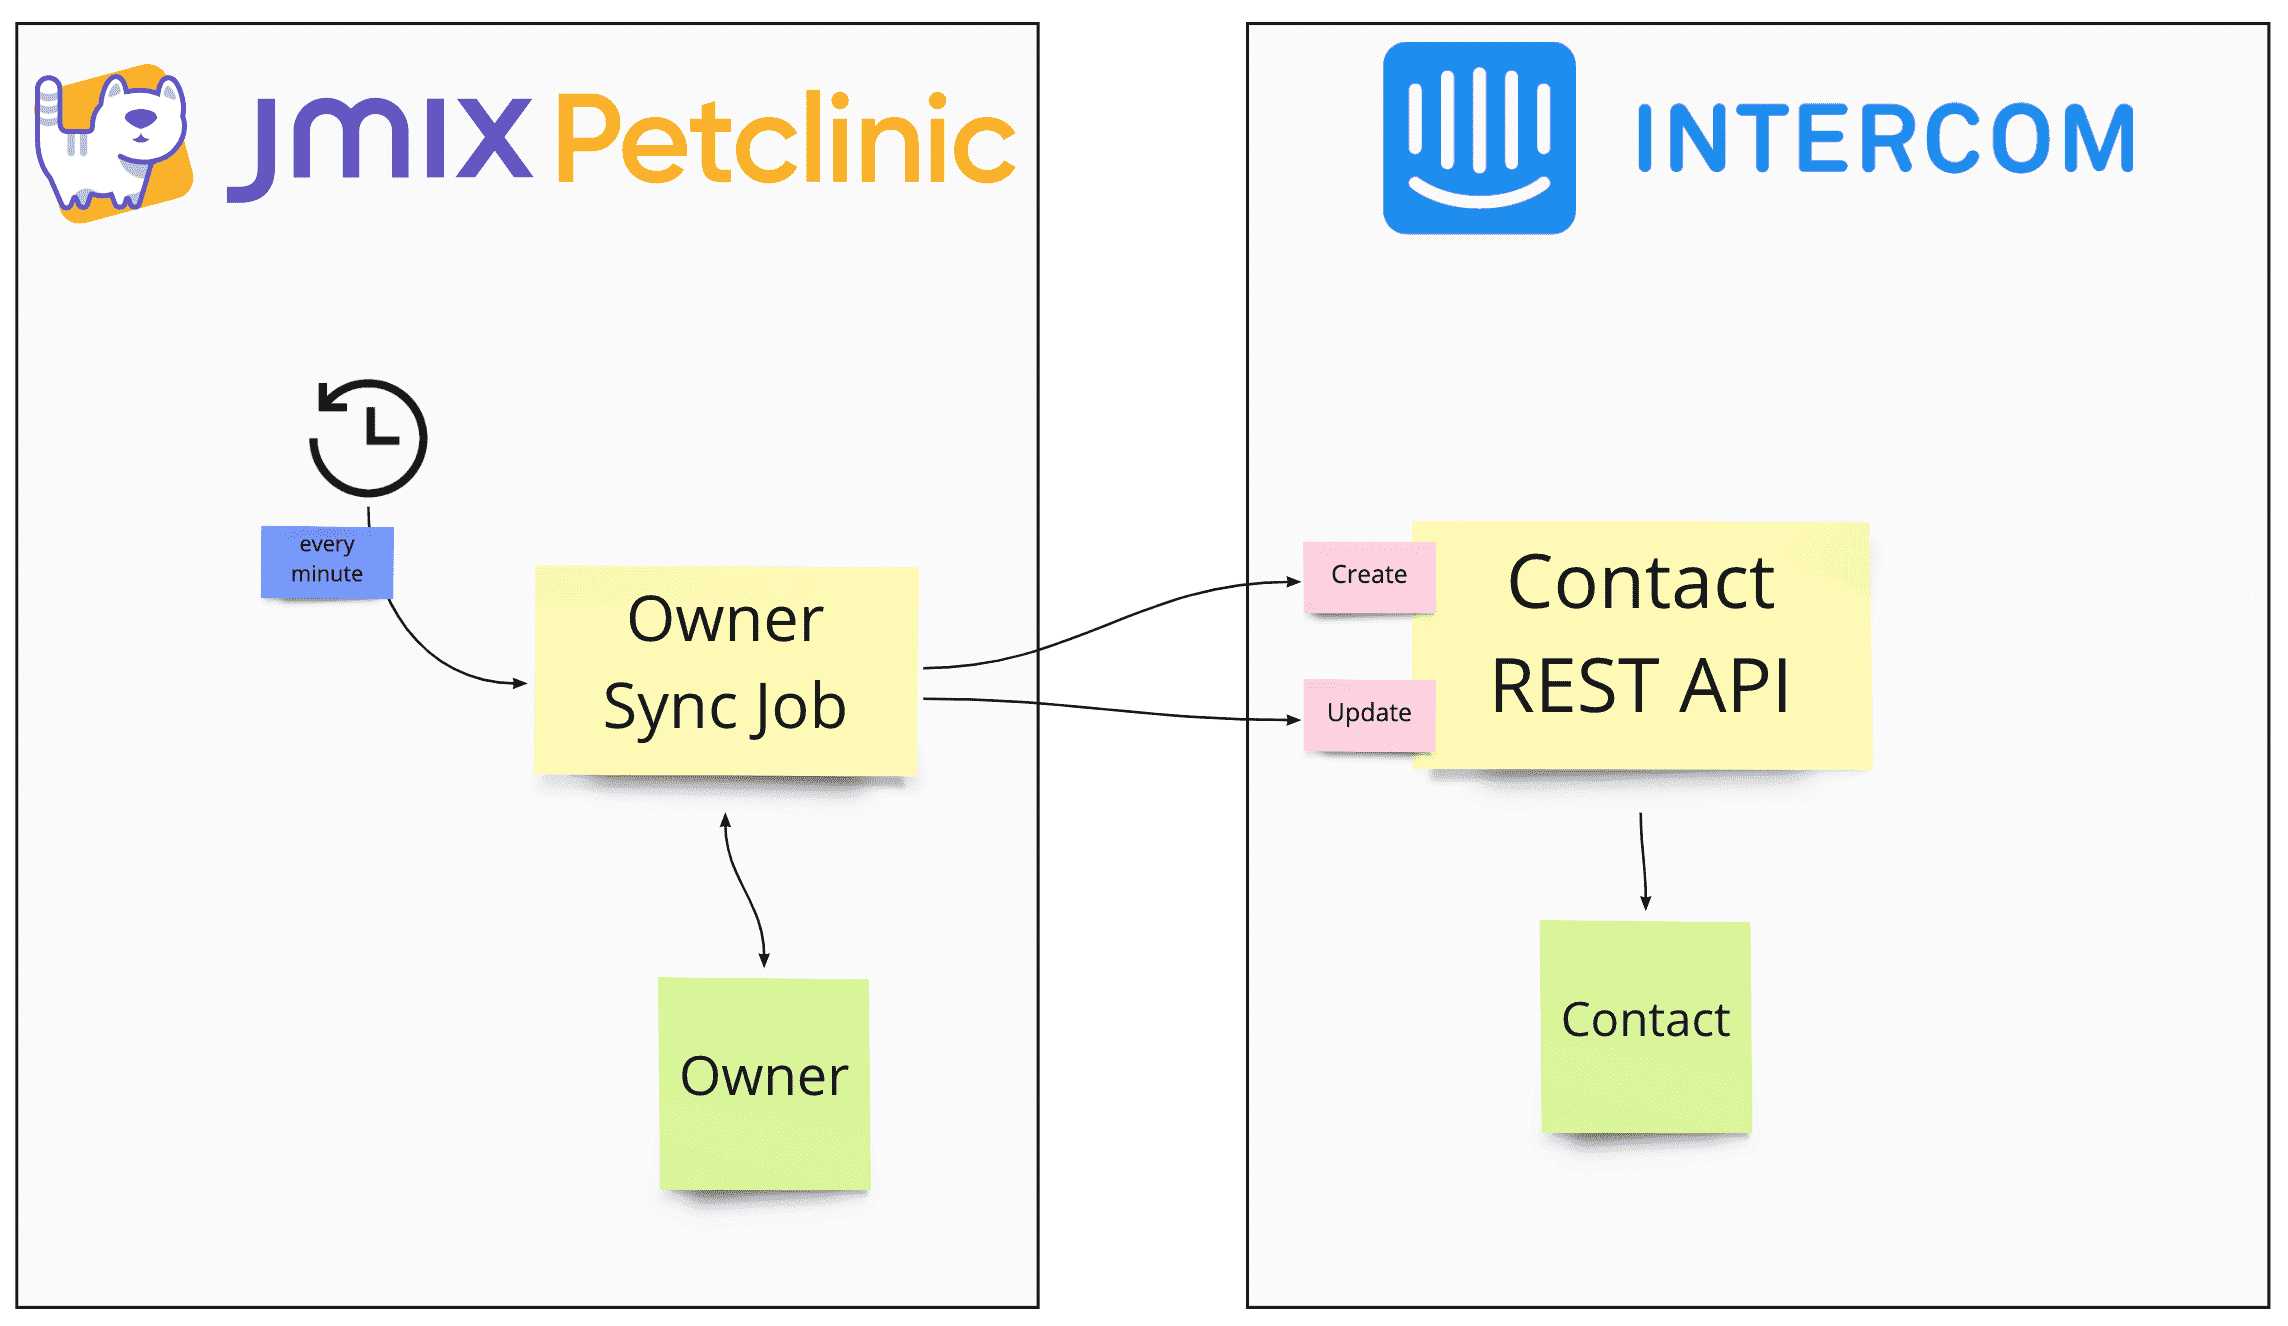
The JSON that defines the UI contains the layout and the data that are displayed. A REST Controller in the Petclinic application called PetclinicInformationController is receiving this webhook. The request contains information about the conversation. With that, it is possible to extract the Email address of the conversation partner. The code performs a lookup of the User and checks if the User is a Nurse. If this is the case, it will load the most recent visits associated with the user.
List<Visit> latestActiveVisitsForUser =
systemAuthenticator.withSystem(() ->,
  visitRepository
    .latestActiveVisitsForUser(data.getContact().getExternalId())
);
After loading the data, it will create a JSON object that represents the UI and send it back as a response of the webhook:
{
  "canvas": {
    "content": {
      "components": [
        {
          "id": "text",
          "style": "header",
          "text": "Upcoming Visits",
          "type": "text"
        },
        {
          "type": "divider"
        },
        {
          "items": [
            {
              "id": "ea31793b-866a-03a5-5764-69e5cadc14b7",
              "title": "Goldeen", "subtitle": "Other",
              "tertiary_text": "28. June 10:00",
              "image": "...",
              "image_width": 32,
              "image_height": 32,
              "disabled": false,
              "action": {
                "url": "https://jmix-petclinic-intercom.herokuapp.com/#main/visits/edit?id=7a65wkq1ka0ejnes39wq5dr55q",
                "type": "url"
              },
              "type": "item"
            },
            {
              "id": "a6e254a9-ac3d-1441-455c-44cd8cf99d81",
              "title": "Crobat",
              "subtitle": "Regular Checkup",
              "tertiary_text": "28. June 11:30",
              "image": "...",
              "image_width": 32,
              "image_height": 32,
              "disabled": false,
              "action": {
                "url": "https://jmix-petclinic-intercom.herokuapp.com/#main/visits/edit?id=56w9aakb1x2h0maq24sp6fk7c1",
                "type": "url"
              },
              "type": "item"
            }
          ],
          "type": "list"
        }
      ]
    }
  }
}
Recent user actions in the Intercom Inbox
Another integration example is the ability to show actions performed lately by a user. Intercom allows storing custom events for a particular contact. This way it is possible to create an event in Intercom when a particular situation in the Petclinic application occurs, like the start of a Treatment. Furthermore, Intercom allows you to proactively reach out to the user via the chat system when a particular event occurs.
As an example, we will notify Intercom when a Treatment started via a custom event. Then we will use a custom chatbot to create an outbound conversation to ask if the Nurse has any questions.
As part of the UI controller for the “My Visits” UI, we will extend the controller to send an event to Intercom:
  intercomNotifications.notify(
    TreatmentStartedEvent.builder()
      .visit(visit)
      .build()
  );
The IntercomNotifications bean that is responsible for sending out the events, is using the Intercom Java SDK which performs API requests against the Data Events REST API from Intercom. This results in new events showing up in the custom events section of the Intercom Inbox.
As you can see, the events can also carry arbitrary custom attributes, which makes it quite flexible to provide additional information to the Inbox user.
Although this functionality has value in itself, let’s enrich the experience for the Nurse as well by proactively asking for further assistance when this event occurs.
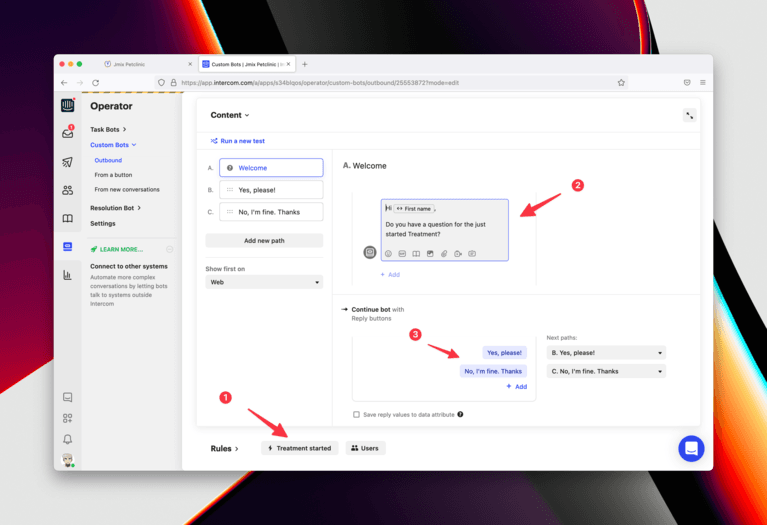
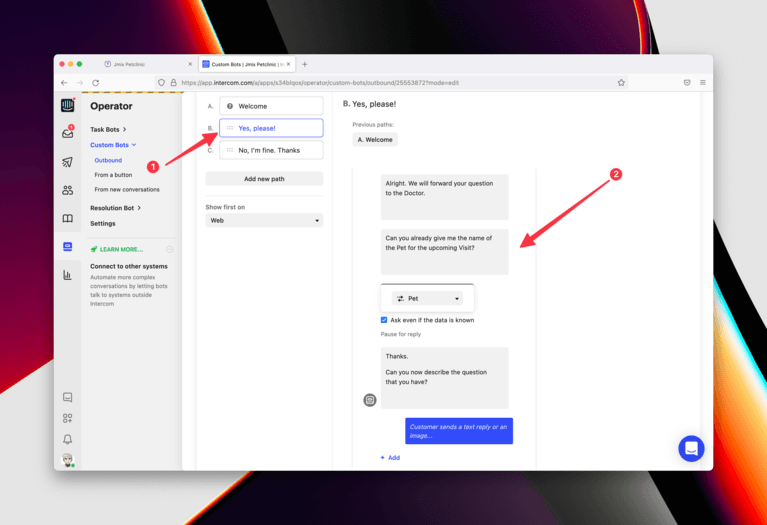
To achieve this, we need to configure a Bot in Intercom. The starting event is our newly created custom event: “treatment-started” (1).
Then the behavior of the bot is configured — (2) and (3) — to start a conversation and provide a couple of possible answers to a Nurse.
If the answer is “Yes, please!”, the bot asks a couple of questions to determine which Visit it is about and what questions the Nurse has. All of this information is then transferred to a Vet as a Conversation in Intercom.
The result of the combination of a custom event and the configured bot looks like this:
Summary
As you have seen with those examples, it is possible to enrich your Jmix application with the ability to directly interact with your users. With that, it gives you the possibility to get a very direct connection to your users, understand how they use the software, and see problems/questions that arise during the usage. With the ability to proactively start a conversation via bots, you can also make the user aware of the ability to get in contact with you.
To give you more contextual information, it is also possible to give a support person a custom-tailored experience directly in the support tool of choice (in this example it is Intercom, but different vendors have similar capabilities).
Besides this, we also looked into the technical details on how to integrate Jmix with external systems like Intercom. You saw two major interaction patterns: webhooks & REST API usage. There are a couple of more examples implemented and explained in the README: https://github.com/mariodavid/jmix-petclinic-intercom .


