


Introduction
Historically, enterprise software development centered on desktop applications with utilitarian user interfaces—dominated by tables, buttons, forms, and multiple pop-up layers. Businesses were typically cautious about change, especially when it involved added costs, making aesthetically pleasing UIs rare in business applications.
Today, modern frameworks like React enable the efficient creation of visually appealing and functional interfaces. But is React the only option? What other tools can effectively support business application development?
Key Requirements for Business Interfaces
To begin with, consider reviewing a typical business interface using the example of an application from SAPUI5 Demo:
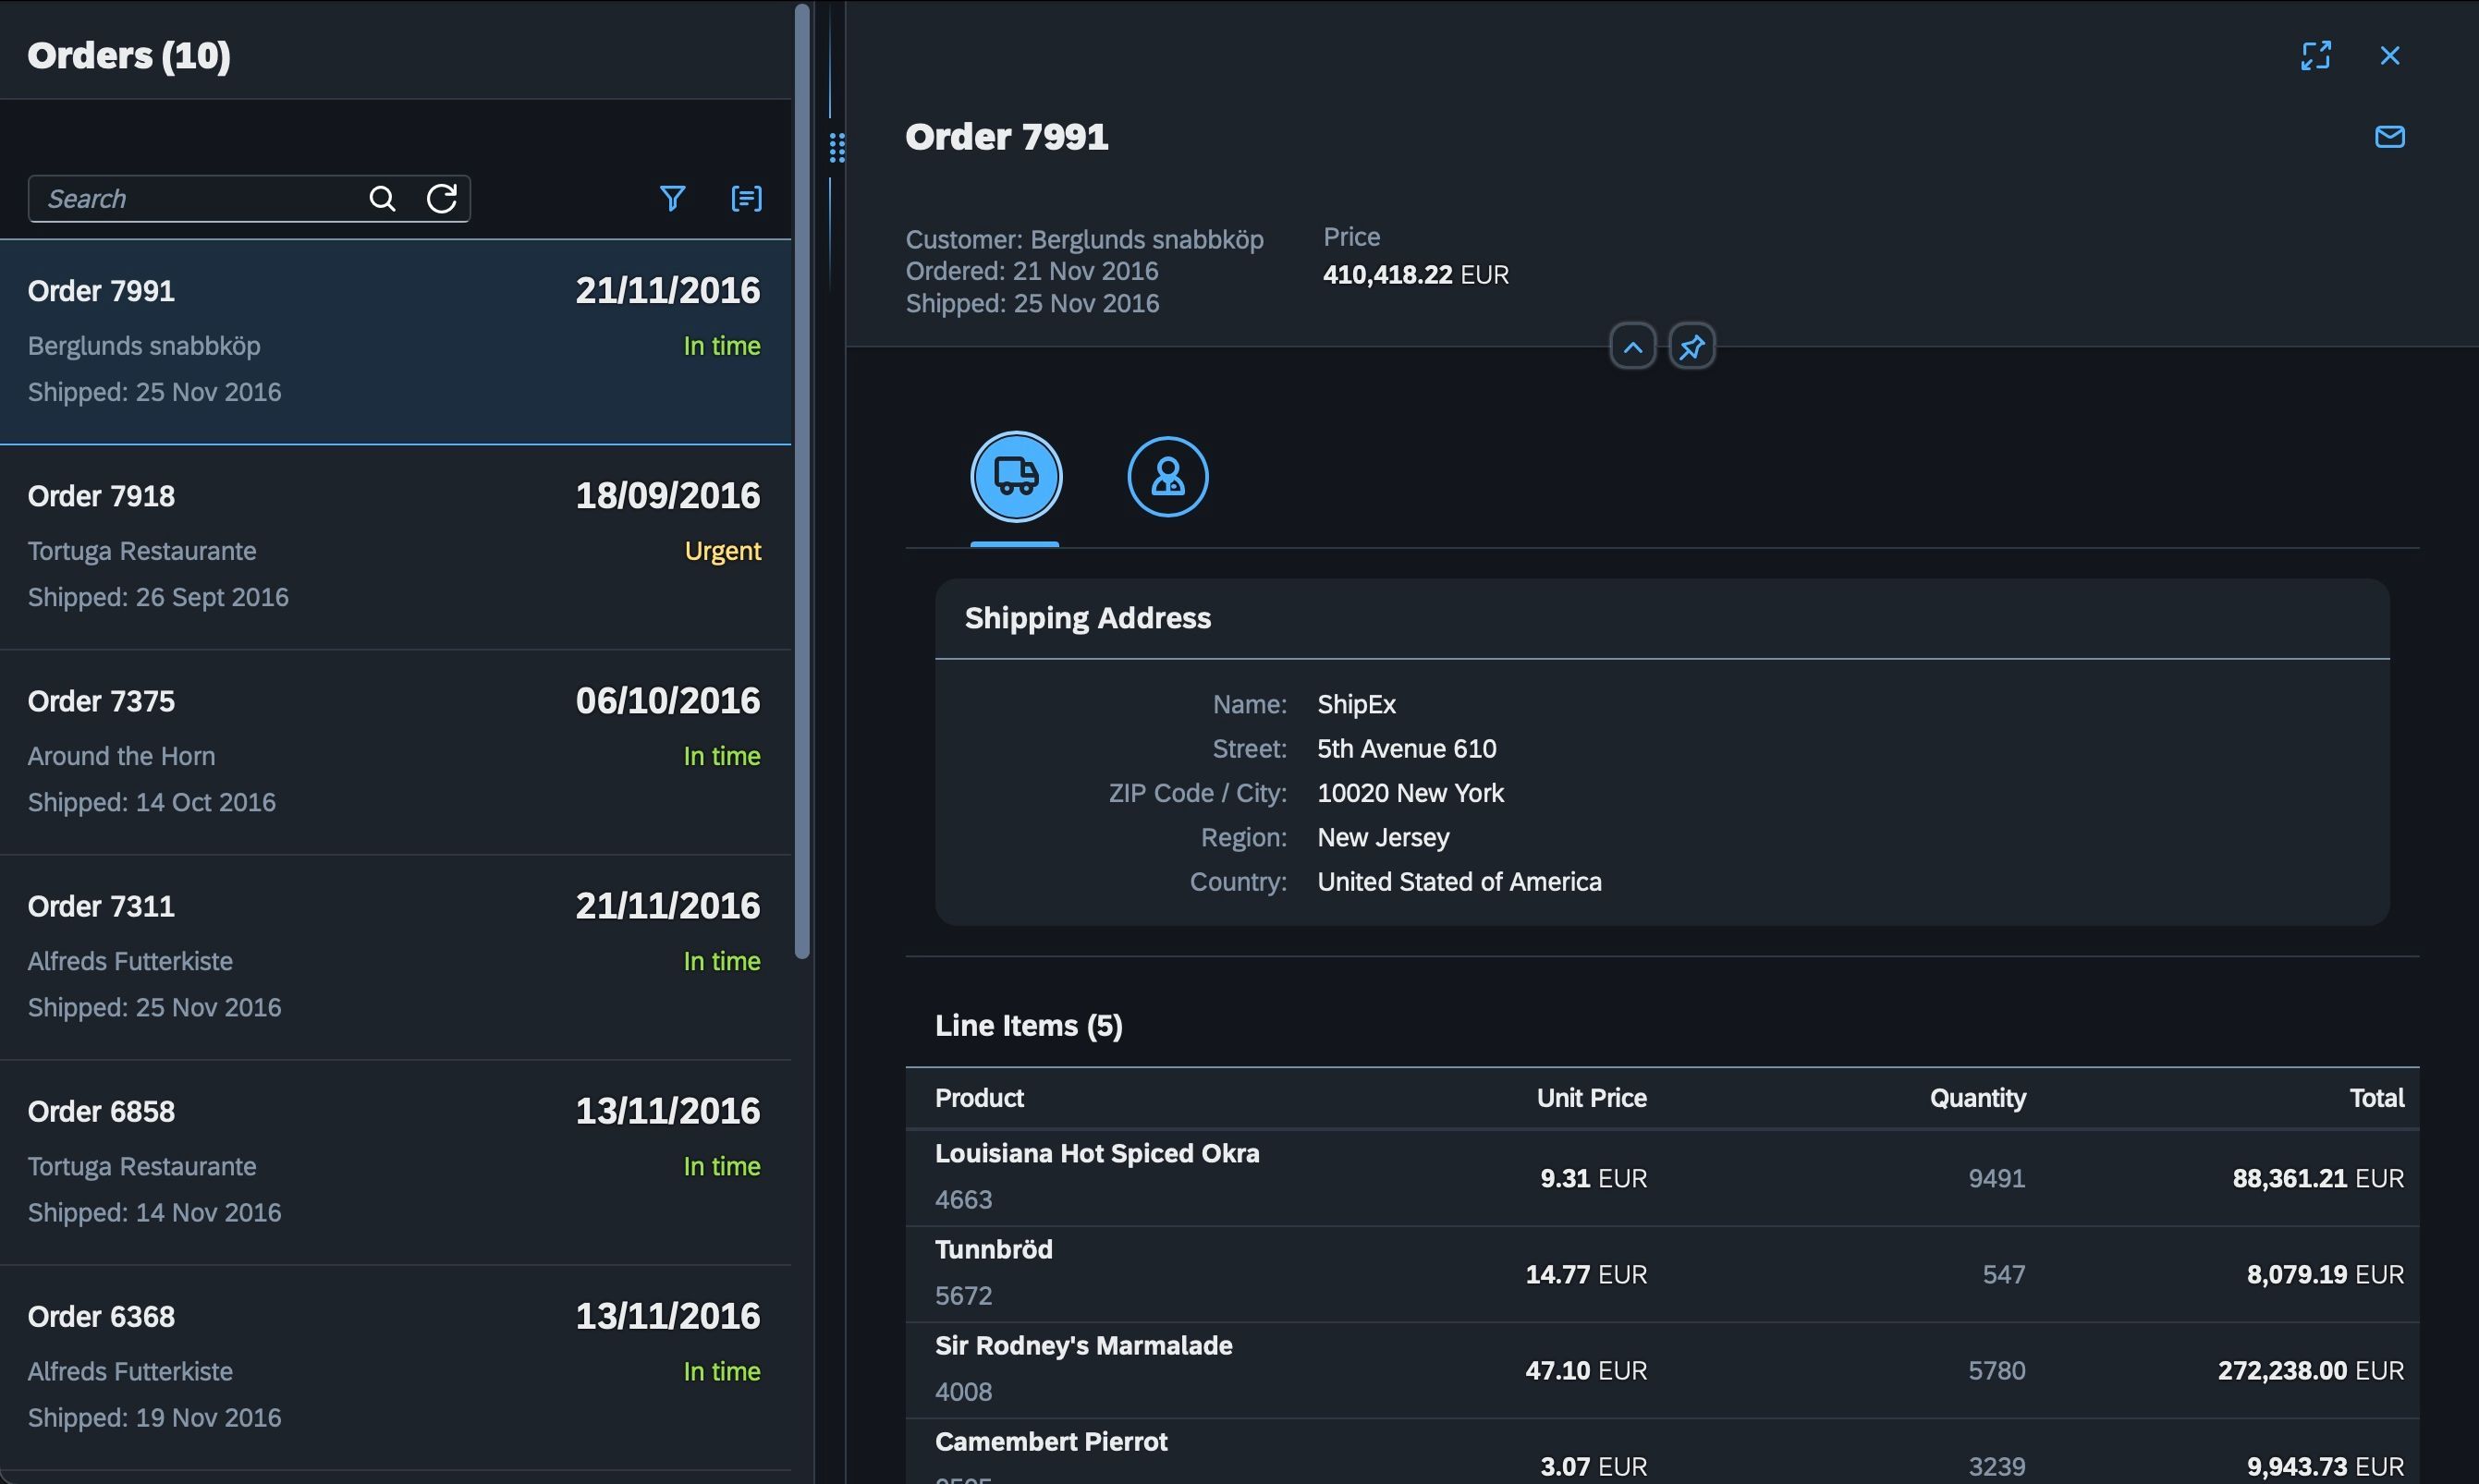
While this looks rather utilitarian, critically, it fulfills its purpose. The interface shows all available orders, with detailed information, and provides filtering options. However, the UI could definitely be improved. The spacing and alignment of the recipient’s card are unclear, the splitter is misaligned, the search control buttons are different sizes, and so on.
In practice, no one will fix this, because, in an enterprise application, visual polishing is never a top priority. Users don’t expect to be spoiled by high-end aesthetics, and so most developer time will be spent fulfilling “what it does” requirements, rather than “how it looks”.
Even from this small example, we can identify several areas to focus upon:
-
More Data = More Screens. A typical business application may have more than 50 different entities in its database. Therefore, multiple screens are necessary to manage these entities. Even with basic CRUD operations for each entity, you will end up around 100 similar screens (one view screen and one edit screen for each).
-
Functionality. Ideally, every business user would experience the same level of functionality that they enjoy with Excel. But this is impractical with web technologies. To bring users closer to this ideal, developers have included various data interactions tools such as filters, logical grouping, sorting, and the ability to modify the table structure in the interface. However, these tools can clutter the interface, making it harder to focus on the main task at hand.
-
Security. It’s not uncommon for enterprise application developers to spend up to 40% of their project time configuring access rights. Why is this the case? Well, even the most basic business app requires at least two roles: a system user and a system administrator. In reality this is often expanded to department heads, several managers, and a support specialist who also needs access to certain screens. If only the support specialist and department head need access to a particular screen, you’re already looking at more than six roles. All of these different roles must be taken into account when designing the UI. This makes it challenging to assemble all of the necessary UI elements for each role.
-
Cheaper Means Better. The primary goal of any business is to maximize profits and complete projects within budget, which requires minimizing expenses. Therefore, extra budget is usually not allocated for aesthetics, especially when it comes to internal business systems.
Technologies
Now that we’ve discussed the requirements, let’s take a look at the technologies that best suit them.
The backend is relatively simple. Typically, it can be implemented using Python with Django or Java with Spring Boot. However, for large-scale enterprise solutions, Java has become the de-facto standard for backend development, so let’s focus on that approach.
Choosing a frontend technology, on the other hand, is a much more complex process. We need to find something that is cost-effective (refer to point 4) and visually appealing. Popularity and trends in this area are constantly changing, but some of the standard options include React, Next, Angular and Vue. We will choose the most popular and flexible option among these – React.
With the foundation laid, it’s time to define our opponent. The chosen technologies will be compared to Jmix, a ready-to-use solution that has been tailored to meet the requirements we have outlined for enterprise applications. Jmix is a full-stack Java framework designed to build enterprise applications.
For the comparison, we’ll use implementations of a standard Petclinic CRUD application built with Jmix and React + Spring Boot respectively.
About the Architecture
In this comparison, we are looking at a widely recognized standard and a niche solution. The difference begins at the application architecture level. A web-application built with the Java Spring + React has a straightforward structure.
- Building the Backend
- Entities
- Repositories for entities
- Services to work with the entities
- Validators
- DTOs for entities
- Mappers
- REST-controllers
- Building the Frontend
- Components for editing and viewing lists of entities
- API requests and binding data to components
- Setting up routing within the application
- Configuring validation for UI components and filters
- Styling
With Jmix, things become quite interesting. It is a full-stack solution with a backend based on Spring Boot. The UI is built using the Vaadin Flow framework, which might come as a surprise at first.
Vaadin uses the server-side rendering method, where the server maintains the state of the entire interface. It is a web framework built on the Web Components specification and the Google Polymer library. The server-side of Vaadin is written in Java, so in Jmix, the backend and frontend are both written in the same language - Java.
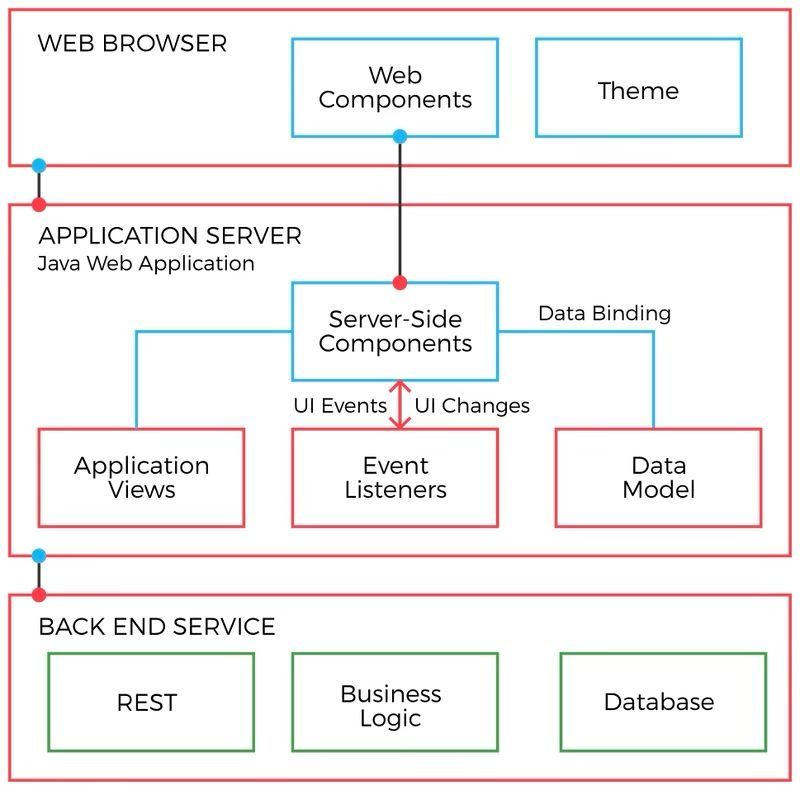
With this approach, there is no way for the UI state to change without the server eventually learning about it through a synchronization request. This solves many security issues. To create reusable components, Vaadin uses the concept of custom elements, which is similar to the component concept in React. You can also use JavaScript and TypeScript to create custom web components.
Start a Project
To start a project using native React, you’ll need to use the create-react-app tool which will help you set up the project structure. You’ll also need to configure Webpack, install the necessary npm modules and, for Spring Boot projects, use Spring Initializr to generate applications and define application properties. Finally, you can set up Spring configuration as needed.
Here is where Jmix starts to show its advantages as a full-stack development framework. Jmix offers a predefined set of templates and extensions. The standard template creates a full-stack application with a basic user entity, screens for editing, and a role management system. Naturally, these types of templates limit customization options, something to be aware of.

Creating Screens
Let’s take a look at the ‘Pets’ screen in the React application. To create this interface, we needed to write some basic layout, fetch data from a backend using a REST API, map the data into a table row component, and then render it on the page.

 // ...some boilerplate code above

    render() {
        const { pets, isLoading } = this.state;

        if (isLoading) {
            return <p>Loading...</p>;
        }

        const petList = pets.map((pet) => {
            return (
                <tr key={pet.id}>
                    <td>{pet.name}</td>
                    <td>{pet.birthDate}</td>
                    <td>{pet.type?.name}</td>
                    <td>{pet.owner.user.username}</td>
                    <td>
                        <Button size="sm" color="info" tag={Link}
                            to={`/pets/${pet.id}/visits`}>
                            Visits
                        </Button>
                    </td>
                    <td>
                        <ButtonGroup>
                            <Button size="sm" color="primary" tag={Link}
                                to={"/pets/" + pet.id}>
                                Edit
                            </Button>
                            <Button size="sm" color="danger" onClick={() => this.remove(pet.id)}>
                                Delete
                            </Button>
                        </ButtonGroup>
                    </td>
                </tr>
            );
        });

        return (
            <div>
                {/* <AppNavbar /> */}
                <Container style= fluid>
                    <h1 className="text-center">Pets</h1>
                    <Button color="success" tag={Link} to="/pets/new">
                        Add Pet
                    </Button>
                    <Table className="mt-4">
                        <thead>
                            <tr>
                                <th>Name</th>
                                <th>Birth Date</th>
                                <th>Type</th>
                                <th>Owner</th>
                                <th>Visits</th>
                                <th>Actions</th>
                            </tr>
                        </thead>
                        <tbody>{petList}</tbody>
                    </Table>
                </Container>
            </div>
        );
    }
This is a basic implementation with inline editing buttons. This approach was chosen to avoid the need for implementing row selection functionality. There are also simple buttons that simply redirect to the corresponding pet creation/editing screens. The Remove button has a ‘delete’ function, which we will discuss later.
Now let’s take a look at the same screen in Jmix. Jmix has a built-in screen generator for creating CRUD screens for entities. This generator uses predefined templates to populate the screen with the necessary columns and form fields based on the entity data. All the components used are based on the Vaadin Flow library.
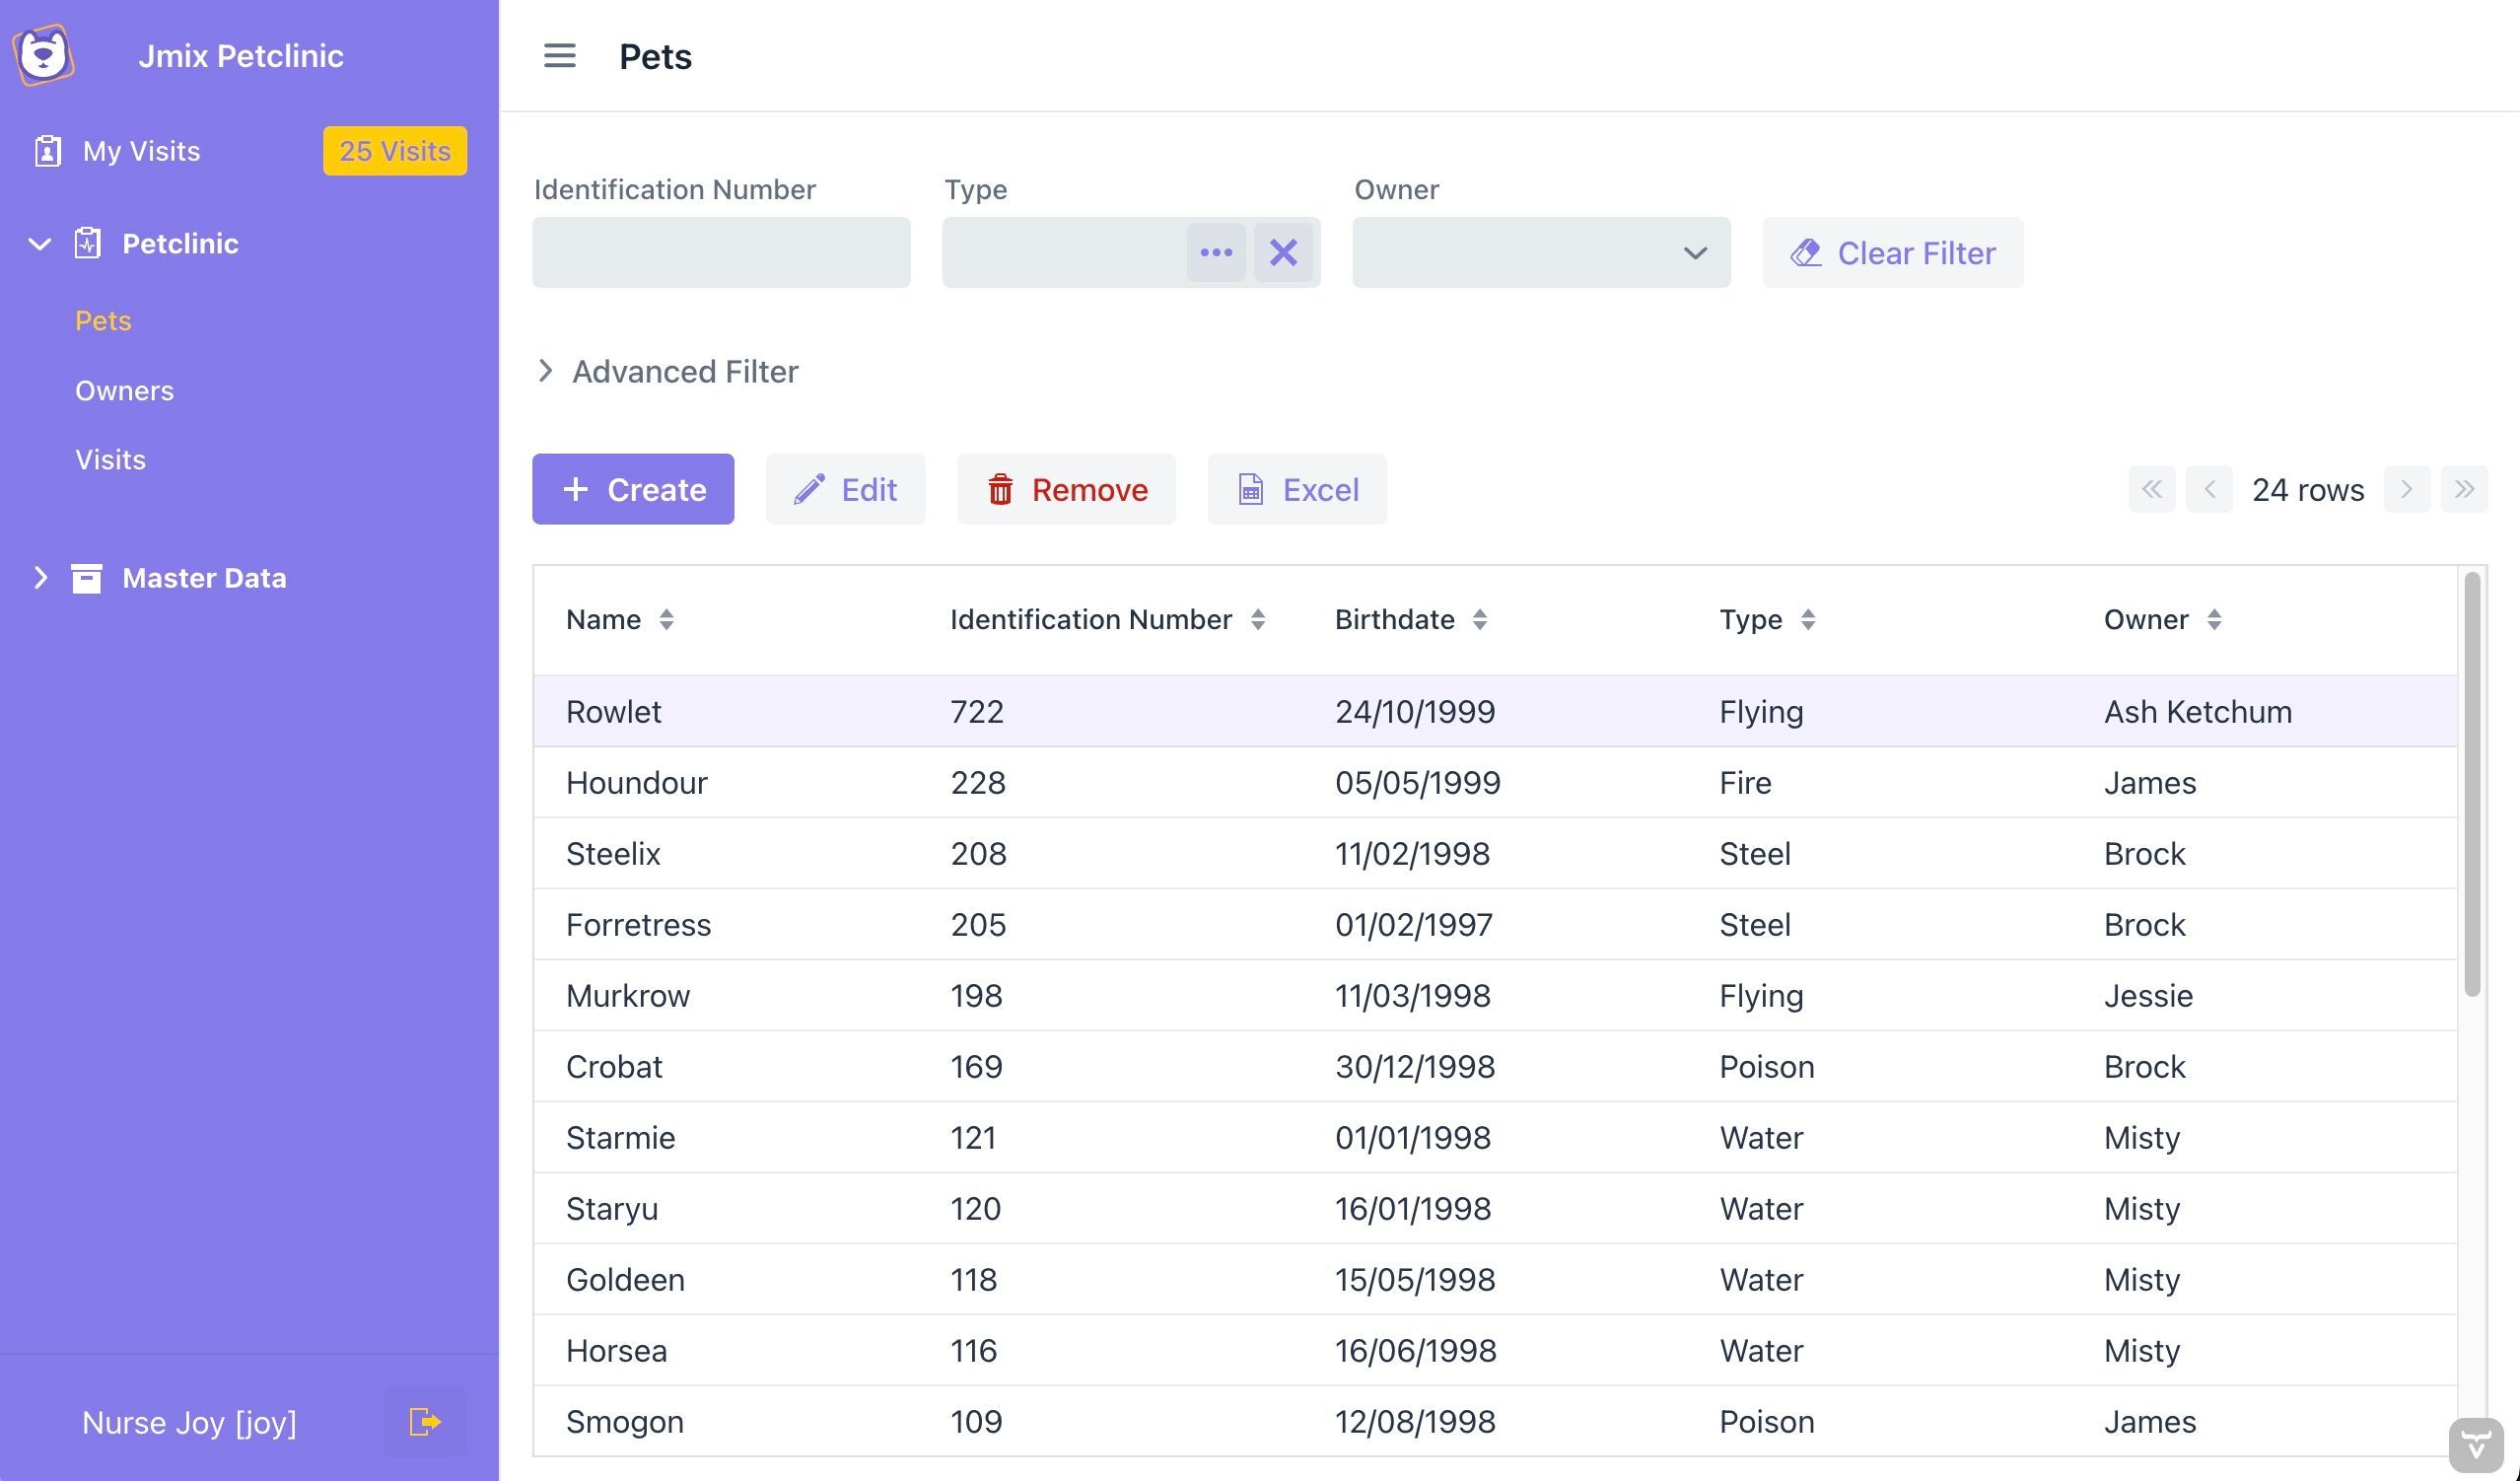
What does it take to create a screen like this in Jmix?
A screen in Jmix is defined using a controller and an optional descriptor. This controller is a Java class that represents the UI screen. The descriptor is an XML file that defines the layout of the screen, making the code more concise and easier to read. The generator automatically creates both the controller and the descriptor for each screen.
If you need to create screens for more than 12 entities, having a generator like this is much more convenient than manually creating each layout.
 <layout>
        <hbox width="100%" alignItems="BASELINE" classNames="buttons-panel">
            <propertyFilter
                    id="identificationNumberFilter"
                    property="identificationNumber"
                    operation="CONTAINS"
                    dataLoader="petsDl"
                    labelPosition="TOP"
                    label="msg://io.jmix.petclinic.entity.pet/Pet.identificationNumber"
            />
            <propertyFilter
                    id="typeFilter"
                    property="type"
                    operation="EQUAL"
                    dataLoader="petsDl"
                    labelPosition="TOP"
                    label="msg://io.jmix.petclinic.entity.pet/Pet.type"
            />
            <propertyFilter
                    id="ownerFilter"
                    property="owner"
                    operation="EQUAL"
                    dataLoader="petsDl"
                    labelPosition="TOP"
                    label="msg://io.jmix.petclinic.entity.pet/Pet.owner">

                <entityComboBox metaClass="petclinic_Owner" itemsContainer="ownersDc" />
            </propertyFilter>
            <button id="clearFilterBtn" action="clearFilterAction" />
        </hbox>
        <genericFilter id="genericFilter"
                       dataLoader="petsDl" opened="false" summaryText="Advanced Filter">
            <properties include=".*"/>
        </genericFilter>
        <hbox id="buttonsPanel" classNames="buttons-panel">
            <button id="createBtn" action="petsDataGrid.create"/>
            <button id="editBtn" action="petsDataGrid.edit"/>
            <button id="removeBtn" action="petsDataGrid.remove"/>
            <button id="excelExportBtn" action="petsDataGrid.excelExport"/>
            <simplePagination id="pagination" dataLoader="petsDl"/>
        </hbox>
        <dataGrid id="petsDataGrid"
                  width="100%"
                  minHeight="20em"
                  dataContainer="petsDc">
            <actions>
                <action id="create" type="list_create"/>
                <action id="edit" type="list_edit"/>
                <action id="remove" type="list_remove"/>
                <action id="excelExport" type="grdexp_excelExport"/>
            </actions>
            <columns>
                <column property="name"/>
                <column property="identificationNumber"/>
                <column property="birthdate"/>
                <column property="type"/>
                <column property="owner"/>
            </columns>
        </dataGrid>
        <hbox id="lookupActions" visible="false">
            <button id="selectBtn" action="selectAction"/>
            <button id="discardBtn" action="discardAction"/>
        </hbox>
    </layout>
In the generated code, you can find declarative definitions for the table, its actions, the buttons above it, and various filters. Overall, this is sufficient to make the screen fully functional. The framework provides all standard entity operation out-of-the-box.
Woking with Data
To retrieve data from a server in a React application, you need to send a REST request. For example, on the “Pet” screen described earlier, this is how it works:
    componentDidMount() {
        fetch("/api/v1/pets", {
            headers: {
                "Authorization": `Bearer ${this.jwt}`,
                "Content-Type": "application/json",
            },
        }).then((response) => response.json())
            .then((data) => this.setState({ pets: data }));
    }
When the screen loads, a single request is sent to the server.
Let’s now examine what happens when you click the Remove button. To delete data, another request must be sent to the server.
  async remove(id) {
        await fetch(`/api/v1/pets/${id}`, {
            method: "DELETE",
            headers: {
                "Authorization": `Bearer ${this.jwt}`,
                Accept: "application/json",
                "Content-Type": "application/json",
            },
        }).then((response) => {
            if (response.status === 200) {
                let updatedPets = [...this.state.pets].filter((i) => i.id !== id);
                this.setState({ pets: updatedPets });
            }
            return response.json();
        }).then(function (data) {
            alert(data.message);
        });
    }
Overall, this is not too difficult, but it does require a fair amount of coding, especially when you take into account the backend request handling.
In Jmix, data loading is managed using the dedicated data section within the same screen definition. It utilizes built-in mechanisms to retrieve data directly from a database.
 <data readOnly="true">
        <collection id="petsDc"
                    class="io.jmix.petclinic.entity.pet.Pet">
            <fetchPlan extends="_base">
                <property name="type" fetchPlan="_instance_name"/>
                <property name="owner" fetchPlan="_instance_name"/>
            </fetchPlan>
            <loader id="petsDl">
                <query>
                    <![CDATA[select e from petclinic_Pet e]]>
                </query>
            </loader>
        </collection>
        <collection id="ownersDc"
                    class="io.jmix.petclinic.entity.owner.Owner">
            <fetchPlan extends="_base"/>
            <loader id="ownersDl">
                <query>
                    <![CDATA[select e from petclinic_Owner e]]>
                </query>
            </loader>
        </collection>
    </data>
    <!-- layout -->
A JPQL query is defined directly in the XML code, specifying how data should be retrieved from the database. If you need to handle UI component events, you can do so in the controller by writing Java code.
@Route(value = "pets", layout = MainView.class)
@ViewController("petclinic_Pet.list")
@ViewDescriptor("pet-list-view.xml")
@LookupComponent("petsDataGrid")
@DialogMode(width = "50em")
public class PetListView extends StandardListView<Pet> {

    @ViewComponent
    private PropertyFilter identificationNumberFilter;

    @ViewComponent
    private PropertyFilter typeFilter;

    @ViewComponent
    private PropertyFilter ownerFilter;

    @Subscribe("clearFilterAction")
    public void onClearFilterAction(final ActionPerformedEvent event) {
        identificationNumberFilter.clear();
        typeFilter.clear();
        ownerFilter.clear();
    }
}
The main difference between React and Jmix is that we work on the backend. When a button is clicked, we can directly call a service, perform additional data processing, or interact with a database.
Layouts are written in XML and screen controllers in Java… At first glance, this might seem similar to Spring MVC, but there are some key differences. Here’s a comparison table:
| Jmix UI | Spring MVC | |
|---|---|---|
| Layout technology | Proprietary layout system using declarative UI components in XML | HTML templating engines (Thymeleaf, Freemarker, etc.) |
| Client-side communication | JSON used to configure web components | Static HTML delivery |
| Navigation technology | Vaadin Flow React Router | Mapping of HTTP requests to controllers |
Speaking of navigation, let’s move on to how it’s implemented in React and Jmix.
Creating Routing
So, we have screens in our application and data is being loaded. Let’s examine how we navigate between these screens.
In the React application, a simple Navbar component is implemented as a horizontal menu at the top of the page.
  return (
    <div>
      <ErrorBoundary FallbackComponent={ErrorFallback} >
        <AppNavbar />
        <Routes>
          <Route path="/" exact={true} element={<Home />} />
          <Route path="/plans" element={<PlanList />} />
          <Route path="/docs" element={<SwaggerDocs />} />
          {publicRoutes}
          {userRoutes}
          {adminRoutes}
          {ownerRoutes}
          {vetRoutes}
        </Routes>
      </ErrorBoundary>
    </div>
  );
To display routes based on a user’s role, you will need to define separate routes for each role.
 roles.forEach((role) => {
    if (role === "ADMIN") {
      adminRoutes = (
        <>
          <Route path="/users" exact={true} element={<PrivateRoute><UserListAdmin /></PrivateRoute>} />
          <Route path="/users/:username" exact={true} element={<PrivateRoute><UserEditAdmin /></PrivateRoute>} />
          <Route path="/owners" exact={true} element={<PrivateRoute><OwnerListAdmin /></PrivateRoute>} />
          <Route path="/owners/:id" exact={true} element={<PrivateRoute><OwnerEditAdmin /></PrivateRoute>} />
          <Route path="/clinics" exact={true} element={<PrivateRoute><ClinicListAdmin /></PrivateRoute>} />
          <Route path="/clinics/:id" exact={true} element={<PrivateRoute><ClinicEditAdmin /></PrivateRoute>} />
          <Route path="/clinicOwners" exact={true} element={<PrivateRoute><ClinicOwnerListAdmin /></PrivateRoute>} />
          <Route path="/clinicOwners/:id" exact={true} element={<PrivateRoute><ClinicOwnerEditAdmin /></PrivateRoute>} />
          <Route path="/pets" exact={true} element={<PrivateRoute><PetListAdmin /></PrivateRoute>} />
          <Route path="/pets/:id" exact={true} element={<PrivateRoute><PetEditAdmin /></PrivateRoute>} />
          <Route path="/pets/:petId/visits" exact={true} element={<PrivateRoute><VisitListAdmin /></PrivateRoute>} />
          <Route path="/pets/:petId/visits/:visitId" exact={true} element={<PrivateRoute><VisitEditAdmin /></PrivateRoute>} />
          <Route path="/vets" exact={true} element={<PrivateRoute><VetListAdmin /></PrivateRoute>} />
          <Route path="/vets/:id" exact={true} element={<PrivateRoute><VetEditAdmin /></PrivateRoute>} />
          <Route path="/vets/specialties" exact={true} element={<PrivateRoute><SpecialtyListAdmin /></PrivateRoute>} />
          <Route path="/vets/specialties/:specialtyId" exact={true} element={<PrivateRoute><SpecialtyEditAdmin /></PrivateRoute>} />
          <Route path="/consultations" exact={true} element={<PrivateRoute><ConsultationListAdmin /></PrivateRoute>} />
          <Route path="/consultations/:consultationId" exact={true} element={<PrivateRoute><ConsultationEditAdmin /></PrivateRoute>} />
          <Route path="/consultations/:consultationId/tickets" exact={true} element={<PrivateRoute><TicketListAdmin /></PrivateRoute>} />
        </>)
    }

    // etc.
}
In Jmix, the role system is designed so that each role contains information about which screens the user can access. Roles are defined using annotated interfaces. For example, here’s how the Nurse role is defined.
@ResourceRole(name = "Nurse", code = NurseRole.CODE)
public interface NurseRole {

    String CODE = "Nurse";

    // ... other policies

    @ViewPolicy(viewIds = {"petclinic_MyVisits",
            "petclinic_Pet.list", "petclinic_Pet.detail",
            "petclinic_Owner.list", "petclinic_Owner.detail",
            "petclinic_Visit.list", "petclinic_Visit.detail",
            "petclinic_Specialty.list", "petclinic_Specialty.detail",
            "petclinic_Veterinarian.list", "petclinic_Veterinarian.detail",
            "petclinic_PetType.list", "petclinic_PetType.detail", "petclinic_PetType.lookup",})
    void views();

    @MenuPolicy(menuIds = {"petclinic_MyVisits",
            "petclinic_Pet.list",
            "petclinic_Owner.list",
            "petclinic_Visit.list",
            "petclinic_Specialty.list",
            "petclinic_Veterinarian.list",
            "petclinic_PetType.list"})
    void screens();
}
This interface uses special annotations (policies) to control access to different parts of the application
- The @MenuPolicy annotation is used to grant permission to display certain menu items. This allows users to see and interface with specific menu options.
- Similarly, the @ViewPolicy annotation controls access to different screens or views within the application. It determines which screens a user can access based on their permissions.
There are also policies related to entity access, but they are not the main focus of this comparison.
In addition, it is possible to create roles within the running application. This allows not only developers, but also system administrators, to define roles and manage access to different parts of the system.
Routing in Jmix is defined using the @Route annotation on screen controllers. These routes support both routeParameters (e.g., an entity ID in an editor screen) and queryParameters (custom screen state options).
To define the menu structure and screen order, you can use a special XML file:
<menu-config xmlns="http://jmix.io/schema/flowui/menu">

    <item view="petclinic_MyVisits" title="msg://io.jmix.petclinic.view.visit/myVisitsView.title" icon="CLIPBOARD_USER"/>
    <menu opened="true" id="petclinic" title="msg://io.jmix.petclinic/menu.petclinic.title" icon="CLIPBOARD_PULSE">
        <item view="petclinic_Pet.list" title="msg://io.jmix.petclinic.view.pet.pet/petListView.title"/>
        <item view="petclinic_Owner.list" title="msg://io.jmix.petclinic.view.owner/ownerListView.title"/>
        <item view="petclinic_Visit.list" title="msg://io.jmix.petclinic.view.visit/visitListView.title"/>
    </menu>
    <menu id="application-masterdata" title="msg://io.jmix.petclinic/menu.application-masterdata.title" icon="ARCHIVE">
        <item view="petclinic_Specialty.list"
              title="msg://io.jmix.petclinic.view.veterinarian.specialty/specialtyListView.title"/>
        <item view="petclinic_Veterinarian.list"
              title="msg://io.jmix.petclinic.view.veterinarian.veterinarian/veterinarianListView.title"/>
        <item view="petclinic_PetType.list" title="msg://io.jmix.petclinic.view.pet.pettype/petTypeListView.title"/>
    </menu>
    <menu id="security" title="msg://io.jmix.petclinic/menu.security.title" icon="KEY_O">
        <item view="User.list" title="msg://io.jmix.petclinic.view.user/UserListView.title"/>
        <item view="sec_ResourceRoleModel.list"
              title="msg://io.jmix.securityflowui.view.resourcerole/resourceRoleModelListView.menu"/>
        <item view="sec_RowLevelRoleModel.list"
              title="msg://io.jmix.securityflowui.view.rowlevelrole/rowLevelRoleModelListView.menu"/>
    </menu>
    <menu id="datatools" title="msg://io.jmix.petclinic/menu.datatools.title" icon="DATABASE">
        <item view="datatl_entityInspectorListView"
              title="msg://io.jmix.datatoolsflowui.view.entityinspector/listTitle"/>
    </menu>
</menu-config>
You don’t need to specify which screens are available for each role separately – just define the entire menu, and Jmix will filter it based on the user’s access permissions.
Here’s what the menu would look like for a user with the Nurse role:
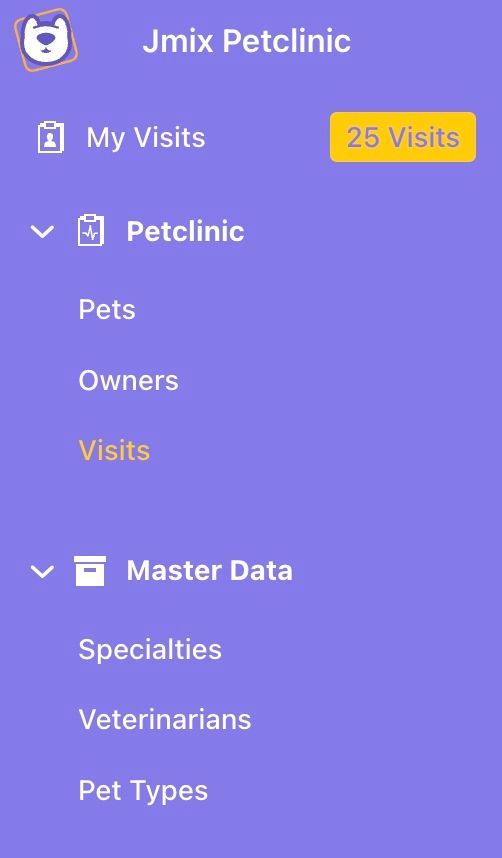
As shown, the security and datatools sections from the menu.xml file is missing. These sections have been automatically filtered out by the built-in security system.
Obvious Drawbacks
Customization and Flexibility
When relying on predefined components and approaches, customization options may be limited. You are forced to follow a path envisioned by the developers of the framework. However, with React, this is not a problem – it gives you the freedom to create any interface, regardless of its complexity or functionality.
Although there is an option to style the application using CSS, the web components template is fixed. This means that you can’t simply add additional functionality to, for example, a table – you will either need to modify the existing web component or create a new one.
If you wish to integrate a JavaScript library with a visual component, it’s important to understand that both server-side and client-side code will need to be written. This means that you can’t simply “plug in” the JS component as it is; instead, you’ll need to integrate it into your project’s infrastructure. This process can be time-consuming and requires substantial effort, as it involves customizing the library to suit your specific needs.
Scalability
Since Jmix uses a server-side UI approach, it naturally requires more resources, especially server-side. When a user session is created, an instance of the UI is created on the server and occupies memory. As a result, you need to have a precise understanding of the number of concurrent users in order to provide enough computing resources.
Session Replication
In addition, storing both the UI state and the session on the server presents challenges related to sessions replication.
First, in order for replication to work, all UI states must be serializable. While all standard Vaadin components are serialized by default, it is not guaranteed that a custom visual component will also be serialized.
Second, remember that we’re in the world of Java. A session is a Java object – a potentially large one – with many references to other Java objects. This can easily increase the size of the session to several megabytes.
Third, every client request to a Jmix application modifies the session state to some extent. Event in simple cases where no application-level data is changed, synchronization points update their state. This means it’s crucial that multiple requests for the same session are never processed in parallel.
All of this leads to a situation where standard session replication solutions don’t work well with Vaadin and Jmix. The only viable option is sticky sessions, which is not always convenient. This is one of the main drawbacks of the Vaadin framework.
Community
React has one of the largest communities in the world of frontend development. There are a vast number of pre-build solutions, questions answered on forums, and documented workarounds – often at the top of Google’s search results.
Obviously, the Jmix developer community is smaller compared to React, but it is active, vibrant and fast-growing. There is a dedicated forum where developers and users can find extensive support from each other. Additionally, a growing number of educational materials and demo applications are available.
Conclusion
It seems that in certain cases, using React for building business applications may be overkill. At the very least, you’ll need two specialists – each responsible for their own part of the project. However, with a niche solution such as Jmix, the same work can be done by a single developer. This allows for a more streamlined process, while still producing a modern functional, and visually appealing interface. Additionally, code generators can significantly accelerate the creation of repetitive CRUD screens.
This approach has some drawbacks, and one of them (the session replication issue) can be critical. However, for building business-oriented applications with heavy data load, using Jmix seems to be a more reasonable and efficient solution compared to the traditional Spring Boot + React stack.


