


The Kubernetes clustering software is becoming server applications management standard as, probably, the most feature rich and widely supported infrastructure toolchain. However, it is still hard to set up from scratch. This can be fine when you run on cloud hosting with unlimited capacity but causes problems when you have to use your own software, or a custom configuration is needed. The good news is that such problems don’t usually appear at the application level, so you should be able to easily change your cluster software vendor when required without rewriting your applications from scratch.
To run our own K8s cluster, we will use MicroK8s as a quite lightweight and easy to use but powerful distribution. It is developed by Canonical (a Ubuntu Linux OS vendor) but still available for various Linux distributions as well as Windows and MacOS X operating systems using virtualization technologies. System-on-a-Chip devices like RaspberryPi and clones are also capable of running MicroK8s cluster nodes.
The set of extensions will allow you to manage your server software including LLM-model servers and agents.
In comparison to Minikube, another popular Kubernetes mini distribution, MicroK8s, enables clustering features and brings further helpful addons, making it a good choice for Small Office or Home infrastructures as well as for IT technology enthusiasts.
We are going to build a Jmix framework application and deploy it to a Kubernetes cluster configured by ourselves.
To start playing, we will need a virtual or dedicated server with at least 3-4 Gb RAM. You can rent a server with a hosting provider or even use your own PC or device.
When you obtain a server, you usually should have SSH access details for it that consist of an IP address, login and password information.
First, we will setup SSH-key authentication on it to login smoothly.
For Windows, you can use GitBash console or MSYS toolchain or PuTTY or setup WSL software to connect to your server.
Set up your server connection
Generate your identity SSH-key if you haven't done this before
ssh-keygen -t ed25519
Assume your server’s IP address is 45.87.104.148
Install your SSH-key with a ssh-copy-id command
ssh-copy-id root@45.87.104.148
After that, you be able to connect to server without a password
ssh root@45.87.104.148
It is quite useful to have terminal sessions management software like Screen, Byobu or tmux that will keep your terminal session open after you have closed the terminal window.
Install MicroK8S
Create and configure non-privileged user.
useradd kubeuser
usermod -aG sudo,microk8s kubeuser
Set password for this user or copy your public SSH key to this user’s /home/kubeuser/.ssh/authorized_keys file.
If your distribution doesn’t have Snap package manager, you will have to install it first
sudo apt install snapd
On Debian, I also had to install snap core package with
sudo snap install core
Then you will be able to install MicroK8s packages:
sudo snap install microk8s --classic
Relogin to SSH with newly created kubeuser.
Official docs also advise to configure a firewall in case you are using Ubuntu; this can be done with the following CLI execution:
sudo ufw allow in on cni0 && sudo ufw allow out on cni0
sudo ufw default allow routed
Install some “must-have” addons:
microk8s enable dns
microk8s enable dashboard
microk8s enable storage
microk8s enable host-access
Install the kubectl tool
To manage your microk8s you can use the microk8s kubectl command tool but it is also possible to install the original kubectl tool. This will be helpful in case your cluster is hosted on a separate server or a number of them. To do that run:
curl -LO "https://dl.k8s.io/release/$(curl -L -s https://dl.k8s.io/release/stable.txt)/bin/linux/amd64/kubectl"
cp kubectl /usr/local/bin
This will download the binary build for Linux and copy it into the Path folder.
Import context configuration from cluster to the current user’s kubectl profile
microk8s config > $HOME/.kube/config
If you plan to build the project on a local PC, copy this configuration relative to your local home folder.
After that you will be able to use the kubectl command instead of microk8s kubectl.
Set up web panel
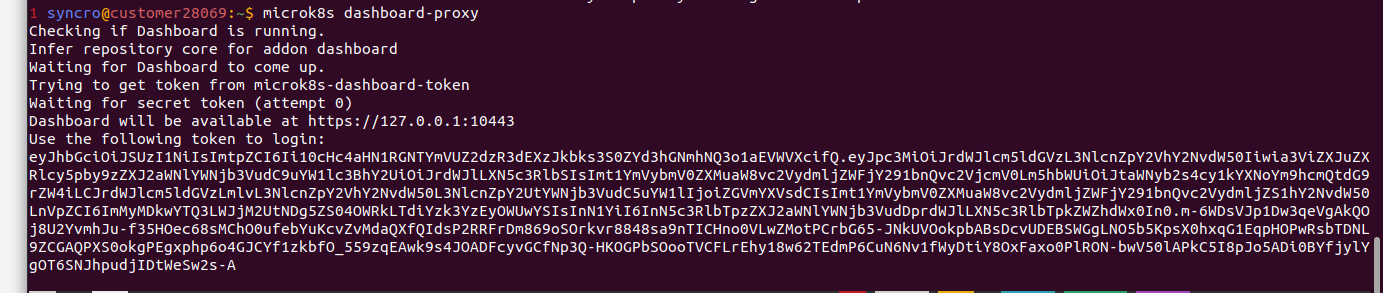
It can be quite useful to operate from a fancy looking web interface. You can enable it on a temporary basis, which seems more secure, by running the dashboard-proxy command:
microk8s dashboard-proxy
You will see the port number and the access token in the command output
Or on permanent basis by applying the following resource:
dashboard.json - https://pastebin.com/RRg8z5t0
{
  "apiVersion": "v1",
  "kind": "Service",
  "metadata": {
    "labels": {
      "k8s-app": "kubernetes-dashboard"
    },
    "name": "kubernetes-dashboard-np",
    "namespace": "kube-system"
  },
  "spec": {
    "type": "NodePort",
    "ports": [
      {
        "port": 443,
        "protocol": "TCP",
        "targetPort": 8443,
        "nodePort": 30000
      }
    ],
    "selector": {
      "k8s-app": "kubernetes-dashboard"
    }
  }
}
Use your server’s external IP address and the given port to open the dashboard in the browser.
After you have opened the dashboard, it will ask to authenticate with a token.
You can obtain it from the server’s terminal by running the following commands:
token=$(microk8s kubectl -n kube-system get secret | grep default-token | cut -d " " -f1) && microk8s kubectl -n kube-system describe secret $token | grep token:
Container image registry
A wide number of services like GitHub or Gitlab nowadays are allowing free container images hosting services as an alternative to DockerHub.
To use the docker image registry provided by GitHub, you must create an access token first.
Go to Settings -> Developer Settings of your account and open the Personal Access Tokens -> Tokens(class) section.
Generate a new token with the write:packages permission.
Save the generated token value: you will use it instead of the account password in configurations.
Jmix project setup
Install git if you haven’t done this before
sudo apt install git
git clone https://github.com/jmix-framework/jmix-onboarding-2.git
When the application will be deployed the key parameter vales will be provided by the cluster configuration. So you need to choose one from the following two options:
- Setup application.properties configuration with variables
As the minimum requirement you will need to set up the datasource configuration as follows:
main.datasource.url = jdbc:postgresql://${DB_HOST}:5432/${DB_NAME}?stringtype=unspecified main.datasource.username = ${DB_USER} main.datasource.password =${DB_PASSWORD}
- Enable profile-based configuration
Create the application-dev.properties, application-prod.properties files
Move the datasource configuration with hardcoded HSQL values to application-dev.properties
Create a “variable”-rich version of datasource confirugration in application-prod.properties as in p. 1
Add also a Hazelcast JCache configuration:
spring.cache.jcache.provider = com.hazelcast.cache.HazelcastMemberCachingProvider
Add PostgreSQL and Hazelcast drivers to build.gradle’s dependencies section
implementation 'org.postgresql:postgresql'
implementation 'com.hazelcast:hazelcast'
Add profile activation to build.gradle
bootRun {
    args = ["--spring.profiles.active=dev"]
}
tasks.named("bootBuildImage") {
    environment["BPE_APPEND_JAVA_TOOL_OPTIONS"] = " -Dspring.profiles.active=prod"
}
To use our custom container image registry, also add the IP/port
bootBuildImage {
  docker {
  publishRegistry {
    url = 'https://ghcr.io/GITHUB_LOGIN/sample-spp'
 username = 'GITHUB_LOGIN'
 password = 'GITHUB_TOKEN'
  }
}
Replace GITHUB_LOGIN and GITHUB_TOKEN with your account’s real values in the above and the further examples.
Install Java on the computer where you are going to build your application from sources.
sudo apt install openjdk-21-jdk
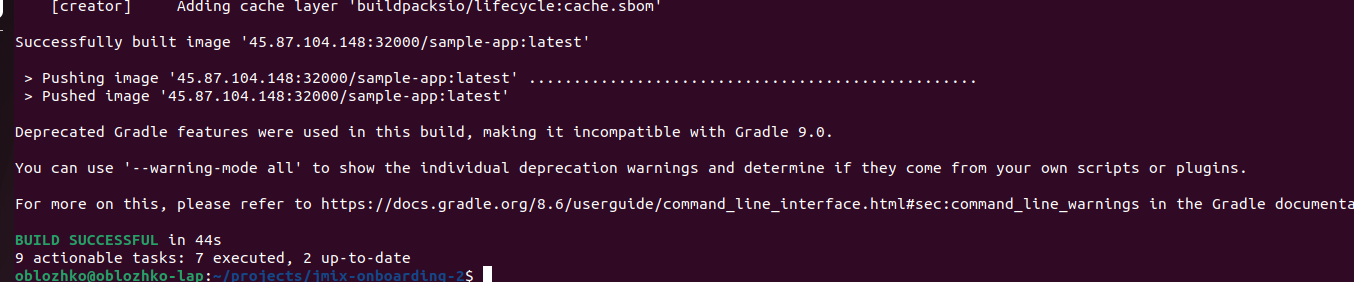
To build an application container image, run the following Gradle command:
./gradlew -Pvaadin.productionMode=true bootBuildImage --imageName=ghcr.io/GITHUB_LOGIN/sample-app --publishImage
You should see successful status messages after a bit of time elapses during the building process:
Delivery
To use GitHub’s Docker registry, you need to add a secret to the cluster
kubectl create secret docker-registry registrysecret --docker-server=ghcr.io --docker-username=GITHUB_LOGIN--docker-password=GITHUB_TOKEN
Create a k8s/ folder in a location you are comfortable with. It can be the project folder, but professionals prefer to keep deployment configurations separated from sources.
Add the files listed below to the folder.
Database Service Configuration
This file defines the PostgreSQL database service named sample-db-service.
k8s/db.json - https://pastebin.com/Ay0uB3Ra
{
  "apiVersion": "v1",
  "kind": "ConfigMap",
  "metadata": {
    "name": "sample-db-config"
  },
  "data": {
    "db_name": "sample",
    "db_user": "root",
    "db_password": "root",
    "db_port": "5432"
  }
}
k8s/db-persistance.json - https://pastebin.com/pQq4QvUF
{
  "apiVersion": "v1",
  "kind": "PersistentVolumeClaim",
  "metadata": {
    "name": "sample-db-pvclaim"
  },
  "spec": {
    "accessModes": [
      "ReadWriteOnce"
    ],
    "resources": {
      "requests": {
        "storage": "5Gi"
      }
    }
  }
}
k8s/db-deployment.json - https://pastebin.com/xKF1hKwT
{
  "apiVersion": "apps/v1",
  "kind": "Deployment",
  "metadata": {
    "name": "sample-db"
  },
  "spec": {
    "replicas": 1,
    "selector": {
      "matchLabels": {
        "app": "sample-db"
      }
    },
    "strategy": {},
    "template": {
      "metadata": {
        "labels": {
          "app": "sample-db"
        }
      },
      "spec": {
        "volumes": [
          {
            "name": "sample-db-storage",
            "persistentVolumeClaim": {
              "claimName": "sample-db-pvclaim"
            }
          }
        ],
        "containers": [
          {
            "image": "postgres",
            "name": "sample-db",
            "env": [
              {
                "name": "POSTGRES_USER",
                "valueFrom": {
                  "configMapKeyRef": {
                    "name": "sample-db-config",
                    "key": "db_user"
                  }
                }
              },
              {
                "name": "POSTGRES_PASSWORD",
                "valueFrom": {
                  "configMapKeyRef": {
                    "name": "sample-db-config",
                    "key": "db_password"
                  }
                }
              },
              {
                "name": "PGDATA",
                "value": "/var/lib/postgresql/data/pgdata"
              },
              {
                "name": "POSTGRES_DB",
                "value": "sample"
              }
            ],
            "ports": [
              {
                "containerPort": 5432,
                "name": "sample-db"
              }
            ],
            "volumeMounts": [
              {
                "name": "sample-db-storage",
                "mountPath": "/var/lib/postgresql/data"
              }
            ]
          }
        ]
      }
    }
  }
}
k8s/db-service.json - https://pastebin.com/mwkLfNx1
{
  "apiVersion": "v1",
  "kind": "Service",
  "metadata": {
    "name": "sample-db-service"
  },
  "spec": {
    "type": "NodePort",
    "ports": [
      {
        "port": 5432,
        "name": "sample-db-db"
      }
    ],
    "selector": {
      "app": "sample-db"
    }
  }
}
Application Service Configuration
The following file defines the application service named sample-app-service. It uses the sample-registry/sample-app Docker image with our application.
k8s/app.json - https://pastebin.com/4j8vYekg
{
  "apiVersion": "apps/v1",
  "kind": "Deployment",
  "metadata": {
    "name": "sample-app"
  },
  "spec": {
    "replicas": 1,
    "selector": {
      "matchLabels": {
        "app": "sample-app"
      }
    },
    "template": {
      "metadata": {
        "labels": {
          "app": "sample-app"
        }
      },
      "spec": {
    "imagePullSecrets": [
      {"name": "registrysecret"}
    ],
        "containers": [
          {
            "image": "ghcr.io/syncro/sample-app:latest",
            "imagePullPolicy": "Always",
            "name": "sample-app",
            "env": [
              {
                "name": "DB_NAME",
                "valueFrom": {
                  "configMapKeyRef": {
                    "name": "sample-db-config",
                    "key": "db_name"
                  }
                }
              },
              {
                "name": "DB_USER",
                "valueFrom": {
                  "configMapKeyRef": {
                    "name": "sample-db-config",
                    "key": "db_user"
                  }
                }
              },
              {
                "name": "DB_PASSWORD",
                "valueFrom": {
                  "configMapKeyRef": {
                    "name": "sample-db-config",
                    "key": "db_password"
                  }
                }
              },
              {
                "name": "DB_HOST",
                "value": "sample-db-service"
              },
              {
                "name": "DB_PORT",
                "valueFrom": {
                  "configMapKeyRef": {
                    "name": "sample-db-config",
                    "key": "db_port"
                  }
                }
              },
              {
                "name": "SPRING_PROFILES_ACTIVE",
                "value": "k8s"
              }
            ],
            "lifecycle": {
              "preStop": {
                "exec": {
                  "command": ["sh", "-c", "sleep 10"]
                }
              }
            },
            "ports": [
              {
                "containerPort": 8080
              },
              {
                "containerPort": 5701
              }
            ]
          }
        ]
      }
    }
  }
}
And the corresponding service assigning ports to container pods.
k8s/app-service.json - https://pastebin.com/ckBTVenH
{
  "apiVersion": "v1",
  "kind": "Service",
  "metadata": {
    "name": "sample-app-service"
  },
  "spec": {
    "type": "NodePort",
    "ports": [
      {
        "port": 8080,
        "name": "sample-app-app"
      },
      {
        "port": 5701,
        "name": "sample-app-hazelcast"
      }
    ],
    "selector": {
      "app": "sample-app"
    }
  }
}
Run deployment configurations
When we have all resource files in the folder, we can run them all with just one apply command:
kubectl apply –f k8s/
After that you can open the web panel and make sure that all status graphs are green; otherwise, you can check Logs from the Pos section.

The typical problem in this case is the order of services starting. You can try to restart or reapply the application container if it hasn’t found the database as it was not yet started.
To remove resources, use the same command but with the delete action
kubectl delete –f k8s/
Then fix your configurations and try again
Check the results
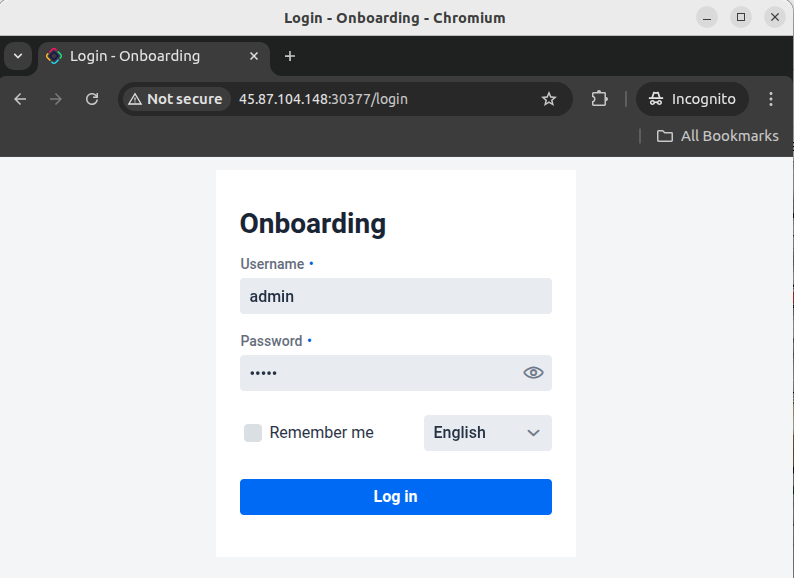
To know the port number assigned to the application run the kubectl command with result filtering:
kubectl get all --all-namespaces | grep service/sample-app-service

In my case, the port number was 30377, so the URL to open in my browser http://45.87.104.148:30377
Check out the port that was mapped from 8080 and open it in browser.
Consider enabling ingress services and cert-manager or an external proxy server like nginx or Traefik for real-life application deployments.
Enable clustering
Adding nodes to your cluster is quite easy, just execute
microk8s add-node
on the master node, and its output will contain the commands to run on another node, so it is joined to the cluster. This node must have MicroK8s installed, but Operating System distributions are not required to be the same.

After running it you can check the state with
kubectl get nodes
Command or in Cluster -> Nodes section of Web Panel
Now you can scale your application container to both running nodes.
kubectl scale -n default deployment sample-app --replicas=2
And check the result in Pods or Deployment sections.
Conclusion
As you can see, MicroK8S enables easy setup of Java/Jmix web application deployments for development, testing or SOHO purposes. This can be done in an extensible architecture way using your own hosted hardware resources or dedicated/virtual servers. The described approach keeps your software less vendor-locked, as you will be able to use the same source code, tools and resource configurations with other Kubernetes-compatible cluster software vendors and IT specialists.


