


Validation of data in enterprise applications often turns out to be spread across the entire codebase: JavaScript checks at the client side, in the screen controllers, business logic, database triggers and constraints. When the requirements change (and they change all the time), it becomes a real headache to keep finding and updating all the validation points. As a result, we have a combination of uncoordinated check-ups, snarled code, and potential bugs. Just ask yourself if there is a way to centralize validation, as well as to make it declarative and reusable.
The answer is: "Yes", and it has been standardized for quite some time in the Java ecosystem. It is called Bean Validation. Validation is implemented in such a way that you can:
- Define the rules once and apply them everywhere (business logic, Jmix UI, REST API, gRPC, etc)
- Use the declarative approach instead of the imperative 'if-else' code pattern
- Receive automated validation in the UI and the REST API without writing additional code
- Work with the standards
In this article, we are going to look at various approaches to validation in Jmix applications, from simple JPA annotations to advanced techniques that use Entity Listeners. Even though the examples are based on Jmix, the majority of the discussed approaches are applicable to any Spring Boot application with JPA and Bean Validation.
Database-level validation via JPA annotations
The most widespread way of validating the data is to use constraints at the database level: the NOT NULL flag, the string length, and unique indexes.
Such an approach is especially important for enterprise applications focused on data processing. However, developers often make the same mistake of specifying the same constraints separately for each application level. Let's look at an example, which many will find familiar: the specification requires that the passport serial number should contain 10 characters. This constraint is implemented by everyone: the database architect in DDL, the backend developer in the Entity and in the REST API, and the frontend developer in the UI. Then the requirement is changed, and now the field is required to contain 15 characters. The DevOps updates the constraint in the database, but at the client side the restriction remains unchanged...
The solution is obvious: validation has to be centralized! In Jmix, such validation is defined in the JPA annotations belonging to entities. The framework generates a correct DDL script based on those annotations and applies the corresponding validations at the client side.
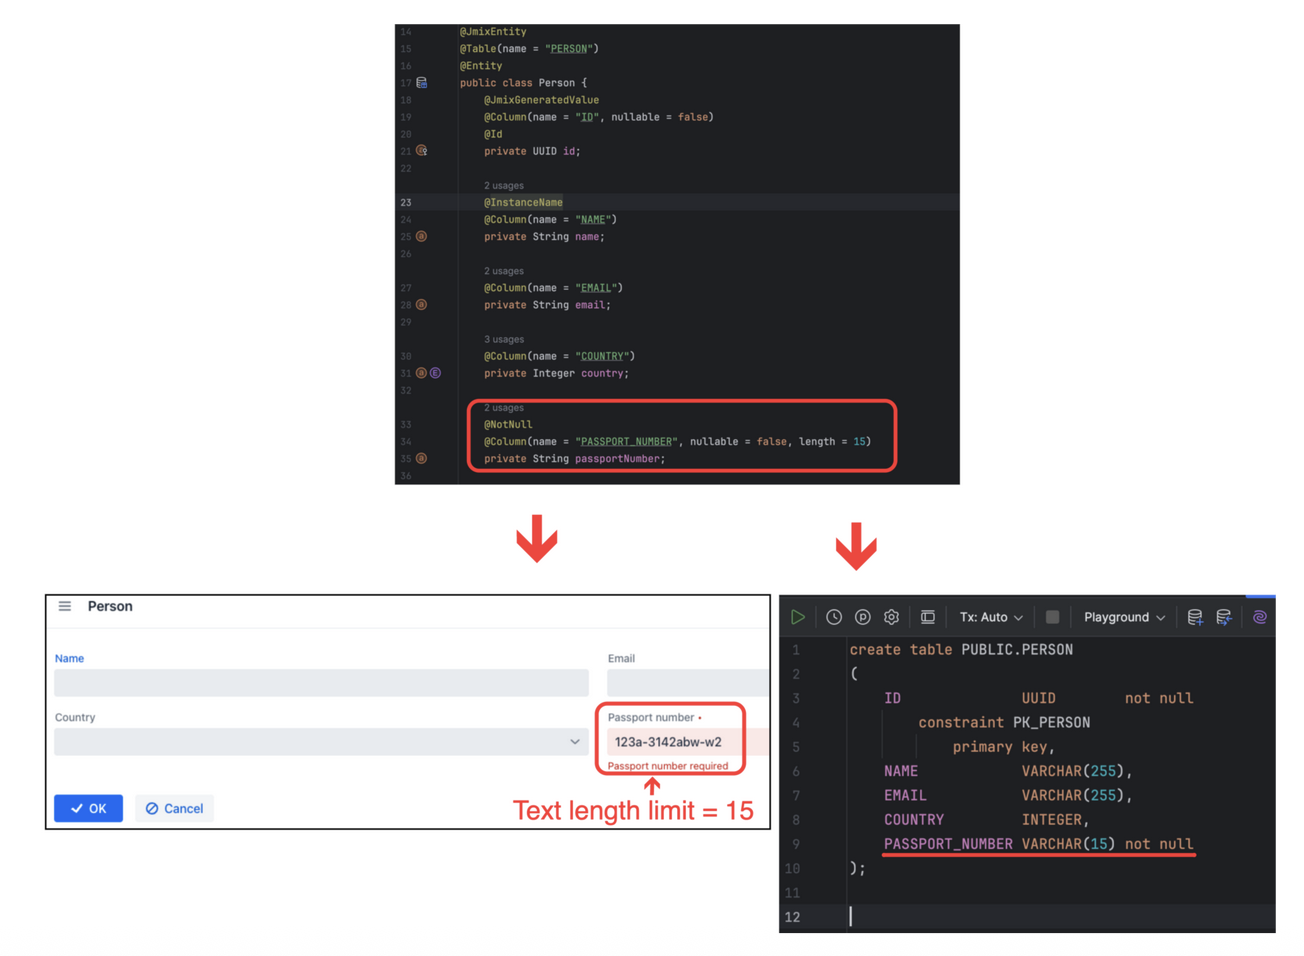
As the annotations are altered, Jmix Studio will update the DDL scripts and generate migrations scripts. At the next deployment, the new constraints will be applied to the UI, backend, and database at the same time.
Limitations of this approach: JPA annotations work only for simple cases, which can be represented via standard DDL, such as NOT NULL, String length or field uniqueness. Using @UniqueConstraint you can define a unique constraint for a combination of several columns. But more complex logic, such as range validation, regular expressions, or custom business rules, requires a different approach, which is known as Bean Validation.
Bean validation
It is considered a good practice to follow the standards that boast a long lifecycle, since their efficiency has been proven over thousands of projects. Java Bean Validation is an approach formulated in JSR 380, 349, and 303 and implemented in Hibernate Validator and Apache BVal. Its modern versions are developed as Jakarta Validation (the current version is 3.1).
Even though a lot of developers are familiar with this solution, it is often underestimated. It is a simple way of building data validation even into legacy projects and of making those checks simple, easily understood, reliable and as close to business logic as possible.
Using Bean Validation gives the project plenty of benefits:
- Validation logic is located close to the subject matter: we define field and bean method constraints in the most natural, object-oriented way.
- The Bean Validation standard gives us scores of validation annotations out of the box, such as:
@NotNull,@Size,@Min,@Max,@Pattern,@Email, and@Past, as well as Hibernate-specific@URLand@Length, an extremely powerful@ScriptAssertand a lot of others. - The standard doesn't force us to use only the ready-made annotations; instead, it allows us to create our own. We can create a new annotation by combining a few others, or we can define it using a separate Java class as its validator.
- Constraints can be placed only on fields or classes, but also on methods and their parameters. This approach is called validation by contract and will be discussed below.
When the user submits the entered data, Jmix starts Bean Validation automatically, so the error message is displayed immediately, if the validation didn't pass. Therefore, you don't have to run the bean validators manually.
But let's go back to the passport number example, and this time we are going to augment it with some constraints applied to the Person entity:
- The
namefield value must consist of two or more characters and be correct (the regular expression should match Charles Ogier de Batz de Castelmore Comte d'Artagnan but reject R2D2); - The
heightfield value should fall within the following range: 0 < height <= 300 cm; - The
emailfield should contain a string value matching the correct format for an email address.
The Person class will look as follows when we add all the necessary checks:
@JmixEntity
@Table(name = "PERSON")
@Entity
@ValidPassportNumber(groups = {Default.class, UiCrossFieldChecks.class})
public class Person {
@JmixGeneratedValue
@Column(name = "ID", nullable = false)
@Id
private UUID id;
@InstanceName
@Pattern(
          	message = "Badly formed person's name: ${validatedValue}",
          	regexp = "^[A-Z][a-z]*(\\s(([a-z]{1,3})|(([a-z]+')?[A-Z][a-z]*)))*$"
)
@NotNull
@Size(min = 2)
@Column(name = "NAME", nullable = false)
private String name;
@Email(
        	message = "Email address has an invalid format: ${validatedValue}",
        	regexp = "^[a-zA-Z0-9_.+-]+@[a-zA-Z0-9-]+\\.[a-zA-Z0-9-.]+$"
)
@Size(max = 120)
@Column(name = "EMAIL", length = 120)
private String email;
@DecimalMax(value = "300", message = "Person's height can not exceed 300 centimeters")
@DecimalMin(value = "0", inclusive = false, message = "Person's height should be positive")
@Column(name = "HEIGHT")
private BigDecimal height;
@NotNull
@Column(name = "COUNTRY", nullable = false)
private Integer country;
@NotNull
@Size(min = 15, max = 15)
@Column(name = "PASSPORT_NUMBER", nullable = false, length = 15)
private String passportNumber;
   // … getters & setters
}
The way we use the standard annotations here, such as @NotNull, @DecimalMin, or @Pattern, is intuitive. Let's look more closely at the @ValidPassportNumber annotation implementation.
Our @ValidPassportNumber annotation checks that Person#passportNumber matches the regular expression template for each country specified in the Person#country field.
First of all, let's take a look at the documentation (Jmix or Hibernate manuals will do fine). According to the documentation, we have to annotate our class with this new annotation and pass the groups parameter into it, where UiCrossFieldChecks.class means that this validation has to be applied during the cross-validation stage, after the checks done on every individual field, which Default.class keeps the constraint in the default validation group unchanged.
The annotation description looks like this
@Documented
@Target(ElementType.TYPE)
@Retention(RetentionPolicy.RUNTIME)
@Constraint(validatedBy = ValidPassportNumberValidator.class)
public @interface ValidPassportNumber {
String message() default "Passport number is not valid";
Class<?>[] groups() default {};
Class<? extends Payload>[] payload() default {};

}
Here, @Target(ElementType.TYPE) tells us that the objective of this runtime annotation is a class, and @Constraint(validatedBy = ... ) defines that the check is carried out by the ValidPassportNumberValidator class, which implements the ConstraintValidator<...> interface. The validation code as such is located in the isValid(...) method, which actually does the checking:
public class ValidPassportNumberValidator implements ConstraintValidator<ValidPassportNumber, Person> {
@Override
public boolean isValid(Person person, ConstraintValidatorContext ctx) {
    	if (person == null) return false;
    	if (person.getCountry() == null || person.getPassportNumber() == null) return false;
    	boolean ok = doPassportNumberFormatCheck(person.getCountry(), person.getPassportNumber());
    	if (!ok) {
        	ctx.disableDefaultConstraintViolation();
        	ctx.buildConstraintViolationWithTemplate(
                        	"Passport number '" + person.getPassportNumber() +
                                	"' does not match the required format for country " + person.getCountry()
                	)
                	.addPropertyNode("passportNumber")
                	.addConstraintViolation();
    	}
    	return ok;
}
private boolean doPassportNumberFormatCheck(Country country, String passportNumber) {
    	// passport format check
}
}
And that's it. With Jmix Framework we don't have to write anything except this piece of code: the custom validation works, and it will display the error message for the user. No rocket science, is it?
Now let's see how it actually works. Jmix has a convenient feature: the platform not only displays the error message for the user, but also highlights the fields in red, if they didn't pass the validation:
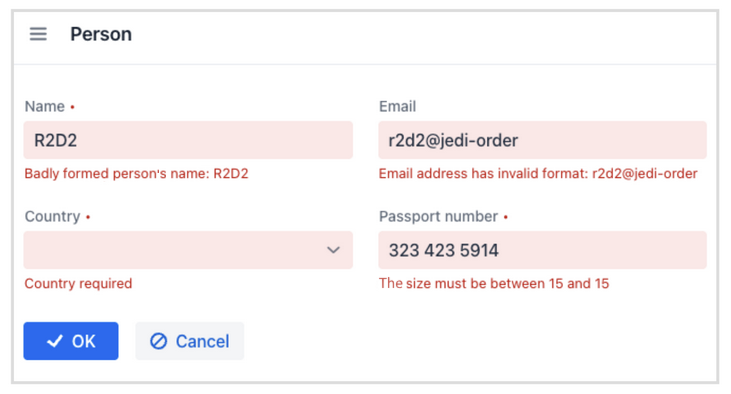
This is quite an elegant solution, isn't it? You receive an adequate visualization of the validation errors in the UI, and all you need to do is to add a couple of Java-annotations to the domain entities.
To sum up this section, let's briefly enumerate the entity Bean Validation benefits:
- It is readable and easy to understand.
- It allows us to set the value constraints in the entity classes directly.
- It can be configured and expanded.
- It is integrated into ORMs, and the checks are run automatically long before storing the changes into the database.
- Frameworks like Jmix run bean validation automatically when the user submits the data into the UI (and if it doesn't, invoking the Validator's interface manually is not hard).
- Bean Validation is a universally accepted standard, well documented by internet resources.
But what to do when you need to set constraints on a method, a constructor, or a REST address to validate the data coming from an external system? Or in case you need to validate the values of method parameters declaratively without writing boring code with multiple if-else conditions in each validated method?
The answer is easy: Bean Validation is applicable to methods, as well!
Validation by contract
Sometimes we need to go beyond the data model state validation. Quite a lot of methods could benefit from automated parameter validation and from the returned value. This could be necessary not just for data validation before letting it go to REST or SOAP addresses, but also when we want to define preconditions and postconditions for method invocations to ensure that the input data is validated before the method body is executed, or that the return value fits within the expected range. Another example is when we describe the input parameter ranges declaratively to improve code readability.
With bean validation, the constraints can be applied to input parameters and to returned values from methods and constructors to validate the preconditions and postconditions applied to their invocations by any Java class. This approach has several advantages in comparison with the traditional ways of validating the parameter and return value correctness:
- No need to carry out the checks manually using the imperative style (e.g., by throwing an
IllegalArgumentExceptionor something similar). It is possible to define the constraints declaratively, thus making the code easier to understand and more expressive. - The constraints can be set up differently, reused, and configured: there is no need to write up the validation logic for every check. Less code means fewer bugs.
- If a class, a method return value or a parameter are annotated with
@Validated, the checks will be automatically carried out by the platform at every method invocation. - If an executable module is annotated with
@Documented, its preconditions and postconditions will be included into the generated JavaDoc.
Using validation by contract we receive easily understood, concise and highly maintainable code.
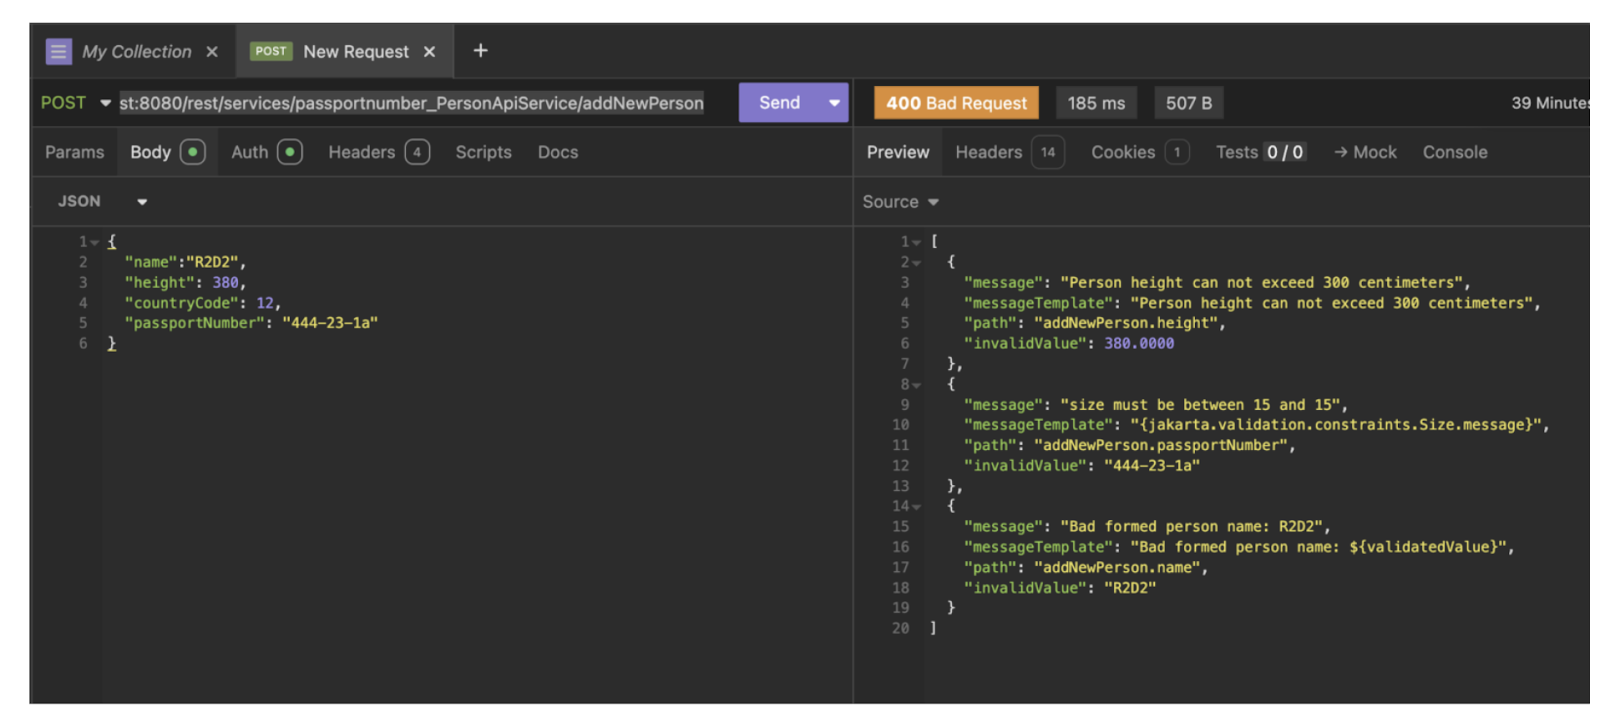
As an example, let's consider a REST service from a Jmix application. The PersonRestService service allows us to get a list of people's names from the database using the allPersonNames() and also to add a new person by calling addNewPerson(...).
Not to forget that bean validation can be inherited! In other words, if we annotate a class, a field, or a method, then all classes that extend this class or implement this interface will inherit the same validation annotation.
@Validated
@RestService("jmixapp_PersonApiService")
public class PersonRestService {
private final DataManager dataManager;
public PersonRestService(DataManager dataManager) {
    	this.dataManager = dataManager;
}
@NotNull
@RestMethod(httpMethods = RestHttpMethod.GET)
public List<@NotBlank String> allPersonNames() {
    	return dataManager.load(Person.class)
            	.all()
            	.list()
            	.stream()
            	.map(Person::getName)
            	.toList();
}
@Transactional
@RestMethod(httpMethods = RestHttpMethod.POST)
public void addNewPerson(
        	@NotNull
        	@Size(min = 2, max = 255)
        	@Pattern(
                	message = "Bad formed person name: ${validatedValue}",
                	regexp = "^[A-Z][a-z]*(\\s(([a-z]{1,3})|(([a-z]+')?[A-Z][a-z]*)))*$"
        	) String name,
        	@DecimalMax(value = "300", message = "Person height cannot exceed 300 centimeters")
        	@DecimalMin(value = "0", inclusive = false, message = "Person height should be positive")
        	BigDecimal height,
        	@NotNull Integer countryCode,
        	@NotNull @Size(min = 15, max = 15) String passportNumber
) {
    	var person = dataManager.create(Person.class);
    	person.setCountry(Country.fromId(countryCode));
    	person.setHeight(height);
    	person.setName(name);
    	person.setPassportNumber(passportNumber);
    	dataManager.save(person);
}
}
It is important to note that AOP doesn't work inside the self-invocations of its own methods, so we should be careful while working with @Validated – sometimes it can create bugs in production, if we don't track the AOP transaction sequences appropriately. This applies not only to validation, but to transactions themselves, as well. It is always possible to call a validation manually by injecting the required Spring Bean by its qualifier from the Spring context and calling validator#validate(); on it. As an alternative, we can just delegate the required code snippet into another Spring Component.
This code is specific for the Jmix Framework, which exposes an ordinary Spring Service as a REST controller and passes the parameters and the method return value using the @RestService annotation (an alias for the common @Service) and @RestMethod. However, if you don't like this approach, you can use ordinary REST controllers, which, in turn, represent the commonly used approach to exposing REST in Spring.
Thus, the @Valid annotation determines that each object in the collection returned by the allPersonNames() method has to be validated also for matching the @NotBlank constraint.
In a Jmix application, these methods are available at the following URL paths:
/rest/services/jmixapp_PersonApiService/allPersonNames/rest/services/jmixapp_PersonApiService/addNewPerson
To understand working with Business Logic REST in detail, we advise you to take a look at the following documentation.
As you have probably noticed, in the example above the passport number and other parameters of the Person entity are not validated at the cross-validation stage. This is because these fields require cross-validation of the addNewPerson method parameters, since the choice of the passportNumber regular expression template depends on the country field value. Such cross-validation is a complete analogy of an entity constraint at the class level!
Cross-validation for parameters is supported in JSR 349 and 380. You can take a look at the Hibernate documentation to learn how to implement your own cross-validation for class/interface methods.
What other options for data validation are there?
- Generic REST Entity API: Jmix has a REST API for entities out of the box, and validation is applied automatically to all fields annotated for validation
- Spring REST Controller: Standard for any Spring Boot application
- Any other Spring Component annotated with
@Validated. - Manual usage: we validate any object via the Validator from the Spring DI Context. It is possible to receive
validatorBeanand callvalidator.validate(object), or you can configure the Validator on your own.
Whatever you choose, it is the same unified mechanism intended for checking the data for validity.
Validation pitfalls
We could confidently say that validation of time-related data is one of the most insidious areas in Java applications. The problems often show themselves only in production when the server works in one time zone, and the clients live in another, or the developers tested it all under Windows, but then deployed it to Linux. Let's take a look at the problems and their solutions.
Problem with @PastOrPresent on different OS's
The key problem is related to the difference in system clock accuracy on Windows and Linux. Linux supports highly accurate timers with resolutions up to nanoseconds, whereas Windows historically works with accuracy from 1 to 15 milliseconds. This causes a situation where the @PastOrPresent validation can behave unpredictably:
- On Linux, the times values almost universally differ even between the consequent
LocalDateTime.now()calls - On Windows, both calls can hit the same "tick" of the system clock and return the same value
Solution: Use a custom validator with an acceptable margin of error:
@Target({ElementType.FIELD, ElementType.PARAMETER})
@Retention(RetentionPolicy.RUNTIME)
@Constraint(validatedBy = PastOrPresentWithToleranceValidator.class)
public @interface PastOrPresentWithTolerance {
long milliseconds() default 100;
String message() default "Date must be in the past or present (with tolerance)";
Class<?>[] groups() default {};
Class<? extends Payload>[] payload() default {};
}
public class PastOrPresentWithToleranceValidator
    	implements ConstraintValidator<PastOrPresentWithTolerance, LocalDateTime> {
private long toleranceMs;
@Override
public void initialize(PastOrPresentWithTolerance annotation) {
    	this.toleranceMs = annotation.milliseconds();
}
@Override
public boolean isValid(LocalDateTime value, ConstraintValidatorContext context) {
    	if (value == null) return true;
    	LocalDateTime now = LocalDateTime.now();
    	LocalDateTime nowWithTolerance = now.plus(toleranceMs, ChronoUnit.MILLIS);
    	return value.isBefore(nowWithTolerance) || value.equals(nowWithTolerance);
}
}
This "tolerant" validator can turn out to be an acceptable working solution, though there are better alternatives:
- Use
ClockProviderand define "now" in a centralized way (for tests, you are allowed to "freeze" time); - Where possible, validate Instant (UTC) for technical labels.
Anyway, you should always keep in mind that when we are comparing two date/time values in business logic, we have to be careful with such code.
The time zone issue
LocalDate and LocalDateTime contain no information about the time zone, which can cause validation errors when the server and the client are located in different time zones.
Example:
- The server is in UTC; the time is 11:30 pm; the date is 2025-09-30
- The client is in Istanbul (GMT+3); the time is 02:30 am; the date is 2025-10-01
- The client sends the "today's" date; the server considers it "a future date"
Solution: Take the time zone into account in the validator:
@Component
public class FutureOrPresentClientZoneValidator
    	implements ConstraintValidator<FutureOrPresentClientZone, LocalDate> {
@Autowired
private CurrentAuthentication currentAuthentication;  // Jmix компонент
@Override
public boolean isValid(LocalDate date, ConstraintValidatorContext context) {
    	if (date == null) return true;
    	if(currentAuthentication.getAuthentication() == null) throw new IllegalStateException("No authentication");
    	// Getting the user's time zone
    	TimeZone userTimeZone = currentAuthentication.getTimeZone();
    	ZoneId clientZone = userTimeZone.toZoneId();
    	// Calculating "today" in the client's time zone
    	LocalDate todayForClient = LocalDate.now(clientZone);
    	return !date.isBefore(todayForClient);
}
}
The date cross-validation problem
Cross-validation takes place when several fields in the same form or object have to be validated together. The classical example is the date range where the start date should be earlier than the end date.
Anti-pattern:
// Validation in the controller - code duplication
if (order.getStartDate().isAfter(order.getEndDate())) {
throw new ValidationException("Start date must be before end date");
}
Correct solution: class-level validation:
@ValidDateRange  // Custom annotation at the class level
public class DateRangeRequest {
private LocalDate startDate;
private LocalDate endDate;
}
@Target({ElementType.TYPE})
@Retention(RetentionPolicy.RUNTIME)
@Constraint(validatedBy = DateRangeValidator.class)
public @interface ValidDateRange {
String message() default "End date must be after start date";
Class<?>[] groups() default {};
Class<? extends Payload>[] payload() default {};
}
public class DateRangeValidator implements ConstraintValidator<ValidDateRange, DateRangeRequest> {
@Override
public boolean isValid(DateRangeRequest value, ConstraintValidatorContext context) {
    	if (value.getStartDate() == null || value.getEndDate() == null) {
        	return true; // Letting @NotNull process null values
    	}
    	if (value.getStartDate().isAfter(value.getEndDate())) {
        	context.disableDefaultConstraintViolation();
        	context.buildConstraintViolationWithTemplate(
                        	"Start date " + value.getStartDate() +
                                	" cannot be after end date " + value.getEndDate())
                	.addPropertyNode("startDate")  // Binding the error to a particular field
                	.addConstraintViolation();
        	return false;
    	}
    	return true;
}
}
Choosing the correct date type
Here are some brief recommendations for choosing the date types to work with dates:
- LocalDate — for dates without time (birthdays, document issues dates)
- LocalDateTime — for local events in the same time zone
- Instant — for technical time labels (created_at, updated_at), UTC
- ZonedDateTime — for business logic that takes time zones into account
- OffsetDateTime — for APIs and integrations, ISO 8601 support
- Avoid java.util.Date — it's a legacy type, use
java.time.*instead
Other frequent problems
@Temporal with new date types: The @Temporal annotation is not needed and doesn't work with java.time.* types.
// Incorrect
@Temporal(TemporalType.TIMESTAMP)
private LocalDate eventDateError;  // Error!

// Correct
@Column(name = "EVENT_DATE")
private LocalDate eventDateOk;  // Automatically maps to SQL DATE
Choosing a correct annotation for strings:
@NotNull— only to check for a null value@NotEmpty— not a null and length > 0@NotBlank— not a null and not only spaces (the behavior you need in most case)
To summarize the pitfalls inside Bean Validation: be always careful with what you are writing. Remember that JPA annotations are not some magic; it is concrete code with underlying business rules.
Beyond bean validation
The world knows no perfection, and bean validation has its own fair share of drawbacks and limitations:
- Sometimes we just need to check the condition of a complicated object graph before storing the changes into the database. For example, we need to ensure that all items from the customer's order fit inside the same parcel. It is quite a complex operation and doing it every time the user adds new items to the order is not a good idea. Therefore, this validation might be necessary only once: before we store the
Orderobject and itsOrderItemsub-objects into the database. - Some validations have to be applied inside a transaction. For instance, the e-store system has to check whether there are enough copies of the product in stock to fulfill the order before it is committed to the database. This validation can be done only inside the transaction, since the system is multithreaded and the amount of a certain product in stock can be changed at any moment.
Jmix offers two mechanisms for data validation before transaction commit, which are called Entity Listeners and Transaction Listeners. Let's review them in detail.
Entity listeners
Entity listeners in Jmix are similar as a concept to JPA lifecycle callbacks (). Both mechanisms allow us to validate entity objects before and after they are stored in the database.
Jmix allows us to create and enable an entity listener easily. To do that, you need to create a manageable Spring Component and add methods to it annotated with @EventListener with one of the following three types of parameter events:
EntityLoadingEvent<YourEntity>EntitySavingEvent<YourEntity>EntityChangedEvent<YourEntity>
The easiest way to do that is to use the Jmix Studio Context Menu → the Event Listeners button.
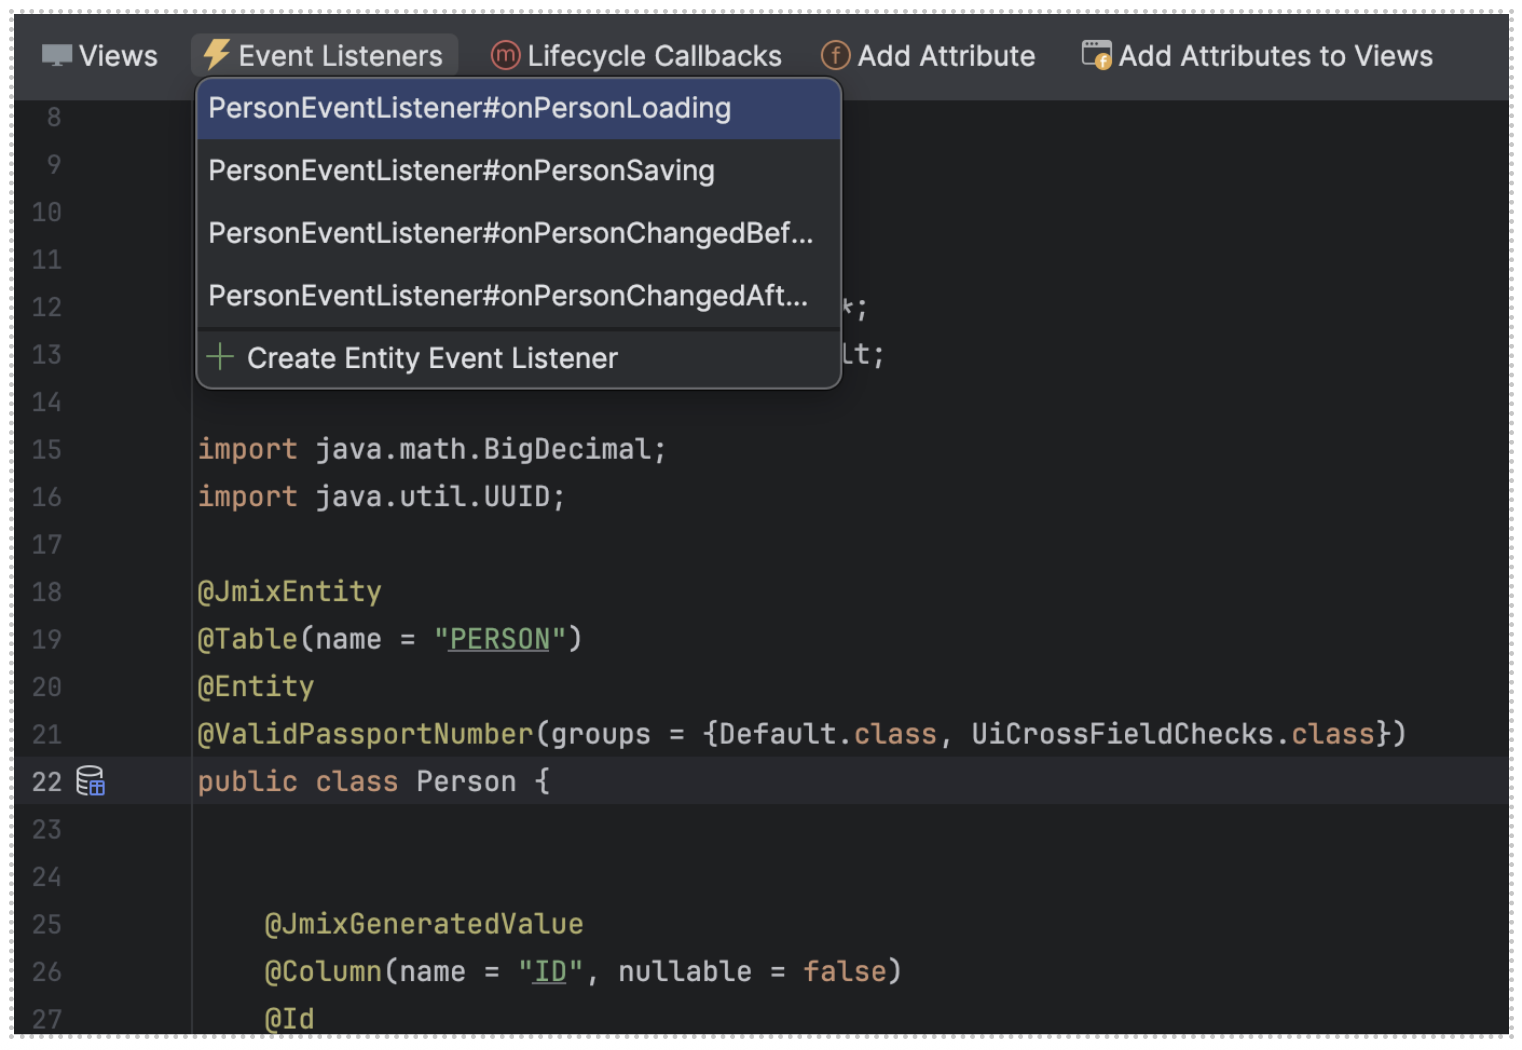
The resulting autogenerated Event Listener looks as follows:
@Component
public class PersonEventListener {
@EventListener
public void onPersonLoading(final EntityLoadingEvent<Person> event) {
// called during fetching from the database
}
@EventListener
public void onPersonSaving(final EntitySavingEvent<Person> event) {
   	// called before storing into the database
}
@EventListener
public void onPersonChangedBeforeCommit(final EntityChangedEvent<Person> event) {
  	// called after the change but BEFORE the transaction commit
}
}
An important aspect of EntityChangedEvent is that this event can be handled in two ways:
With the @EventListener annotation — the handler is called BEFORE the transaction commit, and changes are applied in the same transaction. You can change the data, and it will be included in the same commit. If an exception is thrown, everything will be rolled back.
With the @TransactionalEventListener annotation — the handler is called AFTER the transaction commit, so, you have to start a new transaction explicitly via @Transactional(propagation = Propagation.REQUIRES_NEW). Exceptions thrown in such a handler will not roll back the main transaction.
Example of after-commit handling:
@Component
public class PersonEventListener {
@TransactionalEventListener  // By default phase = TransactionPhase.AFTER_COMMIT
@Transactional(propagation = Propagation.REQUIRES_NEW) // если пишим в БД
public void onPersonChangedAfterCommit(final EntityChangedEvent<Person> event) {
    	try {
        	// Working with the data in the new transaction
        	// Exceptions thrown here won't affect the main transaction
    	} catch (Exception e) {
        	log.error("Error handling Person changes after commit", e);
    	}
}
}
Also, Jmix supports soft delete — an approach which, instead of really deleting records from the database, only marks them as deleted, after which they become inaccessible for a common user. For the soft delete, the platform invokes EntityChangedEvent listeners with the DELETED type.
To summarize, entity listeners are an excellent choice if:
- It is required to carry out the data validation inside a transaction before the entity object is stored into the database
- It is required to check the database data during validation, for example, check that there is enough product in stock to accept the order
- You have to pay attention not only to the context root entity object like Order but also to the objects related to it, e.g.
OrderItems - We would like to trace the
INSERT,UPDATEandDELETEoperations for some entity classes only, for example, only forOrderandOrderItem, and we don’t need to check the changes in other classes within the transaction
Transaction listeners
Jmix transaction listeners also work in the transaction context, but, unlike entity listeners, they are called for each database transaction.
It gives them superpower:
- Nothing can escape their attention
But it also brings about some drawbacks:
- They are harder to write
- They can reduce the performance drastically
- They must be written very carefully: a bug in a transaction listener can hinder even the initial application load-up
To sum up, transaction listeners are a good solution, when you need to inspect different entity types using the same algorithm, e.g., check all data for cyber-fraud using a unified service that serves all business objects owned by you.

Look at the following sample that checks whether the entity has the @FraudDetectionFlag annotation and, if it's there, it starts the fraud detector. I will say it again: keep in mind that this method is invoked in the system before committing every database transaction, and, therefore, the code should try to check as few objects as possible and do it as fast as possible.
@Component("jmixapp_ApplicationTransactionListener")
public class ApplicationTransactionListener implements BeforeCommitTransactionListener {
private static final Logger log = LoggerFactory.getLogger(ApplicationTransactionListener.class);
private final FraudDetector fraudDetector;
public ApplicationTransactionListener(FraudDetector fraudDetector) {
    	this.fraudDetector = fraudDetector;
}
@Override
public void beforeCommit(String storeName, Collection<Object> managedEntities) {
    	for (Object e : managedEntities) {
        	if (EntityValues.isEntity(e)
                	&& !EntityValues.isSoftDeleted(e)
                	&& e.getClass().isAnnotationPresent(FraudDetectionFlag.class)) {
            	boolean ok = fraudDetector.feedAndFastCheck(e);
            	if (!ok) {
                	logFraudDetectionFailure(e);
                	String msg = String.format(
                        	"Fraud detection failure in '%s' object with id = '%s'",
                        	e.getClass().getSimpleName(), EntityValues.getId(e)
                	);
                	throw new ValidationException(msg);
            	}
        	}
    	}
}
private void logFraudDetectionFailure(Object e) {
    	log.warn("Fraud detection failed for {}:{}", e.getClass().getSimpleName(), EntityValues.getId(e));
}
}
To become a transaction listener, a manageable bean has to implement the BeforeCommitTransactionListener interface and the beforeCommit method. Transaction listeners are bound automatically at the application start-up. Jmix registers all classes that implement BeforeCommitTransactionListener or AfterCompleteTransactionListener as transaction listeners.
Conclusion
Bean Validation (JSR 303, 349 and 380) is an approach that can serve as a reliable basis for 95% of the data validation cases encountered in an enterprise project. The main advantage of this approach is that most of the validation logic is concentrated inside the domain model classes. Therefore, it is easy to find, easy to read, and easy to maintain. Spring, Jmix, and many other frameworks support these standards and automatically carry out validations while receiving data at the UI layer, at the invocation of validated methods, or during the ORM data storage process.
Some developers regard the domain model class level validation as unnatural and too complex, preferring UI-level data validation. However, using multiple validation points in the UI components and controllers is not the most rational approach. Validation methods mentioned in this article don't look unnatural when they are integrated into the platform, which contains bean validators and listeners and automatically integrates them with the client layer.
Here are the rules for choosing the validation method:
- JPA validation possesses limited functionality, but it is a good choice for the simplest validations inside the entity's classes when such constraints can be shown in DDL.
- Bean Validation is a flexible, minimalistic, declarative, reusable, and readable way of setting up the majority of validations in the domain classes. In the majority of cases it is the best choice, unless you have to run validations inside transactions.
- Validation by contract is bean validation, but for method invocations. Use it for input and output method parameters, e.g. in REST controllers.
- Entity listeners: though they are not as declarative as Bean Validation annotations, they are perfectly suitable for validating large graphs or for validations inside database transactions, for example, when you have to read the data from the database to make a decision.
- Transaction listeners are a powerful tool for working inside the transaction context. However, they require very careful treatment. Use it when you have to inspect various entity types using the same validation algorithm or when you have to decide which objects to validate in the course of execution.
We hope that this article has helped you refresh your knowledge about various validation methods in enterprise Java applications. We also hope that it has given you some ideas for optimizing the architecture of your current projects.


